background image

9

10

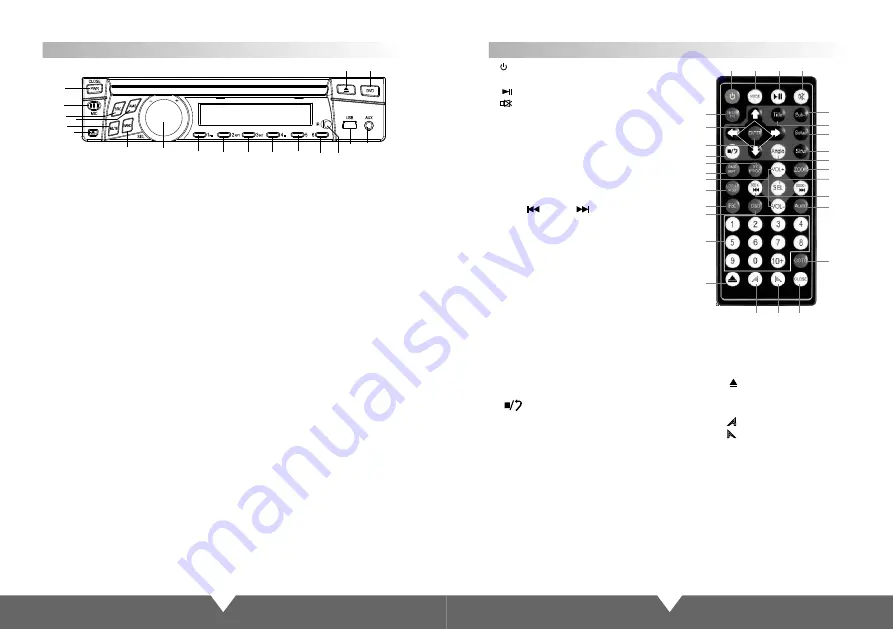
Appearance and Function Introduction

Remote Control Operation

1.        : Power 
    Press this button to turn on/off the unit.
2.         : Play/Pause
3.         : MUTE
4. Press the left and right arrow keys is to
 fast forward / rewind, Up / Down  mobile the
 cursor is select the file
5.

6. Enter 
7. Volume: VOL+/VOL-
8. SEEK-        /SEEK+        : Previous/next
9. DVD Programming
10. OSD
    Press it to display the disc information.
11. SEL: Sound adjustment function
12. AMS/RPT 


DVD mode is Loop broadcast, 

13. Under DVD mode, press it for shuffle
14. Number: Pilih lagu
15. AUDIO memilih mode.
16. Switching sub menu
17. Subtitle on/off
18.Anycast title, chapter, audio, subtitle
19. MODE: Change modes
20.          : Stop playing
21. DVD display disc there are more 
angle select (need the disc support)
22. SLOW: slow forward/slow playing
23. SETUP: DVD system setup
24. TITLE 
   Return to the menu title

In radio state is band switch, other

    channel is invalid.

The radio

    model is automatically search radio station.


Precautions Before Using Remote Control Unit

1. Please pull out the PVC when the remote control unit is first using.
2. Don’t drop or step in remote control unit or subject it to shocks.
3. Note that it maybe impossible to operate the main unit if there are obstacles between it 
and the remote sensor.
4. Using the remote control unit within the specified operating range.

1

3

2

19

27

28

29

17

24
23

22
21
25
11

8

15

5

4

6

20

9

12

7

13

16
10

14

26

18

25. ZOOM
   Press it can zoom or shrink picture
 displayed
26.         : Eject button.
   press this button to eject or slot -in 
the disc
27.         : Display panel slip out.
28.         : Display panel retract.
29. CLOSE: press it, the monitor will 
auto-extend or return.

1

2

3

4

5

6

7

8

9

9

9

9

9

9

10

11

12

1.PWR: Power on/off, press for long time to turn off, short-press it for panel slip in and 

    out.

2

.

MIC

Microphone

3

.

SRC: Signal mode select. 

4

.

AMS:

5

.

MUTE

6

.

press down this button,the panel is detachable

7

.

    On FM mode to select brand of radio: FM1/FM2/FM3. AM1/AM2;

8

.

Clockwise rotation is Control for the volume increase, and can use for MENU 

    adjustment.

    Counterclockwise-rotation is Control for the volume reduce, and can use for MENU

    adjustment.

     Press it for choose "VOL” “TRE” “BAS” “FAD” “BAL” to adjust that you need.

9

.

In FM mode these are number buttons, press it to display select the channel, 

     long-press can reserve the current frequency to corresponding number channel; 

     In DVD/USB/SD mode these are play/pause, repeat, sequence play and stop.

10

.

Remote control window.

11.Mini USB connector

12

.

AUX: audio input jack.

13

.

14

.

Eject/Enter the disc.

In FM mode, it for auto search.

BAND: the radio BAND selection, other state is invalid.

press this button to eject or slot -in the disc

13

14

Note:Radio status,press ST,LOC buttons on R/C no function

Summary of Contents for D76TSB

Page 1: ...ial QUALITY 100g wood free printed paper Size A6 D76TSB 7 Widescreen Color LCD Monitor With DVD Player Please read the manual in detail before using this product This product is made of precision components keep it away from moisture ...

Page 2: ...VD Mode Menu Interface Radio Function Interface Function Index Sign Instruction for install and uninstall face panel 5 User Introduction 6 Wiring Diagram 7 Unit Rear Side Connection 8 Remote Control Operation 10 Bluetooth system settings 13 14 15 Audio Video Menu Setup 16 Warning 19 Trouble Shooting 20 USB SD Operation 15 SYS System Settings 17 System Settings 17 19 ...

Page 3: ...ic shell debase the display quality and products quality Installation should be very tight and secured to prevent the fallen unit hurt people and damage the unit when moving on or a sudden brake Please install carefully to avoid damaging working platform Please clean the internal working platform and ensure sufficient space for installation Inner shell will be installed on the working platform The...

Page 4: ...move the hooks on both sides 2 Select a position where the screw holes of the mounting bracket supplied with the car and the screw holes of the main unit become aligned tighten the screws on each side and re mount the brackets with the factory hardware in the original location NOTE 1 and 10 are not used for installation method2 Tighten the screws to your car UNIT REMOVAL when installed using the s...

Page 5: ...step as the instruct if force to take out the face panel will be easy to broken the material and can not catch the head unit User Introduction 1 Please connect the signal cable with power cable according to Unit rear side connection to connect to power and signal 2 After connect to power Press the power button to switch on press again the power button the screen enter into the main interface 3 Whe...

Page 6: ...AKE CON GREEN BLACK FR GREEN FR PURPLE BLACK RL BLUE ANT CON YELLOW BATT Memory backup WHITE FL RED ACC PURPLE RL BROWN BACK CON 1 FUSE BLACK GND Unit Rear Side Connection Antenna control cable Manual brake switch Reverse mirror control cable connected to the car backing lamp FM NT A IN RA IO ANTENNA ADAP ER D T RED ACC RED ACC YELLOW BATT Memory backup YELLOW BATT Memory backup BATTERY BATTERY BL...

Page 7: ... the remote control unit within the specified operating range 1 3 2 19 27 28 29 17 24 23 22 21 25 11 8 15 5 4 6 20 9 12 7 13 16 10 14 26 18 25 ZOOM Press it can zoom or shrink picture displayed 26 Eject button press this button to eject or slot in the disc 27 Display panel slip out 28 Display panel retract 29 CLOSE press it the monitor will auto extend or return 1 2 3 4 5 6 7 8 9 9 9 9 9 9 10 11 1...

Page 8: ...nherent in DVD disc 12 Press ZOOM key for times the picture will change in order of 2X 3X 4X 1 2 1 3 and 1 4 of normal size Note When playing MP3 USB SD this button is invalid 13 Press SLOW on the remote control to slow playing Change the playing speed to 1 2 1 4 1 8 and 1 16 through pressing SLOW button 14 During playback press the AUDIO voice key can be included on the DVD disc in a variety of a...

Page 9: ...tch the bluetooth by presentation 3 Input 4 figures pass code 0000 this unit s bluetooth will be set up to the authorized equipment of the mobile phone If the match is successful the status of the bluetooth picture will show LINK OK Tips If it unable to match please starting up again After setting up the unit to authorized equipment the bluetooth will connect or enter into mobile phone bluetooth s...

Page 10: ...justment Touch the icon on the screen the alt volume will change BAS Bourdon volume adjust Touch the icon on the screen the bourdon volume will change FAD Front and Rear volume adjustment Touch the icon on the screen the front and Rear volume will change BAL Left and right track adjustment Touch the icon on the screen the left right track volume will change 9 JAZZ 10 POP 11 12 13 COL Color 14 15 1...

Page 11: ...enu choices SYS System Settings Language settings 1 2 Touch efficiency adjustment Touch efficiency adjustment follow the prompts to click on the center of sign if successfully adjust it will auto exit prompt Set the audio video and DVD menu when audio video mode operation the same 1 2 Back to the main interface English Portuguese After opening the machine Under the main menu screen on the touch sc...

Page 12: ...inet non professionals can not disassemble unit 10 Installation should be very tight and secure Preventing the fallen unit hurt people when moving on or a sudden brake Trouble Shooting Warning PROBLEM CAUSE SOLUTION Cannot power on After ignition switch off setting information all lose Remote control no function Poor performance of radio station Cannot play disk Cannot switch language subtitle No ...

Reviews: