background image

6


Operation (with Heater) 

START-UP 

1.

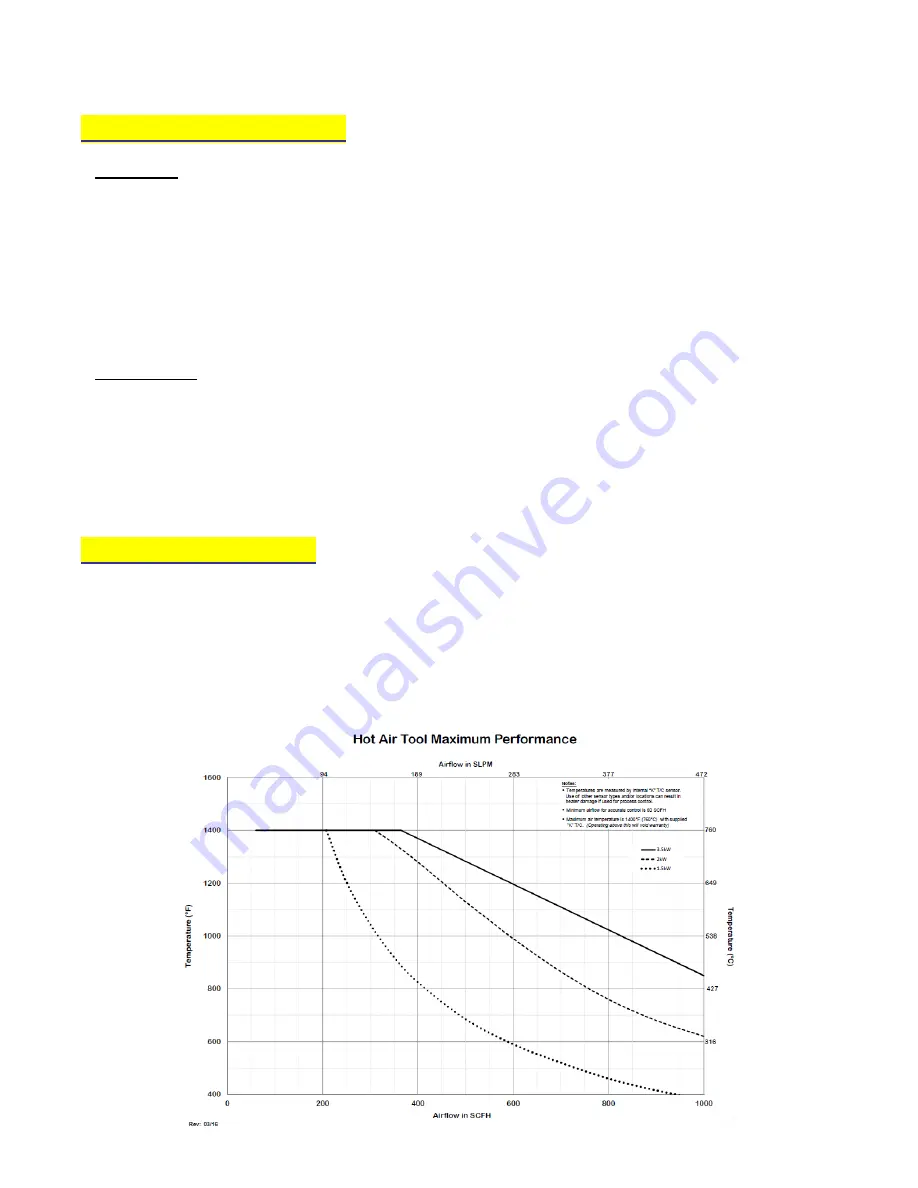
Reference the Performance Curves section 

(see page 6)

 for operational parameters before attempting to

operate heater(s).

2.

Turn on air and set pressure or flow to desired operating level.

3.

If using a closed loop system, turn on power to the temperature and power controller, then set the desired
temperature on the temperature controller.  If using an open loop system, increase power to the heater
through the power controller until the desired temperature is attained.

SHUT-DOWN 

1.

Turn off Main Power circuit breaker, or disconnect MAIN POWER line.

2.

Allow air to continue to flow for a minimum of 1 minute or until exit air temperature is 300

°

F (150°C) or less

for safety. Continue airflow longer as necessary to prevent burn hazard to personnel.

3.

Turn off air to the system.

Performance Curves 

The attached performance curves show exit air temperatures at different airflows and voltages.  Pressure 
readings (longer dashed lines) are measured at the inlet to the heater with no entrance or exit restrictions.  Solid 
lines indicate safe, normal-life operating conditions. The shorter dash lines indicate marginal, shorter-life 
operating conditions leading to premature burnout.  With a known flow (or pressure) at the heater entrance, follow 
the flow (or pressure) line across until it meets the desired temperature curve.  Drop a line straight down to 
intersect the x-axis.  This point, along the “Heater volts – true RMS” axis, represents the voltage required to 
generate the desired exit air temperature at the chosen flow rate (inlet pressure).   

Summary of Contents for F068462

Page 1: ...HOCK HAZARD Only qualified individuals should install this heater and related controls Follow all applicable electrical codes and use proper wiring BURN FIRE EXPLOSION HAZARD Do not use in hazardous environments and or near explosive or reactive gases or combustible materials Avoid contact with the heater or exit accessories during or soon after operation DO NOT USE NEAR VOLATILE OR COMBUSTIBLE MA...

Page 2: ... followed and C such products are to Tutco SureHeat s satisfaction determined to be defective THE WARRANTY SET FORTH IN THE PRECEDING PARAGRAPH IS EXCLUSIVE AND IN LIEU OF ALL OTHER WARRANTIES EXPRESS OR IMPLIED INCLUDING WITHOUT LIMITATION ANY IMPLIED WARRANTY OF FITNESS FOR A PARTICULAR PURPOSE OR OF MERCHANTABILITY The information contained in this manual is based on data considered to be true ...

Page 3: ...0 F 760 C see page 6 for Performance Curves Minimum Airflow 60 SCFH 28 SLPM UL File E177292 only for those Part s listed above otherwise contact factory General Information Environmental Conditions Ambient Temperature 32 F to 104 F 0 C to 40 C Humidity 0 to 95 R H Ventilation Use in a well ventilated area away from excess dust dirt and moisture Cleaning With unit OFF and unplugged exterior surface...

Page 4: ...ate at safe voltages as shown on the Performance Curves see page 6 Excess voltage will cause premature failure 3 Always have sufficient airflow through the heater before applying power Otherwise element will overheat very quickly and burn out NOTE A thermocouple cannot detect temperatures if there is no flow turn on flow before applying power even when a controller with a thermocouple is being use...

Page 5: ...e heater Do not clamp so tightly as to distort the stainless steel housing 2 Connect the filtered air source to the heater using ID high pressure tubing 3 Connect the two power leads grounding screw and thermocouple leads to the appropriate connections For K thermocouples the red lead is negative and the yellow lead is positive 4 If a thermocouple is used external to the heater ensure that it is l...

Page 6: ... 150 C or less for safety Continue airflow longer as necessary to prevent burn hazard to personnel 3 Turn off air to the system Performance Curves The attached performance curves show exit air temperatures at different airflows and voltages Pressure readings longer dashed lines are measured at the inlet to the heater with no entrance or exit restrictions Solid lines indicate safe normal life opera...

Page 7: ...7 ...

Page 8: ...low lock out tag out procedures a For Troubleshooting Heater i Use multi meter to check continuity between 1 Power terminals H1 to H2 2 Thermocouples positive yellow to negative red ii If there is continuity on all above tests check system wiring 1 Crossed thermocouple wires 2 Reversed thermocouple wire polarity note RED is NEGATIVE 3 Verify inlet air temp is below set point on INLET TEMP controll...

Page 9: ...ower control starts off low 0 output before the contactor is engaged and immediately applying full power Use proper closed loop control PID settings Tutco SureHeat typically uses the following PID Proportional P Integral I and Derivative D settings as a starting point for stable temperature control Some manual tuning may be required for more precise control Description Range Default P roportional ...

Page 10: ...258 8290 603 418 7648 K 603 772 1072 Website www tutcosureheat com E mail support tutcosureheat com The technical data and specifications supplied in this operating manual are subject to change without prior notice Contact Tutco SureHeat for additional assistance ...

Reviews: