4
Table of Contents
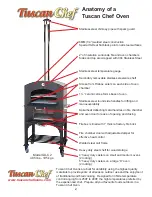
Anatomy of a Tuscan Chef Oven........................................................................................2
Operating Your Oven Safely ...............................................................................................3
Built-In Kitchen Installation .................................................................................................3
Delivery & Inspection ..........................................................................................................4
List of Components.............................................................................................................4
Tools Required for Assembly ..............................................................................................4
Installation Instructions .................................................................................................. 4&5
Initial Operating Instructions ...............................................................................................5
Ignition Instructions.............................................................................................................5
Regulating Temperature .....................................................................................................5
Maintenance Instructions....................................................................................................5
Warranty Information ..........................................................................................................5
Delivery & Inspection
Tuscan Chef Ovens are
carefully inspected and
packaged in a layer of styrofoam
and corrugated at the factory
to ensure safety during
transportation.
Inmar Industries, Inc. has
carefully inspected and packed
your oven on a pallet and shrink
wrapped for extra protection
during shipping and accepts no responsibility for damages
after it leaves our facility.
If your oven is being delivered by truck or courier, please
carefully inspect the shipment for any obvious damage that
may have occurred in shipping prior to signing for the delivery.
If there is any damage, sign the bill as “Damaged” or refuse
delivery.
Any damages reported after three days following delivery
are assumed to have occurred after delivery.
List of Components
Your Tuscan Chef Oven will include the following;
1. Oven
Packed inside oven - stainless steel oven shelf
- stainless steel side handles
- chimney cap
- oven thermometer
2. Cart (with cart models only)
Packed with cart - casters and bolt hardware
3. Chimney
Tools Required for Assembly
• box cutter
• 16mm open end wrench - stainless steel side
handles
• 14mm socket/ratchet and 13mm open end
wrench – casters onto cart frame
Installation Instructions
Your Tuscan Chef Oven requires a minimum of assembly
• start by carefully removing packaging from oven and cart
using a box cutter. Be careful as to not scratch any of the
steel or stainless steel surfaces of the oven or cart.
Assemble components on a moving pad or card board, to
prevent scratching parts.
• remove metal plastic wrapped ties that hold the oven and
firebox doors in place
• remove nylon inserts on the hinged area of the oven and
firebox doors
• remove the plastic tube support in the oven chamber and the
box that will contain the chimney cap, oven thermometer
• the stainless steel side handles are attached to the stainless
steel oven shelf.
• install the stainless steel side handles using the brackets
and bolts supplied. They attach to either side of the oven
body. Remove the bolt in the oven body and attach bracket
and handle using a 17mm socket or wrench.
• insert the thermometer into the
hole provided directly above the
oven chamber. From the
inside of the oven, affix the nut
and washer, tighten until snug.
Do not over tighten.
• remove carton attached to cart and assemble casters using
a 14mm socket and a 13mm open end wrench. Turn cart on
it’s edge to facilitate caster installation. We suggest position-
ing the two casters with locking
device on the long side of
the cart and where you will position
the front of the oven.
• with casters installed, place cart
onto casters and lock the two front
wheels.

