


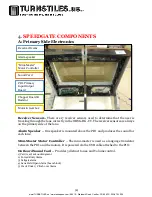
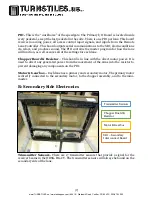
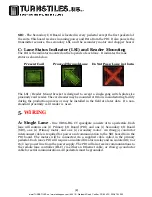
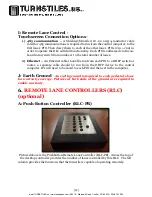
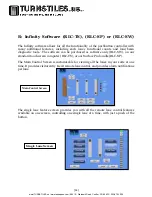
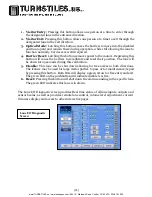


[5]
A: Uncrating
- To remove the speedgate pedestals from the crate you will need a
pair of tin snips (or equivalent), a ratchet set with an extension, open ended wrenches,
and the door tool provided in the crate. Once the top and walls of the crate are removed,
use the door tool found inside the cleaning kit provided to remove the door panels (skins)
labelled “Open here” which are fastened with ball studs, and retention clips. Loosen the
bottom clips first with the door tool provided. The doors are not hinged, please be
sure to remove door evenly so you do not break off the clips or ball studs.
When the bottom door is removed you will see the horizontally mounted board panels on
the bottom frame. They are on hinges located toward the middle of the ped. You will need
to remove the 2 screws that secure the panel to the bottom frame using a 5/32” Allen
wrench. You will then carefully flip the panel up and toward the middle of the ped. This
will fully expose the hardware used to fasten the peds to the crate. Unfasten the pedestals
from the crate floor with the ratchet set.
B: Lane Layout
- The speedgates are referenced from the unsecured side of the
building. Pedestal 1 will always be the turnstile farthest to the right. Pedestal 2 will be
just to the left of Pedestal 1, and so forth. These pedestal numbers are chosen right to left
due to the primary controller (PIO) being located on the right pedestal of each lane. The
pedestals are labeled prior to shipment to help explain the speedgates lane designation.
C: Mounting the Pedestals-
There are four (4) mounting holes, located at
the corners of the base, two (2) at each end. There are also two (2) 3” conduit pass
through holes, one at each end. Do not use the center hole unless directed. Please see
the OBSG-HG-CV Construction Layout drawing for details. We can provide base
templates prior to installation if it is required before the speedgates arrive.
D: Mounting Hardware-
The mounting holes are 5/8” wide in diameter to
accommodate mounting hardware no larger than 1/2” wide. As floor materials vary from
project to project, we do not provide mounting hardware. We ask that whatever hardware
used; please make sure it goes at least 4” below finished floor level for proper pedestal
stability. Please contact us if you need advice on what type of hardware to use for your
application.
www.TURNSTILES.us / www.entrapass.com / 8641 S. Warhawk Road, Conifer, CO 80433 / 303-670-1099


