Turbosol POLI T Instructions For Use And Maintenance Manual Download Page 20

20

21

Conveying and spraying the mix

Drain the residual water of the pump calibration operation 
from  the  hopper  by  opening  the  hatch  located  on  the 
bottom of the hopper.

Use  nitrile  gloves  to  protect  against  cuts  and 
scratches; preferably use models with CE 940072 
certification.

During work use goggles, preferably with shockproof 
polycarbonate lens, to protect the eyes.

Pour  two  or  three  bucketfuls  (30  l)  of  slurry  (50%  water, 
50% cement or lime) into the hopper.

If  there  is  no  slurry  available  but  only  ready-mix 
materials,  make  them  slightly  more  fluid  than 
normal.

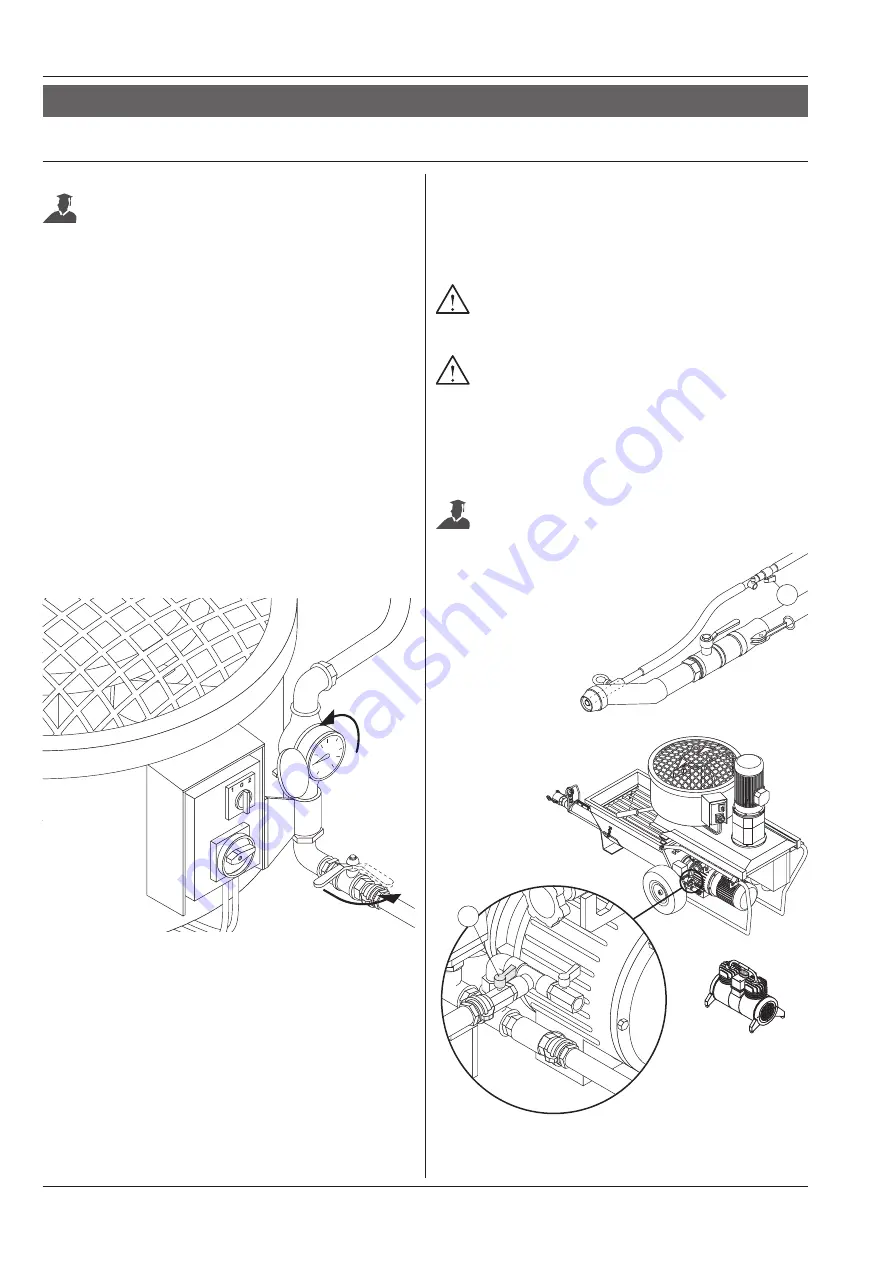
• Open the air supply valve

 (30)

 located

  on the machine and the air control 

valve

 (14)

 on the mortar gun.

Preparing the batch

The  mix  should  be  plastic  and  within  the  grading 
curve, as shown in point 4.2.

The pan mixer

 (/MP version)

 may be used to prepare the 

batch.

When preparing mixes for traditional plasters, pour water 
into  the  mixer;  add  50%  of  the  aggregate  (sand),  then 
100% of the binder (cement) and lastly the remaining 50% 
of the aggregate; add more water if necessary. 
With traditional mortars it is advisable to use the vibrating 
sieve to prevent the pump from being damaged by stones 
or encrustation of material.

When preparing ready-mixed batches, follow the material 
supplier’s instructions. 

For  correct  batching  of  the  water,  a  water  gauge  is 
available (optional), which indicates the quantity of water 
put into the mixer.

• Turn the water gauge so that the indicator is on position 

0

.

• Put water into the mixer, turning the lever in the direction 

indicated in the drawing.

• Close the valve, by positioning the lever at right angles 

to the actual valve, when the litre-counter indicator has 
reached the required quantity.

Prior to each new batch, put the water gauge indicator 
to 

to facilitate operations.

14

30

Summary of Contents for POLI T

Page 1: ...ITALIANO ENGLISH Serial number CT 200 401 PUMPING SYSTEMS FOR THE BUILDING INDUSTRY INSTRUCTIONS FOR USE AND MAINTENANCE COMPREHENSIVE CATALOGUE SPARE PARTS ...

Page 2: ...omes out the spray gun 28 6 2 Other problems 29 6 3 Work by the operator 30 6 4 Work by qualified personnel 30 7 Responsibility of the operator 32 Table 1 Machine casing 34 Table 2 Motor Drive unit 36 Table 3 Pump 2L6 38 Table 4 Pump T25 40 Table 5 Pump 60 12 42 Table 6 Oversize pan mixer 44 Table 7 Switchboard 46 Table 8 Remote control 48 Table 9 Vibrating sieve 50 Table 10 Complete compressor co...

Page 3: ... or damage to persons or things resulting from unauthorized changes in or modification of this equipment MIXING CONVEYING AND SPRAYING MACHINE FOR READY MIX MORTARS TRADITIONAL MORTARS AND FINISHING COATS POLI T Machine serial number You are strongly advised to enter your machine s serial number in the space above which must always be referred in order to facilitate the work of the personnel in ch...

Page 4: ...ted with a safety device Opening the safety grid stops the agitator B The mixer is fitted with a safety device Opening the safety grid stops the mixer This user guide must be read prior to operating the machine DESCRIPTION This user guide must be read with regard to routine and extraordinary maintenance Warning Risk of electrical shock LABELS CAUTION A E D B C ...

Page 5: ...long lasting extremely reliable machine with low operating costs Precautions to be taken with the machine in operation Maintenance or repairs should only be carried out with the machine at a standstill Any protective or safety devices that need to be removed in order to carry out work should be remounted upon completion of the same Maintenance and care Maintenance and care are of the utmost import...

Page 6: ...on the machine s operating power are printed on the manufacturer s registration plate The meaning of the various symbols used is as follows A Type of machine POLI T EV MP POLI T Mixing conveying and spraying machine for ready mix mortars traditional mortars and finishing coats EV Electrical version with variable speed drive MP With pan mixer B Machine serial number NNNNN AA NNNNN Machine serial nu...

Page 7: ...r with agitator Variable output with mechanical variable speed drive Electric motor Switchboard to CE standards with sockets and selectors for connecting and using the machine Socket for pan mixer MP Remote electric control with 33 metres of cable or pneumatic control to be selected from the switchboard Vibrating sieve with Ø 8 mm mesh for traditional plasters 120 litre pan mixer with 1 8 kW motor...

Page 8: ...every 3 000 hours Variable speed drive oil change SHELL A T F DEXTRON III 1 0 l every 3 000 hours Compressor oil change TURBO DIESEL 15W40 0 6 l every 3 000 hours Oversize mixer reduction gear oil change AGIP DELIUM VSF 320 0 7 l every 3 000 hours Hopper capacity 120 l Mixer capacity 120 l Working environment temperature from 5 to 35 C LwA guaranteed 90 confidence level directive 2000 14 CE tested...

Page 9: ...ptional 2L6 standard N B The output may vary according to the viscosity quality and composition of the mix pump wear mortar hose diameter and length pumping height maximum distance and height not reachable at the same time These data are not absolute but depend on the quality of the materials to be pumped their consistency pump capacity and diameter of the used hoses only use hoses made specifical...

Page 10: ...f water and the mixing time POLI T basically consists of a hopper with built in agitator which receives the mixed material and a screw pump for pumping the material It may be fitted with a pan mixer MP version for preparing the mix The mix is unloaded into the hopper then pumped by the screw pump to the place of application the material is conveyed through a hose to the spray gun which may differ ...

Page 11: ...f pumps are available each one particularly indicated for a certain type of material STANDARD CONFIGURATION Pump 2L6 screw code 250 123 stator code 263 184 for ready mixed materials with particle size 4 6 mm grit Pump T25 screw code 250 089 stator code 238 030 for traditional mortars with particle size 8 10 mm OPTIONAL Pump 60 12 screw code 250 136 stator code 263 366 for self levelling screeds Ch...

Page 12: ...ry where the machine is being used Connect the earth terminal of the machine to the site switchboard earth stake by means of a cable having a minimum section that is never less than 16 mm If the machine is powered through a generating set use a 30 kVA set 4 3 PRELIMINARY OPERATIONS Machine position Place the machine as level as possible the maximum allowed gradient is 5 both lengthwise and crosswi...

Page 13: ... this section of hose raised from the ground and in any case do not let it rest on sharp edges or abrasive elements to prevent early wear of the actual hoses Only use original hoses and couplings The hoses should be fitted by TURBOSOL PRODUZIONE S p A or by firms expressly authorised by the same Under no circumstances shall TURBOSOL PRODUZIONE S p A be liable for injury to persons or damage to pro...

Page 14: ...on 21 Then connect the spray gun to the end of the material hose when using the gun for traditional mortars code 216 246 remove the gasket to be found inside the coupling lock the joint levers by means of the relative safety spring 22 and connect the air hose fully tightening the couplings In the version with pan mixer MP connect the socket to the machine switchboard 23 In the version with vibrati...

Page 15: ...rotective grids are on the mixer and the hopper and are properly fixed Before starting the machine ensure that only authorised persons are in the vicinity that is at less than 1 metre from the machine 4 4 STARTING PREVENTIVE CHECKS Carry out the following checks Reduction gear oil level Check the lubricant level 25 If necessary top up with SHELL OMALA 220 Variable speed drive oil level Check the l...

Page 16: ...re gauge and should be equivalent to approx half the pumping pressure measured previously Calibrating the pump If a new pump has been installed and in any case every day prior to commencing work with the material it is advisable to check pump calibration as follows Mount the pump calibrating unit 29 with the shutoff valve open Fill the hopper with water Open the air control valve 14 located on the...

Page 17: ...ncreases loosen the calibration pressure decreases Repeat the calibration operation until the correct pressure values are obtained Now remove the pump calibrating unit 29 and connect the material delivery hose Should it prove impossible to calibrate the pump unit the stator and if necessary the screw must be replaced PUMP 2L6 60 12 T25 HOSE LENGTHS UP TO CORRECT PRESSURE VALUES approximate 40 m 10...

Page 18: ...grid is open The agitator stops when the red indicator light is on The red indicator light also comes on should the overload cutout trip Check that the safety grid is in proper working order upon lifting it pumping stops and the red indicator light 39 on the switchboard comes on To start the machine again press the start stop button 32 With the mortar pump in operation adjust the pump output The o...

Page 19: ...first put the on off switch 41 to position 0 and then to position 1 In the version with vibrating sieve activate the electric vibrator by putting the selector 44 to the position ON Check that the protective grids on the mixer and the hopper are in proper working order it should be impossible to raise them more than 30 mm without the mixer and the agitator stopping During these tests check that the...

Page 20: ...sion may be used to prepare the batch When preparing mixes for traditional plasters pour water into the mixer add 50 of the aggregate sand then 100 of the binder cement and lastly the remaining 50 of the aggregate add more water if necessary With traditional mortars it is advisable to use the vibrating sieve to prevent the pump from being damaged by stones or encrustation of material When preparin...

Page 21: ...erials see page 11 Each gun comprises a coupling to the material delivery hose 45 a coupling to the air hose 46 a control valve on the air hose 14 an air nozzle 47 with or without possibility of regulation 48 a spray tip 49 possibly a material shutoff valve 50 and a relief valve for excess air 51 By way of general information using nozzles and spray tips with a smaller diameter results in a wider ...

Page 22: ...and that no other persons are in the vicinity This potentially hazardous operation should always be carried out by an expert person exercising the utmost caution Remove the spray gun and wash it thoroughly dismantling the spray tip 49 Check that the nozzle hole 47 is clear clean it if necessary Disconnect the hoses from the mortar pump and insert a cleaning sponge into the end of the hose Open the...

Page 23: ...and eyes Before stopping the machine Stop the mortar pump using the start stop button I 0 32 the pan mixer by putting the on off switch to 0 41 and the compressor using button 53 Now switch off the machine using the on off switch 35 located on the control panel Should an EMERGENCY STOP be necessary put the red on off switch with yellow background 35 located on the machine control panel to 0 Toavoi...

Page 24: ... ø 12 mm rod of suitable length 80 cm inserted into the hole made for the bolt to fix the screw to the universal joint of the impeller or to the impeller loosen the screw until it can be removed Check if the screw is still useable the diameter should be no more than 3 mm less than the original value and if it is not use a new screw as well as a new stator This check is carried out by resting the s...

Page 25: ...ce between the hole centre of the bolt fixing the screw to the universal joint of the impeller or to the impeller and the edge of the chamber is approx 85 mm Mount the clamp Mount the material delivery header and fix it firmly with the two stay rods Release and close the hopper protective grid Start the motor Calibrate the pump unit as described on page 16 85 mm ...

Page 26: ...ine operator should ready carefully as well as this guide before starting work Daily operations At the beginning of work Reducer ear oil level Check the lubricant level 25 If necessary top up with SHELL OMALA 220 Variable speed drive oil level Check the lubricant level 26 If necessary top up 27 with SHELL A T F DEXTRON III Check that the compressor air filter 57 is clean Check that the air and mat...

Page 27: ...versize pan mixer General check of the machine Check of the safety devices Check the efficiency of the pressure gauge that indicates the pressure of the material Check the efficiency of the switchboard Check the hopper seals for leaks Check the calibrations of the machine pneumatic system Check the air hoses Check the material hoses Operations to be carried out once a year or every 1 000 hours Cha...

Page 28: ...nnecting them The pressure gauge indicating the mortar hose pressure should show a pressure of 0 bar The operator or nozzleman should have been specifically trained to carry out this operation Before opening a coupling in particular ensure that there is no residual pressure in the hoses and that no other persons are in the vicinity This potentially hazardous operation should always be carried out ...

Page 29: ...ert person exercising the utmost caution Disassemble the spray tip and if necessary the gun and remove the cause of clogging Before reassembling the spray tip or the spray gun ensure that the nozzle is clear if necessary clean it and that material flows freely from the hose Incorrect stator adjustment An incorrectly adjusted stator can result in no material flowing out of the spray gun or even plu...

Page 30: ...assage Spray tip hole too small Incorrectly adjusted stator Spray tip or nozzle hole too large Bent air hose or clogged air nozzle Loosen clamp Change the mix or reduce hose length or use hoses with larger diameter Have the line voltage checked page 12 If necessary obtain an independent generating set with minimum capacity of 25 kVA version without mixer or 30 kVA version with mixer Incorrect mix ...

Page 31: ...31 ...

Page 32: ...comes null and void if this machinery is not used in accordance with the instructions in this manual In addition this manual must always accompany the machine The machine s operator must be thoroughly taught and trained in regard to the operation and use of the machine itself and must sign this use and maintenance manual on the line reading read and approved If this procedure is not complied with ...

Reviews: