background image

2 1

English  


-

During measuring, users have to hold both hands 

on the hand grips. LCD display “-” “- -” “- - -” “- - - 

-” for 8 seconds until computer finish measuring.


-

LCD will display BMI and FAT %.

Body fat mode error codes


-

*E-1 

There is no heart rate signal input detected.


-

*E-4 

Occurs when FAT% and BMI result is below 5 or 

exceeds 50.

Trouble shooting: 


-

When the display of LCD is dim, it means the 

batteries need to be changed.


-

If there is no signal when you pedal, please check if 

the cable is well connected.

NOTE

•  When stop training for 4 minutes, the main 

screen will be off.

•  If the computer displays abnormally, please re-

install the transformer and try again.

Bluetooth & APP


-

This console can connect with an APP on a smart 

device by Bluetooth.


-

Once console is connected to a smart device via 

Bluetooth, the console will power off.

NOTE

•  Tunturi only provides the option to connect 

your fintess console throughout a blue tooth 

connection. Therefore Tunturi cannot be held 

resposible for damage, or malfunctioning of 

products other than Tunturi products.

Console connects best with:

 “Fit Hi Way”  

Developed by: Chang yow.

Search in App store (iOS) for : fit hi way

Search in Play store (Android) for : Fit Hi Way

“Kinomap Fitness  

Developed by: Kinomap.

Search in App store (iOS) for : Kinomap fitness

Search in Play store (Android) for : Kinomap fitness

Cleaning and maintenance

The equipment does not require special maintenance. 

The equipment does not require recalibration when 

it is assembled, used and serviced according to the 

instructions.

WARNING 

•  Do not use solvents to clean the equipment.

•  Clean the equipment with a soft, absorbent cloth 

after each use.

•  Regularly check that all screws and nuts  

are tight.

•  If necessary, lubricate the joints.

Defects and malfunctions

Despite continuous quality control, defects and 

malfunctions caused by individual parts can occur in the 

equipment. In most cases, it will be sufficient to replace 

the defective part.


-

If the equipment does not function properly, 

immediately contact the dealer.


-

Provide the model number and the serial number of 

the equipment to the dealer. State the nature of the 

problem, conditions of use and purchase date.

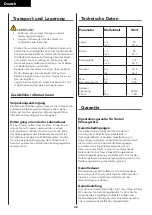
Transport and storage

WARNING

•  Carry and move the equipment with at least two 

persons.

•  Remain standing in front of the equipment 

on each side and take a sturdy grip at the 

handlebars. Tilt the front of the equipment 

so as to lift the rear of the equipment on the 

wheels. Move the equipment and carefully put 

the equipment down. Place the equipment on a 

protective base to prevent damage to the floor 

surface.

•  Move the equipment carefully over uneven 

surfaces. Do not move the equipment upstairs 

using the wheels, but carry the equipment by the 

handlebars.

•  Store the equipment in a dry place with as little 

temperature variation as possible.

Summary of Contents for Star Fit E100 HR i

Page 1: ...durch bevor Sie mit er Montage dieses Produkts beginnen Veuillez lire ce manuel avant de commencer le montage de ce produit Leest u deze handleiding voordat u dit apparaat installeert www tunturi com...

Page 2: ......

Page 3: ...3 Star Fit E100 HR i A...

Page 4: ...4 Star Fit E100 HR i B NO 11...

Page 5: ...5 Star Fit E100 HR i C 100 cm 100 cm 100 cm 100 cm D 0...

Page 6: ...6 Star Fit E100 HR i D 1...

Page 7: ...7 Star Fit E100 HR i D 2...

Page 8: ...8 Star Fit E100 HR i D 3 13...

Page 9: ...9 Star Fit E100 HR i D 4 B C A D...

Page 10: ...1 0 Star Fit E100 HR i D 5...

Page 11: ...1 1 Star Fit E100 HR i E 1 E 2 MAX input 9V DC 1 3 Amp...

Page 12: ...1 2 Star Fit E100 HR i F 01 F 06 F 02 F 07 F 03 F 08 F 04 F 09 F 05 F 10...

Page 13: ...1 3 Star Fit E100 HR i F 11 F 16 F 12 F 017 F 13 F 18 F 14 F 19 F 15 F 20...

Page 14: ...1 4 Star Fit E100 HR i F 21 F 25 F 22 F 23 F 24 F 25...

Page 15: ...can give cause to hazards Persons responsible for their safety must give explicit instructions or supervise the use of the equipment Before starting your workout consult a physician to check your hea...

Page 16: ...least two persons CAUTION Place the equipment on a firm level surface Place the equipment on a protective base to prevent damage to the floor surface Allow at least 100 cm of clearance around the equ...

Page 17: ...er You will have to reduce your speed to keep your heart rate in the target zone Weight loss The important factor here is the amount of effort you put in The harder and longer you work the more calori...

Page 18: ...cording to the height and the exercise position of the user Loosen the handlebar adjustment knob Move the handlebar to the required position Tighten the handlebar adjustment knob Power supply Fig E 1...

Page 19: ...vel Setting selection Down Decrease resistance level Setting selection Mode Confirm setting or selection Reset In setting mode press RESET key once to reset the current function figures Press RESET ke...

Page 20: ...oose SPORTY mode and press mode key to enter next setting entry for SPORTY mode program Use UP DOWN key to select SPORTY program 1 4 fig F 15 and press MODE ENTER to confirm Use UP DOWN key to set tim...

Page 21: ...Kinomap fitness Cleaning and maintenance The equipment does not require special maintenance The equipment does not require recalibration when it is assembled used and serviced according to the instru...

Page 22: ...onditions Warranty coverage Under no circumstances shall Tunturi New Fitness BV or the Tunturi Distributor be liable by virtue of this warranty or otherwise for any special indirect secondary or conse...

Page 23: ...arranty repairs carried out by other than authorised Tunturi representatives are not covered Failure to follow the instructions given in the Owner s Manual will invalidate the product s warranty Decla...

Page 24: ...WARNUNG Herzfrequenz berwachungssysteme k nnen ungenau sein Eine beranstrengung kann zu schweren Sch digungen oder zum Tod f hren Wenn Sie sich schwach oder ohnm chtig f hlen stellen Sie die bungen u...

Page 25: ...laufen Stellen Sie keine Gegenst nde auf das Netzkabel Vergewissern Sie sich dass das Netzkabel nicht ber der Kante eines Tisches h ngt Vergewissern Sie sich dass niemand versehentlich ber das Netzkab...

Page 26: ...12 Minuten dauern die meisten Menschen beginnen mit ca 15 bis 20 Minuten Die Abk hlungs Phase Sie dient der Entspannung Ihres Herz Kreislaufsystems und Ihrer Muskeln Dabei werden die Aufw rm bungen wi...

Page 27: ...Die Maschine steht am stabilsten wenn alle St tzf e vollst ndig eingeschraubt sind Nivellieren Sie die Maschine daher indem Sie alle St tzf e vollst ndig Eindrehen bevor Sie die entsprechenden F e zu...

Page 28: ...en angezeigt Bereich 0 15 999 Wenn vier Sekunden lang ohne Training kein Signal auf den Monitor bertragen wird zeigt U Min 0 an WATTS Aktuelle Trainings Watt werden angezeigt Bereich 0 999 LOAD Zeigt...

Page 29: ...F 03 Advande Abb F 04 Sporty Abb F 05 Cardio Abb F 06 Watt Abb F 07 Programme Quick start Schnellstart Dr cken Sie auf START STOP um Ihr Training ohne Voreinstellungen zu beginnen Verwenden Sie UP DOW...

Page 30: ...dus H R C und dr cken Sie auf die Modus Taste um die n chste Einstellung f r das Programm CARDIO vorzunehmen Verwenden Sie die Taste UP DOWN f r die Alterseinstellung Abb F 16 Verwenden Sie die Taste...

Page 31: ...lfunktionen von Produkten verantwortlich die nicht von Tunturi sind Konsole verbindet sich am besten mit Fit Hi Way Entwickelt von Chang yow Suchen in App store iOS f r fit hi way Suchen in Play store...

Page 32: ...t Gem den europ ischen WEEE Gesetzen sind Sie f r eine geeignete Entsorgung des Fitnesstrainers bei einer anerkannten ffentlichen Entsorgungsstelle verantwortlich Technische Daten Parameter Ma einheit...

Page 33: ...urden Ersatzleistungen aufgrund von Ger uschen die beim Einsatz des Ger ts auftreten sind von der Garantie ausgeschlossen sofern diese Ger usche den Gebrauch des Ger ts nicht wesentlich beeintr chtige...

Page 34: ...es graves voire mortelles Si vous vous sentez d faillir interrompez imm diatement l exercice L quipement est uniquement adapt un usage domestique L quipement ne convient pas un usage commercial La dur...

Page 35: ...age et le d montage et avant le nettoyage et la maintenance Description fig A Votre v lo vertical est un l ment d quipement de fitness stationnaire servant simuler le cyclisme sans exercer de pression...

Page 36: ...oin de vous entra ner plus longtemps ou de faire des entra nements plus pouss s Il est conseill de s entra ner au moins trois fois par semaine et si possible d espacer les s ances r guli rement tout a...

Page 37: ...c la jambe pratiquement droite la vo te plantaire doit toucher la p dale en son point le plus bas Desserrez le bouton de r glage du tube de selle Amenez le tube de selle la position requise Serrez le...

Page 38: ...ible Lorsqu une valeur cible est fix e les calories sont compt es rebours de la valeur cible 0 avec une alarme sonore ou clignotante Les calories continueront s additionner si l entra nement n est pas...

Page 39: ...er la distance Fig F 09 les calories Fig F 10 et le pouls Fig F 11 NOTE Si vous vous fixez plusieurs objectifs l entra nement s arr tera apr s chaque objectif atteint Si vous laissez un objectif vide...

Page 40: ...l objectif de puissance WATT par d faut 120 Watt Fig F 18 Appuyer sur la touche UP DOWN haut bas pour r gler TIME dur e Appuyer sur la touche START STOP pour commencer l entra nement Utiliser UP DOWN...

Page 41: ...dividuels La plupart du temps il vous suffit de remplacer la pi ce d faillante Si l quipement ne fonctionne pas correctement contactez imm diatement le revendeur Fournissez le num ro de mod le et le n...

Page 42: ...ri New Fitness BV et les revendeurs Tunturi ne r pondent pas des d fauts occasionn s par des conditions ind pendantes de leur volont La garantie est applicable uniquement au premier acheteur et est va...

Page 43: ...trainen Het toestel is uitsluitend geschikt voor huishoudelijk gebruik Het toestel is niet geschikt voor commercieel gebruik Het maximum gebruik is beperkt tot 3 uur per dag Het gebruik van dit toest...

Page 44: ...t wilt halen Verwijder de stekker uit het stopcontact wanneer het toestel niet in gebruik is v r montage of demontage en v r reiniging en onderhoud Beschrijving fig A Uw fietstrainer is een stationair...

Page 45: ...r en harder trainen Het is raadzaam minstens drie keer per week te trainen en zo nodig uw oefeningen gelijkmatig over de week te verspreiden Spierversteviging Als u uw spieren wilt verstevigen met beh...

Page 46: ...enste positie Draai de stelknop voor de zadelpen vast Afstellen van de horizontale zadelpositie Fig E 2 De horizontale zadelpositie kan worden afgesteld door het zadel in de gewenste positie te zetten...

Page 47: ...lorie n opgeteld Wanneer u wel een doelwaarde instelt wordt het aantal calorie n terug geteld vanaf de doelwaarde Zodra het aantal op 0 komt hoort u een alarm of gaat het display knipperen Het aantal...

Page 48: ...ooraf ingestelde limiet Druk op de toets START STOP om uw workout te beginnen Met UP DOWN kunt u het weerstandsniveau aanpassen Het belastingsniveau wordt in het venster LEVEL weergegeven fig Modus Be...

Page 49: ...rcentage fig F 22 Stel de leeftijd lengte en gewicht van de gebruiker in voordat u de meting kunt starten Tijdens de meting moet de gebruiker met beide handen de handgrepen vasthouden Op het LCD displ...

Page 50: ...ndgrepen stevig vast Til de voorkant van het toestel op zodat de achterkant van het toestel op de wielen komt te rusten Verplaats het toestel en zet het voorzichtig neer Zorg voor een beschermende laa...

Page 51: ...De garantie betreft alleen de eerste eigenaar van het toestel en is alleen geldig in landen waar een geautoriseerde importeur van Tunturi New Fitness BV is gevestigd De garantie betreft geen trainings...

Page 52: ...ensor 2 38 Washer 2 39 Screw 2 40 Seat post bushing 1 41 Transport wheel 2 42 Bearing 4 43 Hand pulse wire 2 44 Axle for flywheel 1 45 C clip 2 46 Bearing 6001 2 47 End cap for crank 2 48 Decorating r...

Page 53: ...Fit E100 HR i 2 3 4 4 4 4 7 17 17 7 7 25 26 27 28 39 38 39 38 19 37 37 35 29 22 31 33 34 32 16 30 11 40 10 9 15 36 8 12 14 24 43 50 50 50 50 41 41 8 6 7 8 6 7 42 42 42 42 49 14 49 23 14 70 20 13 82 83...

Page 54: ...5 4 Star Fit E100 HR i...

Page 55: ......

Page 56: ...www tunturi com Tunturi New Fitness BV Purmerweg 1 NL 1311 XE Almere P O Box 60001 NL 1320 AA Almere The Netherlands www tunturi tness com info tunturi tness com 20180810...

Reviews: