background image

1 8

GB

 ‼  NOTE

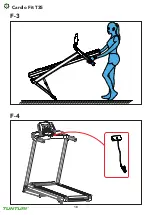
•  Console will show E7 code when safety key is not in (correct) 

position during start up� 

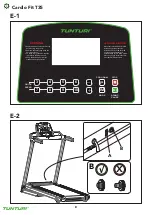
Circuit breaker (Fig.  E-2 B)

The equipment is equipped with a circuit breaker that interrupts the 
circuit when the electricity load is above the maximum capacity� When 
this occurs, the circuit breaker must be pressed�

 ⚠ WARNING

•  Before pressing the circuit breaker, remove the mains plug from 

the equipment�

If the equipment shuts down, proceed as follows to restart the 
equipment:


- Remove the mains plug from the equipment�


- Press the circuit breaker to restart the equipment�


- Insert the mains plug into the equipment�

 ‼  NOTE

•  Some circuit breakers used in homes are not rated for high 

inrush currents that can occur when a treadmill is first turned 
on or even during normal use� If your treadmill is tripping the 
circuit breaker (even though it is the proper current rating and 
the treadmill is the only appliance on the circuit) but the circuit 
breaker on the treadmill itself does not trip, you will need 
to replace the breaker with a high inrush type� This is not a 
warranty defect� This is a condition we as a manufacture have no 
ability to control�

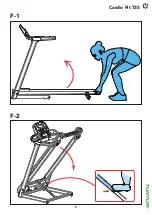
Unfolding and folding the  

equipment (fig. F1-F2)

The equipment can be unfolded for use (fig� F1) and folded for 
transport and storage (fig� F2)�
Refer to the illustrations for the correct way of unfolding and folding 
the equipment�

Adjust incline setting (Manual)


- Fold up your treadmill� (Up)


- Take out adjuster pad safety pin�


- Adjust the adjuster pad in desired position�


- Secure the adjuster pad position with the safety pin� 


- Unfold your treadmill� (Down)

 ‼  NOTE

•  Make sure both adjuster-pads are in same position to avoid your 

treadmill to become unstable� 

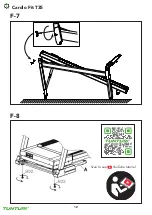
Adjusting the support feet (Fig. F7-F8)

The equipment is equipped with adjustable support feet�
If the equipment feels unstable, wobbly, or not levelled well, these 
support feet can be adjusted to make the required corrections�


- Turn the support feet in/ out as required to put the equipment in a 

stable and as well possible levelled position�


- Tighten the locknut’s* to lock the support feet�

 💡   QUICK  TIP

•  It is easier to do this with two persons, so one person can tilt the 

equipment, while the other makes the needed adjustment�

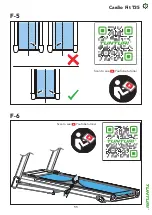
Click to see our supportive YouTube video
https://youtu�be/E_7agKqaUIc

  ‼  NOTE

•  The equipment is most stable when it is as low to the floor as 

possible� Therefore, start to level the equipment by turning all 
support feet fully in, before turning out the required support 
feet to stabilize and level the equipment�

Console (fig. E-1)

 ⚠ CAUTION

•  Keep the console away from direct sunlight�
•  Dry the surface of the console when it is covered with drops of 

sweat�

•  Do not lean on the console�

 ‼  NOTE

•  The console switches to standby mode when the equipment is 

not used for 10 minutes�

Buttons

Stop


- Stop workout� 

Speed +


- Increases the speed (1�0 ~ 16 km/h)�


- Pressing once increases the speed 0�1 km/h� 


- Pressing and holding for two seconds will increase the speed faster�


- Scroll programs and change values in programming mode� 

Speed -


- Decreases the speed (1�0 ~ 16 km/h)�


- Pressing once decreases the speed 0�1 km/h� 


- Pressing and holding for two seconds will decrease the speed 

faster�


- Scroll programs and change values in programming mode� 

Mode


- Select program mode


- Confirm setting to enter next step in programming mode�

Program


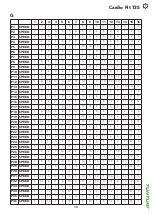
- Select program mode� ( P1~P36, U1~U3, FAT) 

Start/ Pause


- Start selected workout, or restart pause workout when being in 

pause mode� 


- Pause active workout� 

Speed hot keys:

Speed Hot Keys are set as:  3, 4, 5, 6, 7, 8, 9, 10�
For example, the speed changes from any speed to 8 km/h by 
pressing the Speed Hot Key 8�

Explanation of display items

Speed


- Shows the actual treadmill speed in workout mode�

Distance


- Shows the ran distance workout mode�


- Shows the target distance when being in programming mode�


- Shows program selection when being in program mode�

Summary of Contents for Cardio Fit T35

Page 1: ...eiding zorgvuldig voordat u dit product gaat gebruiken Leggere attentamente questo manuale dell utente prima di utilizzare il prodotto Antes de utilizar este producto lea atentamente este manual de us...

Page 2: ......

Page 3: ...3 Cardio Fit T35 A...

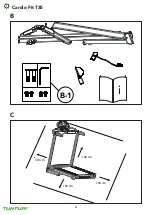
Page 4: ...i B 1 100 cm 100 cm 100 cm 100 cm 4 Cardio Fit T35 B C...

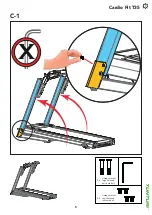
Page 5: ...X Hexagon socket large flat head half tooth bolt Hexagon socket short flat head full tooth bolt 2x 4x 5 Cardio Fit T35 C 1...

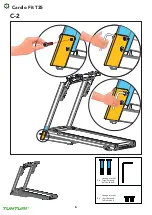
Page 6: ...Hexagon socket large flat head half tooth bolt Hexagon socket short flat head full tooth bolt 2x 4x 6 Cardio Fit T35 C 2...

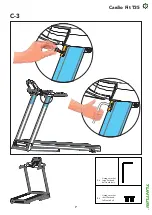
Page 7: ...Hexagon socket large flat head half tooth bolt Hexagon socket short flat head full tooth bolt 2x 4x 7 Cardio Fit T35 C 3...

Page 8: ...y stand on the side rails before starting the unit Keep childeren away from the treadmill during operation WARNING AUTO SLEEP FUNCTION QUICK SPEED Note that this treadmill is fitted witn an auto sleep...

Page 9: ...9 Cardio Fit T35 F 1 F 2...

Page 10: ...1 0 Cardio Fit T35 F 3 F 4...

Page 11: ...Scan to see YouTube tutorial Scan to see YouTube tutorial 1 1 Cardio Fit T35 F 5 F 6...

Page 12: ...Scan to see YouTube tutorial 1 2 Cardio Fit T35 F 7 F 8...

Page 13: ...4 12 4 12 4 12 P17 SPEED 2 2 2 4 6 6 9 11 11 2 4 6 6 11 11 9 P18 SPEED 3 6 3 6 6 3 6 6 3 6 6 3 6 6 3 6 P19 SPEED 4 12 4 12 4 12 4 12 4 12 4 12 4 12 4 12 P20 SPEED 5 13 5 13 5 13 5 13 5 13 5 13 5 13 5...

Page 14: ...H 1 4 Cardio Fit T35...

Page 15: ...or use only The equipment is not suitable for outdoor use Only use the equipment in environments with adequate ventilation Do not use the equipment in draughty environments in order not to catch a col...

Page 16: ...tration shows what the trainer will looks like after the assembly is completed You can use this as a reference during your assembly but do follow the assembly steps always in the correct sequence as s...

Page 17: ...during the warm up and cool down phases but towards the end of the exercise phase you should increase resistance making your legs work harder You will have to reduce your speed to keep your heart rat...

Page 18: ...ly or not levelled well these support feet can be adjusted to make the required corrections Turn the support feet in out as required to put the equipment in a stable and as well possible levelled posi...

Page 19: ...ess PROG buttons to select 8 1 program press MODE button to confirm The Calories display shows F1 SEX The Pulse display shows F1 Press SPEED buttons to select 1 Male 2 Female press MODE button to conf...

Page 20: ...is not needed to lubricate the running belt when taken into use for the first time The running belt must be checked for lubrication condition regularly Therefore the treadmill comes with a 300 hours r...

Page 21: ...n the rear end in a socket in the rear roller cover counter clockwise for 1 4 turn Await 2 minutes to give the running belt the time to respond to the adjustment before repeating the adjustment steps...

Page 22: ...s where Tunturi New Fitness BV has an authorised importer The warranty does not extend to fitness equipment or components that have been modified without the consent of Tunturi New Fitness BV Defects...

Page 23: ...k nnen ungenau sein Eine beranstrengung kann zu schweren Sch digungen oder zum Tod f hren Wenn Sie sich schwach oder ohnm chtig f hlen stellen Sie die bungen unverz glich ein Das Ger t ist nur f r den...

Page 24: ...Kurzschluss f hren Dies kann zu schweren Verletzungen oder sogar zum Tod f hren Erdungsanweisungen Dieses Produkt muss geerdet werden Wenn das Elektrosystem des Laufbands nicht funktioniert oder ausf...

Page 25: ...dargestellt ist 200 180 160 140 120 100 80 20 25 30 35 40 45 50 55 60 65 70 75 85 70 ALTER MAXIMAL ABK HLEN PULS ZIELZONE Diese Phase sollte mindestens 12 Minuten dauern die meisten Menschen beginnen...

Page 26: ...r der Schutzschalter im Laufband selbst nicht ausgel st wird m ssen Sie den Schalter durch einen f r hohen Einschaltstrom ersetzen Dies ist nicht Teil der Garantieleistungen Diese Bedingungen k nnen v...

Page 27: ...aten sind ein grober Anhaltspunkt f r den Vergleich verschiedener Trainingssitzungen Sie k nnen jedoch nicht f r eine medizinische Behandlung verwendet werden Programme Quick start Dr cken Sie die Tas...

Page 28: ...n er nicht benutzt wird Ziehen Sie vor der Reinigung und Wartung den Netzstecker aus der Wandsteckdose Verwenden Sie zur Reinigung des Ger ts keine L sungsmittel Blockieren Sie nicht die Bel ftungs ff...

Page 29: ...r nachgestellt werden Das Laufband wurde so entwickelt dass das Band immer in der Mitte l uft Bei einigen B ndern ist es normal dass das Band zu einer Seite zieht wenn keine Person darauf l uft Nach e...

Page 30: ...ige der Fehlercode immer noch steht Falls in der Anzeige der Fehlercode immer noch steht wenden Sie sich unverz glich an Ihren H ndler Oil OIL ist kein Fehlercode siehe Schmierung E7 Die Konsole zeigt...

Page 31: ...edingt sind Die Garantie beinhaltet keine Wartungsma nahmen wie Reinigung Schmieren oder normales Kontrollieren der Teile auch nicht solche Aufbauma nahmen die der Kunde selbst ausf hren kann und die...

Page 32: ...aque peuvent tre inexacts Un exercice excessif peut entra ner des blessures graves voire mortelles Si vous vous sentez d faillir interrompez imm diatement l exercice L quipement est uniquement adapt u...

Page 33: ...courant lectrique r duisant ainsi le risque de d charge lectrique Ce produit est quip d un c ble pourvu d une fiche de terre Cette fiche doit tre branch e dans une prise appropri e correctement instal...

Page 34: ...nutes Phase de refroidissement Cette tape a pour objectif de laisser votre syst me cardiovasculaire et vos muscles reprendre leur rythme normal Il s agit d une r p tition de l exercice d chauffement B...

Page 35: ...ez remplacer le disjoncteur par un type con u pour des appels de courant importants Il ne s agit pas d un d faut de garantie C est une situation qui chappe notre contr le en tant que fabricant D plier...

Page 36: ...icatif pour comparer entre diff rentes s ances d entra nement elles ne doivent pas tre utilis es dans le cadre d un traitement m dical Programmes Quick start Appuyez sur la touche START pour commencer...

Page 37: ...la fiche secteur de la prise murale N utilisez aucun solvant pour nettoyer l quipement Ne bloquez pas les ouvertures de ventilation D barrassez les ouvertures de ventilation de toute poussi re saliss...

Page 38: ...le tapis reste raisonnablement centr lorsqu il est en service Il est normal que certains tapis ont tendance d river lorsque personne ne se trouve dessus Apr s quelques minutes le tapis devrait se cent...

Page 39: ...e nettoyage et la maintenance retirez la fiche secteur de la prise murale Deux personnes au moins sont n cessaires pour transporter et d placer l quipement Assurez vous que rien ni personne ne se trou...

Page 40: ...ou par le distributeur agr Tunturi seront prises en charge Le non respect des instructions d crites dans le Manuel de l Utilisateur entra nera l annulation de la garantie Donn es techniques Param tre...

Page 41: ...u zich duizelig voelt stop dan onmiddellijk met trainen Het toestel is uitsluitend geschikt voor huishoudelijk gebruik Het toestel is niet geschikt voor commercieel gebruik Het maximum gebruik is bepe...

Page 42: ...aardingsstekker De stekker moet in een geschikt stopcontact worden geplaatst dat op juiste wijze is gemonteerd en geaard in overeenstemming met alle lokale normen en verordeningen WAARSCHUWING Onjuist...

Page 43: ...geveer 15 20 minuten De cooling down In deze fase ontspant u uw cardiovascu laire systeem en spieren Dit is een herhaling van de warming uptraining Verlaag dus uw tempo en ga ongeveer 5 minuten door H...

Page 44: ...arop wij als fabrikant geen invloed hebben Uitklappen en inklappen van het toestel fig F1 F2 Het toestel kan worden uitgeklapt voor gebruik fig F1 en ingeklapt voor transport en opslag fig F2 Raadplee...

Page 45: ...n Druk op de toets MODE om het aftellen te selecteren voor Tijd Afstand Calorie n Druk op de SPEED knoppen om het gewenste aftel doel in te stellen Druk op de knop START om uw training te starten LET...

Page 46: ...ze schoon zijn omdat het toestel niet bestand is tegen vuil van buiten Algemene reiniging Vuil stof en dierenharen kunnen luchtinlaten blokkeren en zich op de band ophopen U moet maandelijks onder de...

Page 47: ...o ontworpen dat de band tijdens gebruik zoveel mogelijk in het midden blijft Het is bij sommige banden normaal dat deze naar de zijkant bewegen terwijl de band loopt zonder dat er iemand op staat Na e...

Page 48: ...n Lees de instructies in deze handleiding in sectie Gebruik Transport en opslag WAARSCHUWING Verwijder voor reiniging of onderhoud de stekker uit het stopcontact Draag en verplaats het toestel met min...

Page 49: ...evoerd door een ander dan de geautoriseerde Tunturi vertegenwoordiger wordt niet vergoed De garantie geldt alleen voor normaal voorgeschreven gebruik van het product zoals beschreven in de handleiding...

Page 50: ...uenza cardiaca pu essere impreciso L eccessivo esercizio pu causare serie lesioni o perfino il decesso Se si avverte spossatezza interrompere immediatamente l allenamento L apparecchio adatto esclusiv...

Page 51: ...nt non funziona bene o rompersi la messa a terra fornisce un percorso di resistenza inferiore per la corrente elettrica riducendo il rischio di scossa elettrica Questo prodotto dotato di un cavo che u...

Page 52: ...160 140 120 100 80 20 25 30 35 40 45 50 55 60 65 70 75 85 70 ET MASSIMO RAFFREDDARE FREQUENZA CARDIACA ZONA DI DESTINAXIONE Questa fase dovrebbe durare almeno 12 minuti anche se la maggior parte delle...

Page 53: ...ale Se il vostro tapis roulant fa scattare l interruttore automatico anche se ha l amperaggio corretto e il tapis roulant il solo apparecchio sul circuito ma l interruttore sul tapis roulant stesso no...

Page 54: ...Pulse pulsazione Mostra la frequenza delle pulsazioni in modalit di esercizio o P quando non viene misurata nessuna pulsazione Calories calorie Mostra le calorie consumate in modalit di esercizio NOTA...

Page 55: ...are gli altri passaggi Premere il pulsante START per iniziare il programma Pulizia e manutenzione ATTENZIONE L attrezzo da allenamento richiede una manutenzione mensile anche quando non viene utilizza...

Page 56: ...gistrazioni della cinghia Le prestazioni del vostro tapis roulant dipendono dal telaio che deve muoversi su una superficie ragionevolmente piana Se il telaio non in piano il rullo anteriore e posterio...

Page 57: ...lizzare solo pezzi di ricambio citati nell elenco delle parti di ricambio Codici di errore Se il display mostra un codice di errore contrassegnato con E numero riavviare l apparecchio e controllare se...

Page 58: ...o i normali interventi di servizio dell attrezzo come per esempio la pulizia lubrificazione controllo periodico dei componenti n le piccole installazioni che pu effettuare il cliente stesso e che non...

Page 59: ...s sistemas de motorizaci n de frecuencia card aca pueden ser imprecisos Un exceso de ejercicio puede provocar lesiones graves o incluso la muerte Si se siente mareado deje de hacer ejercicio inmediata...

Page 60: ...s resistencia para la corriente el ctrica reduciendo el riesgo de descarga el ctrica Este producto est equipado con un cable que tiene un enchufe de toma de tierra de equipo El enchufe se deber enchuf...

Page 61: ...er lo suficientemente fuerte como para incrementar el ritmo card aco hasta el objetivo que se muestra en el siguiente cuadro 200 180 160 140 120 100 80 20 25 30 35 40 45 50 55 60 65 70 75 85 70 ZONA D...

Page 62: ...la m quina Pulse el disyuntor para reiniciar la m quina Inserte el enchufe de red en la m quina NOTA Algunos disyuntores usados en las casas no son id neos para elevadas corrientes de irrupci n que p...

Page 63: ...tancia objetivo cuando se encuentra en modo de programaci n Muestra la selecci n de programa cuando se encuentra en modo de programa Time Muestra el tiempo de entrenamiento en modo de entrenamiento Mu...

Page 64: ...ones PROG para seleccionar el programa U01 U03 pulse el bot n MODE para confirmar Pulse los botones SPEED para establecer el tiempo de entrenamiento que desee El tiempo de entrenamiento predeterminado...

Page 65: ...tos Tras la lubricaci n no pliegue el equipo antes de haber realizado un entrenamiento de 2 minutos con una velocidad de al menos 5 km h Esto har que la cinta de correr absorba el lubricante por compl...

Page 66: ...ficiente con reemplazar la parte defectuosa Si el equipo no funciona correctamente durante su uso tome contacto inmediatamente con su proveedor Tunturi Relate la naturaleza del problema las condicione...

Page 67: ...te la carga o el transporte La garant a no cubre los sonidos o ruidos emitidos durante el uso que no impidan de forma sustancial la utilizaci n del equipo y que no est n provocados por un fallo del mi...

Page 68: ...omedelbart att tr na om du k nner dig svag Utrustningen r endast anpassad f r hemmabruk Utrustningen r inte anpassad Maximal anv ndning r begr nsad till 2 timmar per dag Om utrustningen anv nds av bar...

Page 69: ...stickpropp som inte passar i uttaget anlita en elektriker f r installation av passande v gguttag Monteringsanvisningar Beskrivning illustration A P illustrationen kan du se hur tr ningsredskapet ska...

Page 70: ...na som vanligt under uppv rmnings och nedvarvningsfaserna men mot slutet av tr ningsfasen kan du ka belastningen s att dina ben f r jobba h rdare Du m ste minska hastigheten f r att h lla pulsen i m l...

Page 71: ...tterna SNABBTIPS Det r l ttare att g ra detta med tv personer s att en person kan luta utrustningen medan den andra g r den n dv ndiga justeringen Klicka f r att se v r st djande YouTube video https...

Page 72: ...ryck p knappen MODE f r att bekr fta Calories displayen visar F2 lder Pulse displayen visar 25 Tryck p knapparna SPEED f r att fastst lla det korrekta v rdet 10 99 tryck p knappen MODE f r att bekr ft...

Page 73: ...tas i bruk f r f rsta g ngen L pbandet m ste inspekteras regelbundet f r sm rjning L pbandet har d rf r en p minnelsefunktion p 300 km TIME WINDOW TIDSF NSTRET visar OIL SM RJ och ett pipljud h rs var...

Page 74: ...J4 Regelbunden justering av bandsp rningen kan kr vas beroende p anv ndning och kraftf rdelning under tr ningen Olika anv ndare kan p verkar sp rningen olika Det r normalt att beh va justera bandsp rn...

Page 75: ...j f r redskap eller delar som har ndrats utan Tunturi New Fitness BV s godk nnande Garantin g ller ej f r fel som beror p normalt slitage felaktig anv ndning anv ndning i f rh llanden som inte r avset...

Page 76: ...imm isk ytt on rajoitettu 2 tuntiin p iv ss T m n laitteen k ytt lasten tai fyysisesti aistillisesti henkisesti tai liikunnallisesti rajoittuneiden tai kokemukseltaan ja tiedoiltaan puutteellisten hen...

Page 77: ...otesuojan koloihin Kuvan B 1 kuvaus Kuvassa on esitetty tuotteesi mukana tuleva v linepaketti V linepaketti sis lt pultit aluslaatat ruuvit mutterit jne sek tarvittavat ty kalut harjoittelulaitteen as...

Page 78: ...nopeutta jotta sykkeesi pysyy tavoitealueella Painon pudotus Ratkaisevaa on se miten rasittavaa harjoittelu on Mit enemm n ja mit pidemp n harjoittelet sit enemm n poltat kaloreita Vaikutus on sama ku...

Page 79: ...eralta tai se ei ole tasapainossa t m voidaan korjata tukijalkoja s t m ll K nn tukijalat sis n ulos tarpeen mukaan jotta saat laitteen tukevaan asentoon ja mahdollisimman hyvin vaakatasoon Lukitse tu...

Page 80: ...ellei laitetta pys ytet manuaalisesti Aloita harjoitus painamalla START painiketta Kehon rasvan mittaus Kehonrasvaohjelma on ohjelma jolla pyrit n m ritt m n fyysinen kuntosi kehosi parametrien ja syk...

Page 81: ...liajoin hihnan ja juoksualustan k ytt i n pident miseksi Voitelu kuva F 6 HUOMAUTUS Juoksumaton matto on voideltu ennen sen asentamista juoksumattoon laitteen tuotannon aikana Siksi mattoa ei tarvits...

Page 82: ...heet halutun tuloksen saavuttamiseksi HUOMAUTUS Muista ett pienell s d ll voi olla suuri ero joten tee s d t pienin v lein kerrallaan Katso YouTube ohjevideomme napsauttamalla https youtu be qx5AvTv00...

Page 83: ...ri New Fitness BV ll on valtuutettu maahantuoja Takuu ei koske sellaisia kuntolaitteita tai osia joita on muutettu ilman Tunturi New Fitness BV n suostumusta Takuu ei koske virheit jotka johtuvat luon...

Page 84: ...6 68 20 30 68 68 26 63 20 30 26 63 63 26 68 56 20 30 26 68 20 30 26 20 30 63 36 3 17 17 7 3 17 17 7 1 67 33 35 33 67 62 62 62 62 6 18 19 33 33 35 35 54 69 23 54 22 43 32 34 22 51 38 16 39 32 34 22 13...

Page 85: ...M5 10 5 22 Cross recessed large flat head bolt M4 10 8 23 Shrapnel 16 5 43 1 24 Pull ring latch 10 55 40 2 25 Three speed adjustable plastic parts 144 66 2 26 Cross recessed countersunk head tapping...

Page 86: ...or belt 6P PJ381 150J SC30 1 59 Motor cover 309 580 39 1 60 Rear cover 580 90 30 1 61 Side rail 82 33 1182 2 62 Conical foot pad conductive rubber 28 23 t11 M8 20 4 63 Square cushion 20 40 t10 8 6 64...

Page 87: ......

Page 88: ...20220421 W...

Reviews: