


3. Set Up Instructions
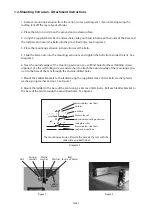
1. Remove the travel cover from the tent by unzipping around the 3 edges and
slide the remaining edge from the rope track. See
2. Release the hold down velcro straps on each side of the tent.
NB - When closing the tent, do not pull down on the side retaining velcro
straps. See caution below.
3. Slide out the ladder until the locking pins engage. The ladder can now be used
as a lever to open the tent. See
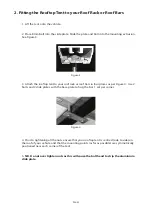
4. Rest the ladder on the ground, and enter the tent. Release the four bungee
cords from
in
side of the tent. Note: if the angle of the ladder is too upright you
will require a ladder extension.
If you are u
sing an
annex
, you will also require a
well extension for your
annex
.
(SOLD WITH LADDER EXTENSION)
5. Pull out the U-shaped aluminium bar and insert each end into the retaining
socket. See .
If you are using the TUFF STUFF Rooftop Tent Annex
you are now ready to attach the
annex
. If you are not attaching the
annex
use
the guy ropes and pegs provided to tension the veranda of the tent. See
6. Slide the rope section of the
annex
into the extrusion at the hinge area of the
tent base, attach the remaining three sides of the
annex
to the tent by fastening
the one piece zip. See . Square out the floor of the
annex
and peg into the
ground using the supplied pegs, using the strap adjustors to tension the
annex
.
See and . The
annex
may also be used without the floor attached.
7. Retrieve the spring steel rods (SSR), these are then positioned to tension the
outside window awnings and flysheet. Hook the shaped end of the SSR into the
eyelet of the flysheet/window awning. Insert the other end of the SSR into the
hole in the base of the rooftop tent, passing through the eyelet in the rooftop tent
skirt. This will require you to bend the SSR so that the angle of the SSR is equal to
the angle of the hole into which it should be inserted. NB reverse this procedure
to remove the SSR from the hole in the base of the rooftop tent. See
8. Should you wish to use the
annex
and require that the ladder be out of the
way, you may secure the ladder to the base of the tent using the velcro strap as
shown. See
9. Repeat all the above steps in the reverse order to pack away your rooftop tent.
10. Note:
- The
annex
is stored separately in its own bag. When packing away your tent,
depending on your bedding volume it may be neccessary to take your pillows out
of the tent.
- When using the
annex
, place the rubber mat under the ladder to protect the
annex
floor.
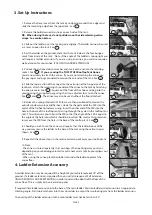
4. Ladder Extension Accessory
A Ladder Extension may be required
if
the height of your vehicle (
exceeds 78"
off the
ground. If a ladder extension is required then you will also require a Well Extension
(INCLUDED WITH LADDER EXTENTION)
in order to extend the depth of the floor of the
annex
floor. This is simply a zip on extension panel.
If required slide ladder extension into the base of the main ladder. Position ladder and extension to an appropriate
climbing angle. Drill two 8mm holes into the main ladder to accept the two locking pins from the ladder extension.
The overlap of the ladder extension to the main ladder must not be less than
9.5"
PAGE 4
1
2
1
2
3
4
7
8
6
5
3
4
5
7
6
8
4


