background image

8


 8


This automatic shut-off option can 
be enabled or disabled by pushing 


or 


to select [

] or [

], 

then pushing the 

key to enter 

your selection. When enabled, the 
automatic shut-off will power-
down the AXD 550 after 20 
minutes of keyboard inactivity. 


This diagnostic tool allows you to 
view important analog voltages 
within the instrument. Pushing 


or 


views the eight different 

channels, which include the 
following: 

—  O V dc. 
 —  4.965 to 5.025 V dc. 

 —  battery voltage (3.5 V 

fresh batteries) 


Factory use only. 


Selecting this item allows the user 
to enable (on) or disable (off) the 
serial port. 
• Press the 

↵ 

key. 

• Using the 


or the 


key, scroll 

to 

or 

• Press the 

↵ 

key. 

• Press the 

ON/OFF 

key to return 

to the 

RUN 

mode. 

Note

the serial port must be 


when interfacing to a computer. 
Keep the port 


when not in 

use to conserve batteries.


tc allows you to select from five 
different speeds of display 
response. 
• A setting of 1 is a quick response. 
• A setting of 5 is a slow response. 
• The meter is always shipped with 

tc=2. 

See the Time Constant Averaging 
section in Appendix B for the 
exact method the AXD 550 uses to 
display a series of measurements. 

Using the AXD 550 

Basic Functions 

To Change Units: 


Push the 

UNIT 

key until [

] appears. 


Use the 


and 


keys to view new measurement 

units. 


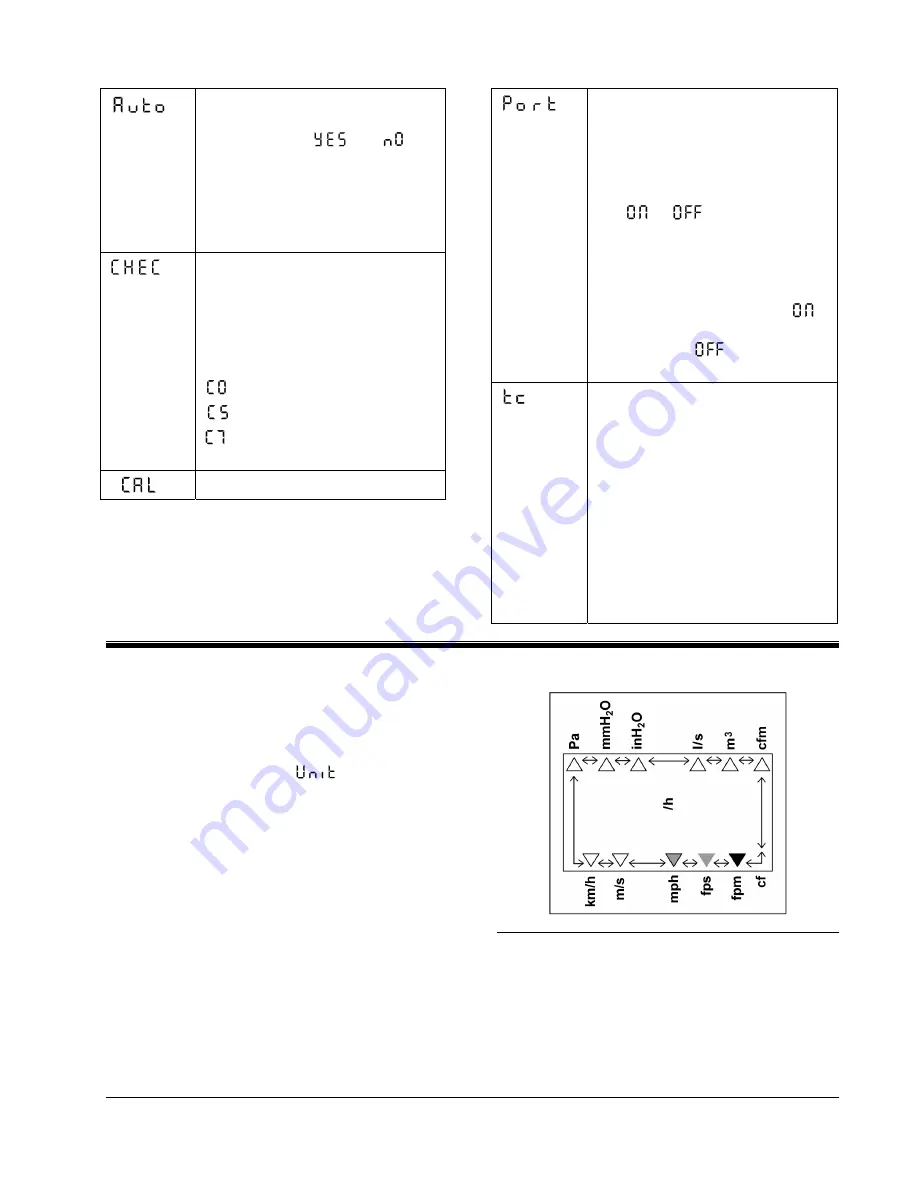
The display annunciator 

c

 will move to the 

selected unit (see Figure 3). 


Push 

↵ 

to select a new measurement unit.


Figure 3:  Display with annunciator and units of 

measure 

Summary of Contents for ALNOR MicroManometer AXD 550

Page 1: ...AXD 550 MicroManometer OWNER S MANUAL...

Page 2: ...IMPLIED WARRANTY OF FITNESS FOR PARTICULAR PURPOSE OR MERCHANTABILITY IS MADE TO THE EXTENT PERMITTED BY LAW THE EXCLUSIVE REMEDY OF THE USER OR BUYER AND THE LIMIT OF SELLER S LIABILITY FOR ANY AND A...

Page 3: ...items to select any of the following press 7 Using the AXD 550 8 Basic Functions 8 To Change Units 8 To Hold a Reading For storage or printing 9 Measurement Modes 9 Pressure Selection 9 Velocity Selec...

Page 4: ...ication Through Windows 95 16 Appendix D Pressure to Velocity Conversion Charts 16 Appendix E Correction Factors for Non Standard Conditions 17 Method 1 17 Method 2 17 Method 3 17 AXD 550 Density Corr...

Page 5: ...can hold 100 readings of pressure velocity or volume For convenience memory can be organized into sections called pages All data is saved by the instrument s own battery powered system Readings can al...

Page 6: ...unit off after a twenty minute period of keyboard inactivity To disable this feature follow the instructions in the menu selections section of this manual Attach hoses to the pressure ports at the top...

Page 7: ...ions the AXD 550 will read small pressure changes Clearing the Memory If this is the first time you are using the AXD 550 clear the memory before using the instrument Clearing the memory is done with...

Page 8: ...he RUN mode If the instrument is in any other mode pressing this key will exit that function and go back to the RUN mode without making any changes VOL The VOL key prepares the AXD 550 for air volume...

Page 9: ...es and menu items After each entry appears on the display as the AXD 550 stores new information Menu Selections Pressing the MENU key activates the main menu Use the and keys to scroll through the ava...

Page 10: ...he key scroll to or Press the key Press the ON OFF key to return to the RUN mode Note the serial port must be when interfacing to a computer Keep the port when not in use to conserve batteries tc allo...

Page 11: ...rsion charts Volume Selection or reviewing the latest area Air volume measurement is achieved by multiplying a velocity reading by an area When you press the VOL key the menu appears on the display an...

Page 12: ...ld the ON OFF key until appears then press the ON OFF key to return to the RUN mode To erase stored data Press the CLR key until appears Push the or key until appears Press to clear the memory Note Ke...

Page 13: ...computer Make sure the serial port on the meter is enabled Review the stored date There must be data stored for printing If any of these problems persist call TSI for assistance Maintenance Periodic m...

Page 14: ...s able to calculate averages automatically thus eliminating the need for additional calculations Refer to AVE on page 6 of this manual Traversing a Round Duct Using the log Tchebycheff method the duct...

Page 15: ...ing the log Tchebycheff method Number of points or traverse lines per side Position relative to inner wall 5 0 074 0 288 0 500 0 712 0 926 8 0 061 0 235 0 437 0 563 0 765 0 939 10 0 053 0 203 0 366 0...

Page 16: ...ll be used In any circumstance if the new value is more than 50 different than the old value 100 of the new value will be used This override percentage allows the meter to quickly attain a new value w...

Page 17: ...l type in GEE1 then press the ENTER key Notice keep typing the G until it reappears on the terminal screen then continue typing EE1 Second method At the terminal and after following the steps under To...

Page 18: ...eeds To Incoming Line Ends and Wrap Lines That Exceed Terminal Width click OK Click OK again to exit Properties Hyperterminal is now ready to receive information from the meter Save terminal configura...

Page 19: ...te pressure temperature and relative humidity record the differential pressure from the AXD 550 the absolute pressure the temperature and the relative humidity at the measurement location Compute the...

Page 20: ...1 29 1 32 1 35 250 1 15 1 18 1 20 1 22 1 25 1 27 1 29 1 31 1 34 1 36 1 40 300 1 20 1 22 1 24 1 27 1 29 1 31 1 34 1 36 1 39 1 41 1 44 350 1 24 1 27 1 29 1 31 1 34 1 36 1 39 1 40 1 43 1 46 1 49 400 1 27...

Page 21: ...cy approximates the resolution e g differential pressure of 01 inches H2O accuracy statement is 01 x 01 01 or 0101 inches H2O or reading error is 101 of reading As differential pressure increases the...

Page 22: ..._______________________________________________________________ Where Purchased _________________________________________________________________________ Describe Malfunction _________________________...

Page 23: ...urrounded by at least 2 inches 5 cm of suitable shock absorbing material Include a purchase order that clearly shows the instrument model number and serial number a contact name phone fax number and R...

Page 24: ...___________________________________________________________________________________ _______________________________________________________________________________________ ____________________________...

Page 25: ...gh 4 digit 7 segment LCD no backlight 15 inch high 2 1 2 digit memory indicator Data Memory One hundred memory locations are available to store units of measure and pressure velocity or volume reading...

Page 26: ...Cardigan Road Shoreview MN 55126 USA Toll Free 800 424 7427 Telephone 651 490 2811 September 2002 Fax 651 490 3824 Printed in USA www alnor com Part No 116 159 128 Rev 13 customerservice alnor com Co...

Reviews: