background image


19 


7.


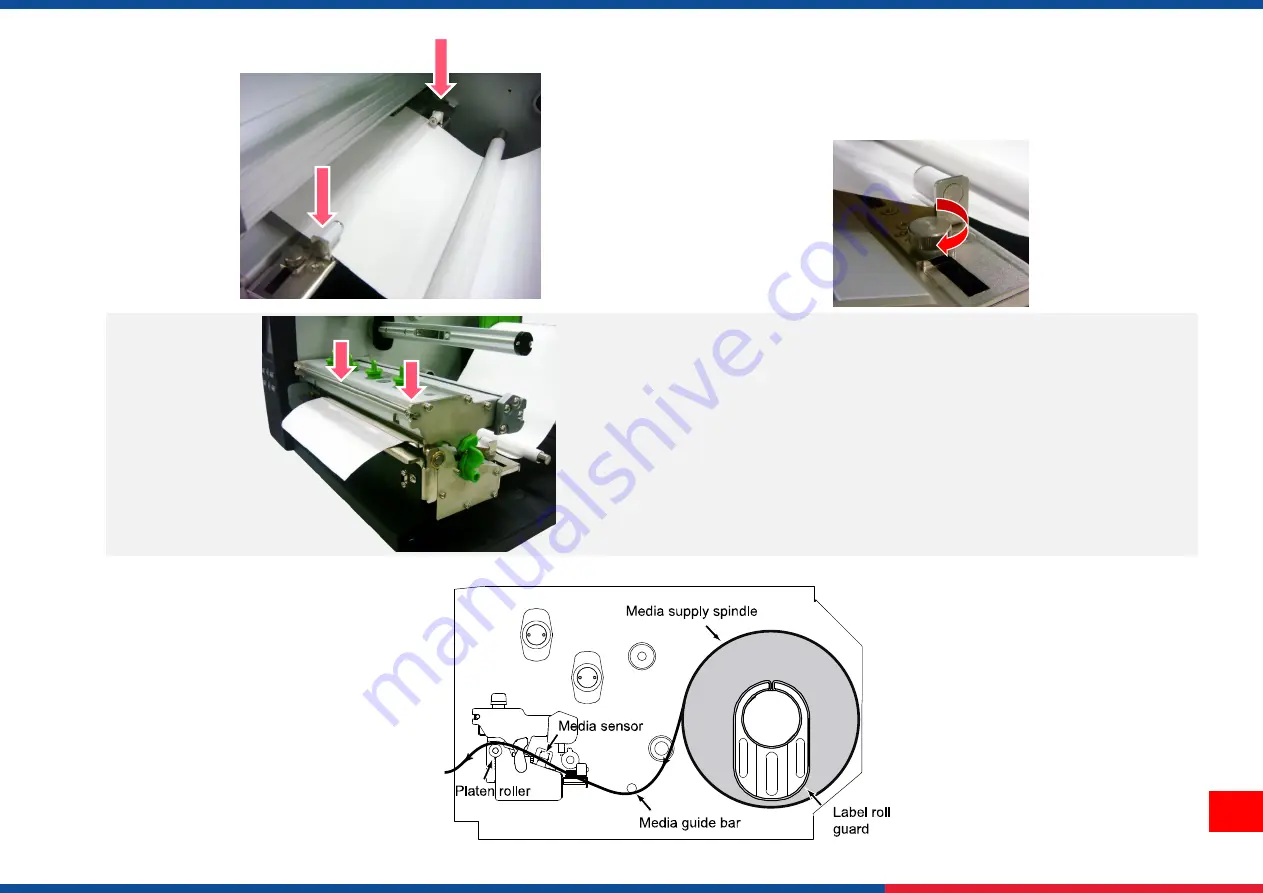
Loose the fixed screw to adjust the label guide to fit 

label width. Screw the fixed screw to lock the label 

guide. 


8.


Close the print head mechanism. Make sure the 

latches are engaged securely. 

9.


Using the front display panel, set media sensor type 

and calibrate the selected sensor. 


Loading path for media


Summary of Contents for Printronix TTP-286MT

Page 1: ...TTP 286MT Series Industrial Barcode Printers User Manual Series Lists TTP 286MT TTP 384MT Thermal Transfer Direct Thermal...

Page 2: ...rom the Monotype Corporation Windows is a registered trademark of Microsoft Corporation All other trademarks are the property of their respective owners Information in this document is subject to chan...

Page 3: ...1 4 Ribbon Specification 6 1 5 Media Specification 6 2 Operation Overview 7 2 1 Unpacking and Inspection 7 2 2 Printer Overview 8 2 2 1 Front View 8 2 2 2 Interior View 9 2 2 3 Rear View 10 2 3 Opera...

Page 4: ...t to Avoid Ribbon Wrinkles 22 5 TSC Console 25 5 1 Start TSC Console 25 5 2 Setup Ethernet Interface 27 5 3 Printer Function 29 6 LCD Menu Function 30 6 1 Enter the Menu 30 6 2 Menu Overview 31 6 3 TS...

Page 5: ...IV 6 9 Advanced 43 6 10 Service 44 7 TroubleShooting 45 8 Maintenance 48 9 Angency Complicance and Approvals 50 10 Revise History 53...

Page 6: ...and bar codes can be printed in any one of the four directions TTP 286MT Series are built in the high quality high performance MONOTYPE IMAGING True Type font engine and one CG Triumvirate Bold Conde...

Page 7: ...16 bits Color 480 x 272 pixels with back lights V V Control panel with 6 operation buttons V V LED indicators V V Real time clock V V Internal Ethernet print server 10 100 Mbps interface V V USB 2 0 c...

Page 8: ...raphics image printing 1D bar code Code128 subsets A B C Code128UCC EAN128 Interleave 2 of 5 Code 39 Code 93 EAN 13 EAN 8 Codabar POSTNET UPC A UPC E EAN and UPC 2 5 digits MSI PLESSEY China Post ITF1...

Page 9: ...x media thickness 0 12 0 25 mm Media type receipt tag and label liner w o glue V Heavy duty cutter module full cut guillotine cutter Max media width 215 9mm 8 5 Max media thickness 0 06 0 30 mm Media...

Page 10: ...0 non condensing Environmental concern Comply with RoHS WEEE 1 3 Print Specification Print Specifications 203 dpi models 300 dpi models Print head resolution dots per inch mm 203 dots inch 8 dots mm 3...

Page 11: ...s 300 dpi models Label roll capacity 208 3 mm 8 2 OD Media alignment Center bias Media type Continuous die cut black mark fan fold notch Media wound type Printing face outside wound Media width 101 6...

Page 12: ...ng the bar code printer Please retain the packaging materials in case you need to reship the printer Unpacking the printer the following items are included in the carton 1 Printer unit 1 Quick install...

Page 13: ...8 1 LED indicators 2 Touch screen 3 Operation buttons 4 Media viewer 5 Paper exit chute 6 Printer right side cover opener 2 2 Printer Overview 2 2 1 Front View 2 1 4 5 3 6...

Page 14: ...3 Print head pressure adjustment knobs 4 Print head release lever 5 Label roll guards 6 Label supply spindle 7 Media guide bar 8 Black mark sensor 9 Print head 10 Ribbon sensor 11 Gap sensor 12 Platen...

Page 15: ...ce 4 Ethernet interface 5 USB interface 6 microSD card slot 7 Centronics interface Option 8 Power switch 9 Power cord socket 10 GPIO interface Option Note The interface picture here is for reference o...

Page 16: ...11 2 3 Operator Control LEDs Printer model Icons Firmware version Keys Touch screen...

Page 17: ...ing data ERROR Off Printer is ready On Carriage open or cutter error Blinking No paper paper jam or no ribbon Keys Function PAUSE Pause Resume the printing process MENU 1 Enter the menu 2 Exit from a...

Page 18: ...13 2 3 2 Touch Screen Manipulation Tap an item to open use it Selected Item Red Return Next Page Scroll down Scroll up Up Page...

Page 19: ...the printer on flat surface 2 Make sure the printer is power off 3 Connect the printer to the computer with the provided USB cable 4 Plug in the power cord Note Please switch OFF the printer before pl...

Page 20: ...sure the ribbon paper core are set at the center of the spindle User can refer to the ruler on the spindles 3 Thread the ribbon through the ribbon sensor slot and then through the open space in betwe...

Page 21: ...16 6 Close the print head mechanism making sure the latches are engaged securely Ribbon Loading Path...

Page 22: ...dle to open the printer right side cover Push the print head release lever to open the print head mechanism 2 Remove one label roll guard from the label spindle 3 Make sure the width of the label You...

Page 23: ...e both close to the label width 5 Pull label roll leading edge forward through the media guide bar media sensor green and place the label leading edge onto the platen roller 6 The media sensor positio...

Page 24: ...to fit label width Screw the fixed screw to lock the label guide 8 Close the print head mechanism Make sure the latches are engaged securely 9 Using the front display panel set media sensor type and...

Page 25: ...to section 3 3 to load media 2 Lead the media through the cutter paper opening 3 Adjust the label guide to fit the width of the label 4 Close the print head mechanism making sure the latches are enga...

Page 26: ...edia If media thickness is larger than 0 19 mm the larger pressure is required to get good quality printout Ribbon wrinkle presented on the media There are 5 levels of pressure for adjustment Level 1...

Page 27: ...rint darkness setting etc In case the ribbon wrinkle happens please follow the instructions below to adjust the printer parts Adjustable Printer Parts There are 5 levels of print head pressure adjustm...

Page 28: ...t head pressure adjustment knobs setting 1 level per each adjustment then print the label again to check if wrinkle is gone If the left side print head adjustment knobs level has been set to index 1 t...

Page 29: ...d pressure adjustment knobs setting 1 level per each adjustment then print the label again to check if wrinkle is gone If the right side print head adjustment knobs setting has been set to index 1 the...

Page 30: ...phics deploy fonts graphics label templates or upgrade the firmware to the group of printers and send additional commands to printers at the same time Printer firmware version before A2 12 will only u...

Page 31: ...3 Select the current interface of the printer 4 The printer will be added to TSC Console s interface 5 Select the printer and set the settings For more information please refer to TSC Console User Man...

Page 32: ...27 5 2 Setup Ethernet Interface Use USB or COM to establish the interface on TSC Console Double click to enter the Printer Configuration Page Click Ethernet tab Check the IP Address...

Page 33: ...Add Printer on the top left of the window Choose Network Key in the IP Address Click Discover to establish the Ehternet interface The notification will pop up Click OK to close the window The Etherner...

Page 34: ...ctory Default Initialize the printer to default settings Reset Printer Reboot printer Print Test Page Print test page according to the specified label size and sensor type Configuration Page Print pri...

Page 35: ...30 6 LCD Menu Function 6 1 Enter the Menu By touch display Tap the Menu icon on LCD to enter the main menu By Keys Press the MENU button and press the SELECT button to enter the main menu...

Page 36: ...ettings to defaults and checking information for printer File Manager To check and manage printer s memory storage Advanced To set LCD initialization cutter type etc Sensor To calibrate the selected m...

Page 37: ...category can set up the printer settings for TSPL Setting TSPL Speed Density Direction Print mode None Batch Mode Peeler Mode Cutter Mode Cutter Batch Offset Shift X Shift Y Reference X Reference Y C...

Page 38: ...de Batch Mode Once finishing the printing process label will be fed to the tear plate location Peeler Mode Enable the label peel off mode Cutter Mode Enable the label cutter mode Cutter Batch Cut the...

Page 39: ...r Off Peeler Off Cutter Print Width List Fonts List Images List Formats List Setup Control Prefix Format Prefix Delimiter Char Media Power Up Feed Calibration Length No Motion Head Close Feed Calibrat...

Page 40: ...r Off Enable the label peel off mode Cutter Enable the label cutter mode Tear Off Print Width Set the print width Available setting range 2 999 dots 812 List Fonts Print the current fonts list from th...

Page 41: ...nter determine length and feed label No Motion Printer will not move media No Motion Label Top Adjust print position vertically on the label Value range 120 to 120 dots 0 Left Position Adjust print po...

Page 42: ...not work please use Manual function to set the paper length and gap bline size to complete the calibration setting N A Threshold Detect Set sensor sensitivity in fixed or auto Auto Maximum Length Set...

Page 43: ...38 6 6 Interface Interface can set the printer interface settings Menu Interface Serial Ethernet Bluetooth...

Page 44: ...Rate Set the RS 232 baud rate 9600 Parity Set the RS 232 parity None Data Bits Set the RS 232 Data Bits 8 Stop Bit s Set RS 232 Stop Bits 1 Menu Interface Serial Baud Rate 1200 bps 2400 bps 4800 bps 9...

Page 45: ...reset the Ethernet module Item Description Default Status Check the Ethernet IP address and MAC setting status N A Config DHCP On or OFF the DHCP Dynamic Host Configuration Protocol network protocol S...

Page 46: ...7 File Manager File Manager is used to check the printer available memory show the files list delete the files or run the files that saved in the printer DRAM Flash Card memory Menu File Manager DRAM...

Page 47: ...mp mode all characters will be printed in 2 columns The left side characters are received from your system and right side data are the corresponding hexadecimal value of the characters It allows users...

Page 48: ...is item is used to setup the brightness for display Touchscreen Calibration This item is used to calibrate the center of the cross for best result for touchscreen Date Time This item is used to setup...

Page 49: ...ion Printer Information Contact us Item Description Initialization This feature is used to restore printer settings to defaults Printer Information This feature is used to check printer serial number...

Page 50: ...there is a command PRINT at the end of the file and there must have CRLF at the end of each command line No print on the label Label or ribbon is loaded not correctly Use wrong type paper or ribbon F...

Page 51: ...t pattern if there is dot missing in the pattern Change proper ribbon or proper label media Adjust the printhead pressure adjustment knob The release lever does not latch the printhead properly Missin...

Page 52: ...label is incorrect Media sensor sensitivity is not set properly Label size is incorrect The parameter Shift Y in the LCD menu is incorrect The vertical offset setting in the driver is incorrect Calib...

Page 53: ...ctrostatic damage Do not wear rings or other metallic objects while cleaning any interior area of the printer Use only the cleaning agents recommended in this document Use of other agents may damage t...

Page 54: ...rinter II Rotate the platen roller and wipe it thoroughly with the lint free 99 Isopropyl Alcohol Clean the platen roller when changing a new label roll Peel Bar Use the lint free cloth with 99 Isopro...

Page 55: ...armful interference when the equipment is operated in a commercial environment This equipment generates uses and can radiate radio frequency energy and if not installed and used in accordance with the...

Page 56: ...eren Stand zu achten Ein Kippen oder Fallen k nnte Besch digungen hervorrufen 7 Beachten Sie beim Anschlu ans Stromnetz die Anschlu werte 8 Dieses Ger t kann bis zu einer Au entemperatur von maximal 4...

Page 57: ...RD INCLUDES REAL TIME CLOCK FEATURE HAS LITHIUM BATTERY CR2032 INSTALLED RISK OF EXPLOSION IF BATTERY IS REPLACED BY AN INCORRECT TYPE 3 DISPOSE OF USED BATTERIES ACCORDING TO THE MANUFACTURER INSTRUC...

Page 58: ...53 10 Revise History Date Content Editor...

Page 59: ......

Reviews: