background image


www.ts-market.com


Operating the Recorder 

 
Battery Charging 
(for models with rechargeable batteries) 

Before using the Recorder, make sure the rechargeable battery is fully charged. If there is a necessity, 
charge the internal  battery of the Recorder. To  do this use  interface cable  from the delivery set to 
connect the device to the PC or power supply with regular USB output.  

Charging process is accompanied by smooth lightening and attenuation of LED with an interval of 1 to 
4 seconds, depending on the current battery charge level. The shorter the interval, the fuller battery 
charge level is. With battery fully charged, this interval decreases to zero. Full charging takes about 3-
5 hours. 
When charging is completed, disconnect the cable from the computer or charger. 
 

Attention! 

Even if you don't use a voice  recorder, you need to recharge the battery at least once a 

month. Otherwise, the battery may fail, which is not a warranty case.


Recording 

To start recording, turn the recording switch to the "ON" ("REC") position. The LED flashes 5 times, and 
recording starts. 

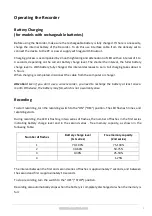
During recording, the LED is flashing in two series of flashes, the number of flashes in the first series 
indicating  battery  charge  level  and  in  the  second  series  -  free  memory  capacity,  as  shown  in  the 
following Table: 

Number of flashes 

Battery charge level 

(1st series) 

Free memory capacity 

(2nd series) 

70-100% 

75-100% 

30-60% 

50-75% 

0-30% 

25-50% 


1-25% 


The interval between the first and second series of flashes is approximately 7 seconds, and between 
the second and first is approximately 14 seconds. 

To stop recording, turn the switch to the "OFF" ("STOP") position.  

Recording also automatically stops when the battery is completely discharged or when the memory is 
full. 

Summary of Contents for EDIC-Mini Tiny

Page 1: ...ording duration depending on the model 2 Recording duration in different modes 2 Operating the recorder 3 Battery Charging 3 Recording 3 Operating the Records 4 Circular Recoding 4 Timer Recording 4 V...

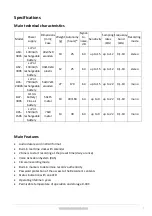
Page 2: ...x37x11 wooden 27 170 64 up to 15 up to 22 0 1 10 mono B47 300h G13 A battery Zinc air battery 50x15 metal 19 40 160 64 up to 9 up to 22 0 1 10 mono A45 150h Li Pol 150mA h rechargeable battery 79x9 me...

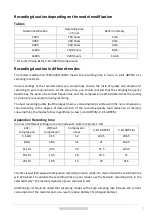
Page 3: ...ecording quality but the largest memory consumption is achieved in the non compression then according to the degree of deterioration of the recording quality and reduction of memory consumption the mo...

Page 4: ...charger Attention Even if you don t use a voice recorder you need to recharge the battery at least once a month Otherwise the battery may fail which is not a warranty case Recording To start recording...

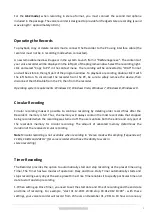
Page 5: ...ecoding Circular recording makes it possible to continue recording by deleting older record files after the Recorder s memory is full Thus the memory will always contain the most recent data that stop...

Page 6: ...ides with the time set for the timer Voice Activation System VAS Voice Activation System VAS properly configured can significantly up to 100 times reduce both memory consumption and energy consumption...

Page 7: ...press the button in the RecManager apply settings to the recorder after changing the parameters after disconnecting the recorder from the PC turn on the recorder for recording and place it in the plac...

Page 8: ...to PC First connect the USB cable to the recorder then to the USB port of the computer A removable media will appear in the system Open it and run the file RecManager exe After launching the program...

Page 9: ...geFiles folder edit the RecManager_rus lng or RecManager_eng lng files as follows in the first line of the file change the code page number to the code page number of your language translate titles an...

Page 10: ...rly neat you do not lose your warranty In case of major breakdowns chemical exposure or mechanical damage to the Recorder the manufacturer will not be able to continue the warranty service of this dev...

Reviews: