INTRODUCTION.
Read carefully this Manual before operating or servicing this
air compressor. Get familiar with the right procedures for its
safe operation and maintenance. Failure to observe the
instructions in this Manual may result in personal injury as
well as material damages and/or making the Warranty void.
Following the instructions in this Manual will deliver to the
compressor a longer and safer working life.
TECHNICAL CHARACTERISTICS:
Voltage:
120 V~
Frequency:
60 Hz
Motor Rated Power:
1 Hp
Maximum Motor Power:
2 Hp
Maximum Pressure:
116 PSI
Tank Capacity:
2.6 Gal
IP Grade:
IP20
Air Flow:
3 CFM - 40 PSI
2 CFM - 90 PSI
Power Cord Grips Type:
Y
All conductors are:
16 AWG x 3 with 221 ºF insulating
temperature
Build quality:
Basic insulation.
Insulation quality:
Class I
Thermal insulation of motor winding:
Class B
To avoid risk of electrical shock or serious
accident, if power cord gets damaged it should be repaired by
the manufacturer or by Truper
®
Authorized Service Center
Power cord grips used in this product: Type”Y”.
Assembly design in this product causes insulation to be affected
by liquid spills or splashing.
Before gaining access to terminals,
all power circuits should be disconnected.
We do not recommend using power
cord extensions with compressors. Using that type of
extension cause power drops resulting in motor
potency loss and overheating. Instead of using an extension
cord increase the compressor’s action scope connecting a
longer hose into the outlet. Connect additional hose lengths
as needed.
SPECIFIC SAFETY GUIDELINES.
THERE IS IMMINENT HAZARD OF SEVERE
INJURY OR DEATH. TO REDUCE RISK OF FIRE OR
EXPLOSION NEVER SPRAY FLAMMABLE LIQUIDS IN
ENCLOSED AREAS.
1. It is normal for the pressurestat to produce sparks while
operating. Should sparks come into contact with gasoline
fumes or other solvents they could be ignited causing fire
or explosion. Always operate the compressor in a
well-ventilated area. Do not smoke while spraying. Do
not spray where open fire is present. Keep the compressor
as far away as possible from the spraying area.
2. Solvents like Trichloroethane and Methylene Chloride may
present a chemical reaction with aluminum used in a
paint-spraying gun, paint pumps, etc., and may cause
explosion. Should you be using these types of solvents
use only stainless steel spraying equipment: it will not
affect the air compressor but could affect the equipment
being used.
3. Never inhale compressed air produced by the compressor.
It is not suitable as breathing air.
POTENTIAL HAZARD OF SEVERE
INJURY OR DEATH.
1. Do not carry out welding jobs in the compressor air tank.
An extremely dangerous condition may be created. If
carrying out any welding job on the tank the warranty will
be void.
2. Never use an electric air compressor outdoors when is
raining or in wet surfaces. Hazard of electrocution!
3. This unit starts automatically. Always turn off the
compressor. Remove the plug from the power outlet and
purge all pressure remaining in the system before servicing
or when the compressor is idle.
4. Double-check both the maximum pressure specified by
the manufacturer and the pneumatic accessories. The
compressor exit pressure should be regulated to never
exceed the maximum specified pressure.
5. Under the unit’s cover there is high temperature as well
as moving parts. To prevent from burns or other hazards
do not operate if the cover is not in place. Allow the
compressor to cool down before handling and servicing.
6. Double-check you read the labels on paints or toxic
materials you will spray. Follow all safety rules. Use a
breathing mask if there is possibility of inhaling the sprayed
material. Read the instructions and make sure it gives the
adequate protection.
7. When using the air compressor always wear safety glasses
or goggles. Never aim the spraying nozzle towards other
people or any part of the body.
8. By no means adjust the pressurestat or relief valve. It will
make the warranty void. Those devices are factory
pre-adjusted to the maximum pressure for this unit.
POTENTIAL DANGER OF MODERATE
INJURY OR DAMAGE TO THE UNIT.
1. Drain periodically the humidity from the tank. A clean and
dry tank will prevent corrosion.
2. Pull daily the pressure relief valve rung to assure the valve
is working correctly. It also removes any obstruction from
the valve.
3. Provide adequate surrounding ventilation space to cool
down the compressor. It should sit approximately at 12”
from the nearest wall and in a well-ventilated are.
4. Securely fasten the compressor and release the tank
pressure before transporting.
5. Protect both air hose and power cable against damage or
punctures. Inspect weekly to detect weak or worn points.
Replace if necessary.
APLICATION
Compressors are widely used with different tools as well as
pneumatic tools in communications, machinery manufacturing,
medical and health applications, garment manufacturing,
spinning and weaving, wheels manufacturing, gas filling and
paint.
OPERATION, LUBRICATION AND MAINTENANCE
1. Please read carefully all technical documents after opening
the packaging box (including the operation instructions).
Double-check all parts are present and verify the
compressor is not damaged.
DANGER
WARNING
WARNING
CAUTION
2
DANGER
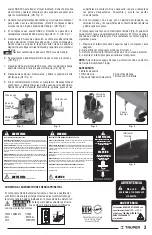
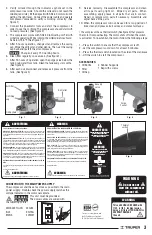
2. Verify oil level through the indicator spyhole set in the
compressor rear side. Should the oil level do not reach the
middle (red circle), fill the deposit with SAE-30 motor oil until
getting the right level. Connect the power cable and operate
compressor unloaded to verify is working correctly. (See
figure 1)
3. Connect the pneumatic tools and start the compressor in
order to use them. (Note: The compressor should start with
no load pressure). (See figure 2)
4. The compressor works with SAE-30 lubricating oil. Fill with
oil before operating. While running the oil temperature should
be below 158 ºF. (See figure 1)
5. After 5 hours operation, change oil and remove the casing
cap. Wipe the dirty oil and other debris. Then, set the casing
cap back and restart the air compressor.
Change oil every 150 working hours.
6. Clean filter regularly once a week. (See figure 1).
7. After 16 hours of operation open the purge valve below the
tank, drain water from tank. Clean the tank every six months.
(See figure 4).
8. After each use disconnect and release air pressure from the
tank. (See figure 3)
9. Service normally. Disassemble the compressor and clean
all its parts using light oil. Wipe dry all parts. When
assembling, apply grease in all parts that are in contact.
Repair or replace worn parts if necessary. Assemble and
adjust back all the parts.
10. When the compressor will not be used for a long period of
time clean and grease all air valves and contact surfaces.
• The compressor has a thermal switch (See figure 5) that prevents
the motor from overheating. The motor shuts off when the switch
is activated. To re-establish the motor follow the following steps:
1.- Press the switch to ensure that the compressor is off.
2.- Let the compressor cool down for at least 5 minutes.
3.- Press the thermal switch located on the side of the crankcase.
4.- Lift the switch to start the compressor.
ACCESSORIES:
1 Oil Bottle
1 Filter
1 Oil Cap
DANGER
Summary of Contents for COMP-10L
Page 6: ...NOTAS...
Page 14: ...NOTES...


