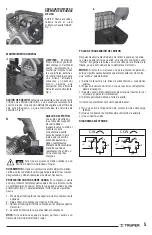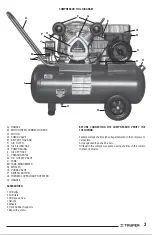
PRESSURE SWITCH BUTTON:
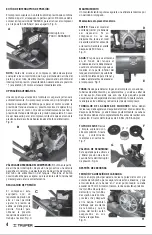
The compressor is built with a pressure switch combining stop
button / start function. Find it in the upper side. The button shall
be set in the “UP” position to start the compressor and in the
“DOWN” to turn-off. (See figure A)
NOTE:
Before starting the compressor any compressed air
remaining above the piston and in the feeding pipe shall be
discharged. Press the pressure switch button and lift it again
into the “I” (ON) position. The motor will start immediately.
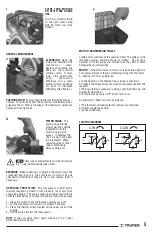
AUTOMATIC OPERATION
Once the compressor is running it will automatically stop and
start. Your compressor is built with a factory preset pressure
switch. It stops the motor when the tank pressure reaches its
maximum operation pressure and starts the motor automatically
when the tank pressure lowers to the preset pressure. In the
event that before reaching the regular pressure-cut you need to
stop the compressor, press the switch button. (See figure B).
COMPRESSOR RELIEF VALVE: The button in the upper side of
the black pressure switch activates a small check valve. It relieves
air from above the piston and the tank-feeding pipe. Press the
button now and then to assure the valve is functioning and
relieving air correctly.
PRESSURE REGULATION
The compressor is built
with an air pressure
regulator to adjust
outlet pressure. Turn
the front knob to get the
pressure required for
the job. (See figure C).
MAINTENANCE
Maintenance made in a regular basis will assure maximum
efficiency for a long period of time.
Preventive daily maintenance
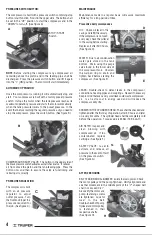
OIL: Check oil level in the
casing and refill if necessary.
If the compressor is not used
every day, check the oil level
in the casing before starting.
Replace oil after 500 hours.
(See figure D).
WATER: Due to air condensation
water gets stored in the tank
bottom. Drain using the purge
valve found in the lower side of
the compressor tank. Unscrew
the warped ring to drain and
tighten back before starting the
compressor. (See figure E).
LEAKS: Double-check to detect leaks in the compressor,
connections, feeding pipes and couplings. Reseal if necessary.
Keep in mind that even a very small leak could waste compressed
air. Is an extra cost in energy used and will reduce the
compressor duty life.
SCREWS IN THE CYLINDERS HEAD: These shall be checked and
tightened after the first day of operation, after 50 hours and later
on, every 4 months. The cylinder head shall be completely cold
before this operation. Torque value is 23Nm (16,96 Lb-ft).
AIR FILTER: Inspect, and
clean blowing with
compressed air. If too
contaminated replace
cartridge. (See figure F).
SAFETY VALVE: Is set to
activate and release air
pressure in the event of fault
on the pressure switch.
(See Figure G)
AFTER 200 HOURS
BELT TENSION AND ALIGNMENT: Isolate the main power. Check
the motor pulley and the pump flywheel. Verify alignment and
see that movement in the middle point of the “V” shaped belt
shall not exceed 0.47”.
Also verify the motor and
pump fastening screws
are tightened. Look for
wear in the belt.
Double-check both pump
flywheel and motor pulley
is fastened in their
respective shafts.
(See figure H).
D
E
B
F
G
C
4
H
A
STOP / START
Switch


