background image

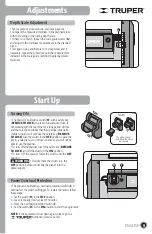
• The planer is built with a switch (

H

) with a safety key 

(

REMOVE TO LOCK

) to prevent unauthorized use. If 

not working with the machine for a long period of time 

and there is the possibility that third parties, especially 

children could use it, remove the safety key (

REMOVE 

TO LOCK

) with the switch in the 

OFF

 position. Leave the 

key in a safe place. Do not lose it because you will not be 

able to use the planner.

• To turn ON the planner, insert the safety key (

REMOVE 

TO LOCK

) and lift the switch in the 

ON

 position. 

• To turn OFF the planner, lower the switch onto the 

OFF


position.

                            • Double check the switch is in the 

OFF

 position before connecting the planer into the 

power supply.

Turning ON

• The planer is built with an overload protection switch (

I

). If 

overloaded, the switch will trigger. To restart the motor, follow 

these steps:

1.- Set the switch (

H

) in the 

OFF

 position.

2.- Leave it cooling down at least 5 minutes.

3.- Press the overload protection switch (

I

).

4.- Set the switch (

H

) in the 

ON

 position to start the equipment.

NOTE:

 If the equipment shuts down again, please go to a

                               Authorized Service Center.

Power Overload Protection

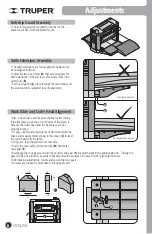
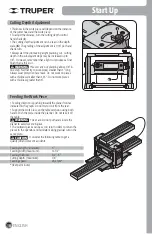
• Feed a piece of scrap wood to plan (see page 10).

• Compare the measured thickness in the planned piece 

with the reading in the cutting depth scale.

• If there is no match, loosen the scale guide screws (

G

and adjust to the thickness measurement in the planned 

piece.

• Test again using another piece of scrap wood and, if 

necessary, repeat the procedure until the measurement 

indicated in the scale guide matches the planned piece 

thickness.

Depth Scale Adjustment

9

Adjustments

Start Up

G

H

I

Switch

The planer cannot

run without the safety

key in place

WARNING

ENGLISH

Summary of Contents for 16240

Page 1: ...Instructivo de Cepillo port til CEP 12 Modelo C digo CEP 12 Este Instructivo es para 16240 Potencia 1 600 W Lea este Instructivo por completo antes de usar la herramienta ATENCI N ESPA OL ENGLISH...

Page 2: ...vicio Autorizados P liza de Garant a 3 3 4 5 6 7 8 9 11 12 13 15 16 CEP 12 Guarde este Instructivo para futuras referencias Los gr ficos de este Instructivo son para referencia pueden variar del aspec...

Page 3: ...todos los circuitos de alimentaci n deben ser desconectados ADVERTENCIA ADVERTENCIA de 0 A hasta 10 A de 10 A hasta 13 A de 13 A hasta 15 A de 15 A hasta 20 A 18 AWG 16 AWG 14 AWG 8 AWG 16 AWG 14 AWG...

Page 4: ...peradas Vista adecuadamente No vista ropa suelta o joyas Mantenga su pelo su ropa y guantes alejados de las piezas en movimiento La ropa o el pelo sueltos o las joyas pueden quedar atrapados en las pi...

Page 5: ...tas Cuando sea necesario cambie las dos cuchillas al mismo tiempo De lo contrario el desequilibrio resultante causar vibraciones y acortar a la vida til de las cuchillas y de la herramienta Maneje las...

Page 6: ...illas de doble filo de 317 mm x 25 4 mm x 3 1 mm 12 1 2 x 1 x 1 8 Extensi n de la mesa Cabezal de corte Porta carbones Interruptor Interruptor de protecci n de sobrecarga Llave Allen Llave para montaj...

Page 7: ...Retire la cuchilla y dele la vuelta para que el filo que hac a contacto con el resorte quede hacia afuera del cabezal de corte Si ambos filos de la cuchilla est n da ados instale una cuchilla nueva Pa...

Page 8: ...u espesor despu s del corte Si el espesor no es igual en ambos lados de la pieza el cabezal de corte y la mesa de trabajo no est n debidamente alineadas Para alinearlas utilice dos piezas id nticas de...

Page 9: ...stablecer el motor siga los siguientes pasos 1 Coloque el interruptor H en posici n apagado OFF 2 Deje enfriar el equipo al menos 5 minutos 3 Oprima el interruptor para protecci n contra sobrecargas I...

Page 10: ...cidad de alimentaci n 8 m min 26 2 fpm pies x minuto Puesta en marcha 10 El espesor de la pieza a trabajar depende de la distancia entre el cabezal de corte y la mesa de trabajo Para ajustar esta dist...

Page 11: ...o de la misma Esto aplica a la reducci n de velocidad y ajuste de altura de las cadenas as como a los tornillos de elevaci n Los rodamientos del cabezal de corte son lubricados y sellados en f brica E...

Page 12: ...o restablece Extensi n el ctrica muy larga o de calibre muy bajo Cuchillas sin filo Funcionamiento a baja tensi n Seque la madera Afile las cuchillas Revise la profundidad correcta de corte Alimente l...

Page 13: ...13 Notas ESPA OL...

Page 14: ...Notas 14 ESPA OL...

Page 15: ...ERRETER AS AV PASEO DE LA REP BLICA 3140 A COL EX HACIENDA DE LA HUERTA C P 58050 MORELIA MICH TEL 01 443 334 6858 FIX FERRETER AS CAPIT N ANZURES 95 ESQ JOS PERDIZ COL CENTRO C P 62740 CUAUTLA MOR TE...

Page 16: ...por personal no autorizado por Para hacer v lida la garant a o adquirir piezas y componentes deber presentar el producto y su comprobante de compra en Av San Isidro 110 Col Industrial San Antonio Alc...

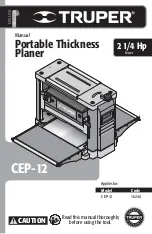
Page 17: ...Manual Portable Thickness Planer CEP 12 Model Code CEP 12 Applies for 16240 Power 2 1 4 Hp ENGLISH ESPA OL CAUTION Read this manual thoroughly before using the tool...

Page 18: ...y Policy 3 3 4 5 6 7 8 9 11 12 13 15 16 CEP 12 ENGLISH Contents CAUTION Keep this manual for future references The illustrations in this manual are for reference only They might be different from the...

Page 19: ...e grounded while in use to prevent an electric shock Connect the plug into a properly grounded outlet as shown in example A Not all the outlets are properly grounded If in doubt verify with a certifie...

Page 20: ...ed situations Dress properly Do not wear loose clothing or jewelry Keep hair clothes and gloves away from the moving parts Loose clothes or long hair may get caught in moving parts If you have dust ex...

Page 21: ...ve a stuck piece turn OFF and disconnect the tool Use a stick to remove the shavings When necessary replace both blades at the same time Otherwise the resulting unbalance will cause vibrations and wil...

Page 22: ...Depth Scale Table Extension Double Edged Blades 12 1 2 x 1 x 1 8 Table extension Cutter Head Carbon Brush Housing Switch Overload Protection Switch Allen Key Blade Mounting Wrench Transportation Grips...

Page 23: ...Remove the blade and turn it around so the sharp edge that was making contact with the spring faces outwards from the cutter head If both sharp edges are damaged install a new blade To mount back the...

Page 24: ...after cutting If the thickness is not even in both sides of the piece is because the cutter head and the work piece are not properly aligned To align use two identical pieces of hard wood with the sh...

Page 25: ...h I If overloaded the switch will trigger To restart the motor follow these steps 1 Set the switch H in the OFF position 2 Leave it cooling down at least 5 minutes 3 Press the overload protection swit...

Page 26: ...speed 26 2 fpm feet per minute Start Up 10 Thickness in the work piece will depend on the distance of the cutter head and the work piece To adjust the distance turn the cutting depth control hand sha...

Page 27: ...ture replacement This applies to speed reduction and chain height adjustment as well as elevation screws The cutter head bearings are factory lubricated and sealed There is no need of further attentio...

Page 28: ...tch restarting The power extension is too long or the gauge is low Dull blades Working with low voltage Dry the wood Sharpen the blades Check the right cutting depth Feed the wood piece in the fibers...

Page 29: ...13 Notes ENGLISH...

Page 30: ...Notes 14 ENGLISH...

Page 31: ...90 FIX FERRETER AS AV PASEO DE LA REP BLICA 3140 A COL EX HACIENDA DE LA HUERTA C P 58050 MORELIA MICH TEL 01 443 334 6858 FIX FERRETER AS CAPIT N ANZURES 95 ESQ JOS PERDIZ COL CENTRO C P 62740 CUAUTL...

Page 32: ...t authorized by In order to make the warranty valid or to purchase components and spare parts you must present the product and its proof of purchase at Av San Isidro 110 Col Industrial San Antonio ALC...

Reviews: