background image

H

H

1

8

Start Up

ENGLISH


        • Read, understand and apply the safety 

warnings on page 5.

• Make sure the container is empty before operating the 

vacuum cleaner as a blower.

• Remove the hose from the vacuum port and connect it to 

the blower port.

• Hold the end of the hose firmly.

• Turn on the vacuum cleaner.

Blowing

WARNING

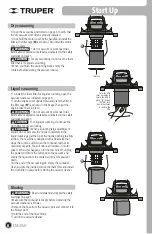
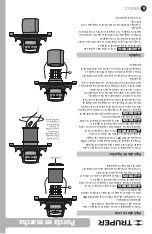
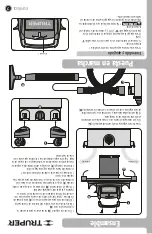
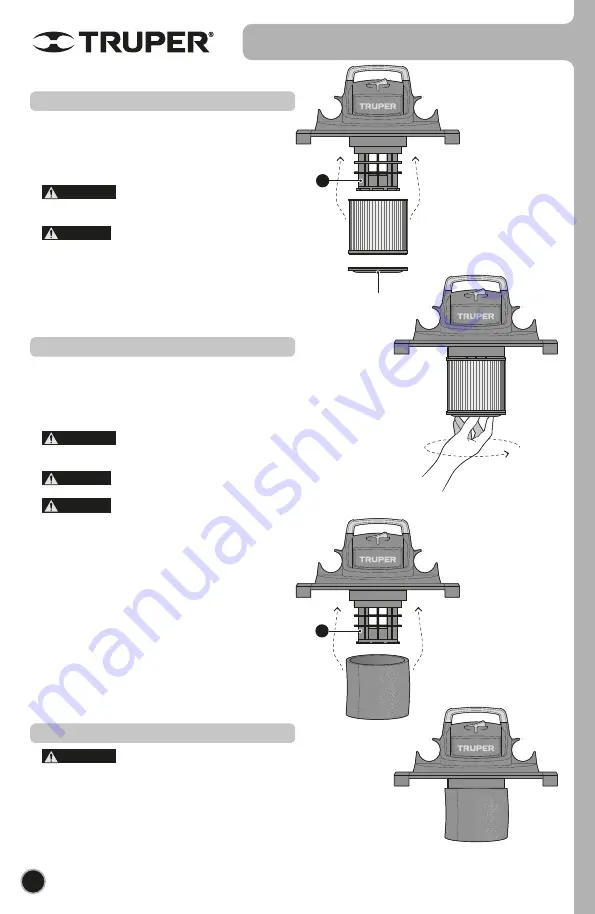
• To install the foam filter for liquid vacuuming, open the 

vacuum cleaner as indicated on page 6.

• Turn the engine cover upside down and place the filter in 

the filter cage (

H

1

) as shown in the image.Then put the 

engine cover back in place.


         • Do not vacuum or work near toxic, 

flammable or explosive materials as indicated in the safety 

warnings on page 5.

                           • For liquid vacuuming, do not use the 

cloth filter for dry vacuuming.

                           • When vacuuming large quantities of 

liquids, do not immerse the nozzle completely in the 

liquid; leave a gap at the tip of the nozzle opening to allow 

air flow. The machine is designed with a float valve that 

stops the suction action when the container reaches its 

maximum capacity. You will notice an increase in motor 

speed.  When this happens, turn the machine off, unplug 

the power cord from the outlet, open the vacuum and 

empty the liquid from the container into a receptacle or 

drain.

• At the end of the vacuuming job empty the container, 

clean and dry the inside. Remove the foam filter and install 

the cloth filter in place before storing the vacuum cleaner.

Liquid vacuuming

CAUTION

CAUTION

WARNING

• Open the vacuum as instructed on page 6 to verify that 

the dry vacuum cloth filter is properly installed.

• If not, hold the motor cover by the handle and install the 

filter in the filter cage (

H

) as shown. Then install the motor 

cover in place.


         • Do not vacuum or work near toxic, 

flammable or explosive materials as indicated in the safety 

warnings on page 5.

                          • For dry vacuuming do not use the foam 

filter that is for liquid vacuuming.

• When you finish the vacuuming work, empty the 

container before storing the vacuum cleaner.

Dry vacuuming

WARNING

CAUTION

Filter cap

Turn the filter 

cover clockwise to 

secure the filter in 

place.  To remove 

the filter, turn 

counterclockwise 

to remove the 

filter

Summary of Contents for 101509

Page 1: ...ASP 12 Model Code ASP 12 Applies for 101509 Capacity 12 gal Manual Vacuum CAUTION Read this manual thoroughly before using the tool ENGLISH ESPA OL...

Page 2: ...best performance of the tool prolong the duty life make the Warranty valid if necessary and to avoid hazards of fatal injuries please read and understand this Manual before using the tool ENGLISH Tech...

Page 3: ...ne resulting in power loss and overheating The following table shows the right size to use depending on cable s length and the ampere capability shown in the tool s nameplate When in doubt use the nex...

Page 4: ...er tools with the switch in the ON position may cause accidents Remove any wrench or vice before turning the power tool on Wrenches or vices left attached to rotating parts of the tool may result in p...

Page 5: ...arts away from openings and moving parts Do not use or store near hazardous materials Do not leave the vacuum cleaner running unattended Do not leave the vacuum cleaner unattended when it is plugged i...

Page 6: ...owing port Switch Handle Mount for accessories Vacuum port Vacuum port Opening latches Power Cord 6 Filter cartridge for dry Foam filter for liquids Crevice nozzle Car nozzle Extension wands Claw type...

Page 7: ...he container lid make sure that both mamelons are inserted into the lid boxes Attach the handle using the 2 screws provided in one of the bags Accessories Accessories F Assembly ENGLISH Start Up Inser...

Page 8: ...on when the container reaches its maximum capacity You will notice an increase in motor speed When this happens turn the machine off unplug the power cord from the outlet open the vacuum and empty the...

Page 9: ...t regularly with compressed air or clean with a brush The carbons should be checked periodically and always be replaced by a Authorized Service Center when they have worn out After they have been repl...

Page 10: ...10 Notes ENGLISH...

Page 11: ...AV PASEO DE LA REP BLICA 3140 A COL EX HACIENDA DE LA HUERTA C P 58050 MORELIA MICH TEL 443 334 6858 FIX FERRETER AS CAPIT N ANZURES 95 ESQ JOS PERDIZ COL CENTRO C P 62740 CUAUTLA MOR TEL 735 352 8931...

Page 12: ...the product in Corregidora 22 Col Centro Alc Cuauht moc CDMX C P 06060 or at the establishment where you purchased it or at any Truper Service Center listed in the annex to the warranty policy and or...

Page 13: ...rregidora 22 Col Centro Alc Cuauht moc CDMX C P 06060 o en el establecimiento donde lo compr o en alg n Centro de Servicio Truper de los enlistados en el anexo de la p liza de garant a y o en www trup...

Page 14: ...DE SERVICIO ECLIPSE CALLE PRINCIPAL MZ 1 LT 1 COL SANTA FE C P 39010 CHILPANCINGO GRO TEL 747 478 5793 FERREPRECIOS S A DE C V LIBERTAD ORIENTE 304 LOCAL 30 INTERIOR DE PASAJE ROBLEDO COL CENTRO C P 4...

Page 15: ...ESPA OL 10 Notas...
Page 16: ...arbones siempre deben reemplazarse los dos carbones El servicio de las herramientas debe ser realizado nicamente en un Centro de Servicio Autorizado El servicio y mantenimiento realizado por personas...

Page 17: ...lamables o explosivos como se indica en las advertencias de seguridad de la p gina 5 Para el aspirado de l quidos no utilice el filtro de tela para aspirado en seco Cuando aspire grandes cantidades de...

Page 18: ...n click Inserte el mango F en la tapa del contenedor aseg rese de que ambos mamelones se introduzcan en las cajas de la tapa Fije el mango utilizando los 2 tornillos que vienen en una de las bolsas In...

Page 19: ...r Mango Monturas para accesorios Puerto de aspirado Puerto de aspirado Seguros de apertura Cable de alimentaci n 6 Filtro de cartucho aspirado en seco Filtro de espuma aspirado de l quidos Boquilla pa...

Page 20: ...ados de las aberturas y partes m viles el cabello la ropa suelta los dedos y cualquier otra parte del cuerpo No se utilice ni almacene cerca de materiales peligrosos No deje la aspiradora funcionando...

Page 21: ...de encendido puede causar accidentes Retire cualquier llave o herramienta de ajuste antes de arrancar la herramienta el ctrica Las llaves o herramientas que quedan en las partes rotativas de la herra...

Page 22: ...ra o de un sistema de corriente el ctrica con conexi n a tierra Al usar un cable de extensi n aseg rese de usar el calibre suficiente para transportar la corriente que consumir su herramienta Un cable...

Page 23: ...ervicio Autorizados P liza de Garant a Guarde este Instructivo para futuras referencias Los gr ficos de este Instructivo son para referencia pueden variar del aspecto real de la herramienta 3 3 4 5 6...

Page 24: ...ESPA OL ENGLISH Instructivo de Lea este Instructivo por completo antes de usar la herramienta Aspiradora ASP 12 Modelo C digo ASP 12 Este Instructivo es para 101509 ATENCI N 12 gal Capacidad 45 L...

Reviews: