Truckman Roll-Top Xtreme Installation Instructions Manual Download Page 10


9  

To help keep your Retractable Tonneau Cover looking it’s best, 
we  recommend  washing  it  the  same  as  caring  for  your  truck 
finish. However  you should not wax  your cover. Using a citrus-
based  vinyl  cleaner  and  protectant  such  as  303  brand 
protectant will keep your cover looking like new.  

To  assure  quiet,  smooth  operation,  periodically  apply  a 
generous  amount  of  the  same  303  brand  or  equivalent 
protectant  to  a  rag  and  wipe  out  the  inside  of  the  rails  the 
underside  of  the  sweep  seal  and  the  top  of  the  wear  strip. 
Repeat as needed until these components are cleaned of debris 
and well lubricated.  

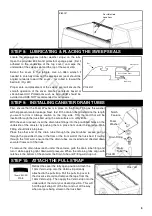
Ensure proper placement of the sweep seal as shown in step 8. Re-apply 
protectant/lubricant  if  the  cover  begins  squeaking  or  sticking  during  use. 

(FIG. 8A)


Alcohol,  petroleum  based  or  silicon-based  cleaners  such  as           
Armor-All® should be avoided and  ARE NOT recommended for our 
covers.  

It is important to open and close the cover regularly; the spring that 

operates the cover is self-lubricated and regular use assures that it stays 
in proper working condition.


Periodically remove the Top Cover and clean out the inside of the canister. 

Drain tubes may become clogged overtime and should be removed and cleaned. To remove the drain tubes reach 
under the canister, grab the drain tube fitting and turn it while applying light downward pressure. When the retaining 
tabs align with notches in the bottom of the canister the Drain Tube and Fitting will drop out. 

(FIG. 9A and FIG. 12A)


Drain Tube Fitting 

Retaining Tab 

Foam Washer 

Canister 

Drain Tube 

FIG. 12A 

 MAINTENANCE 

Rail 

Cover/Fabric Panel 

Wearstrip 

Sweep Seal 

FIG. 8A 

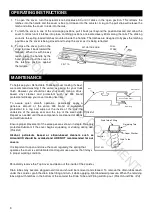
1.  To  open  the  cover,  turn  the  actuator  knob  clockwise  90

until  it  clicks  in  the  open  position.  This  retracts  the 

latches into the handle and the cover is free to roll open into the canister. A tug on the pull strap will release the 
latch and allow the cover to lock into the rails. 

2.  To latch the cover in one of the mid-range positions, pull it back just beyond the position desired and allow the 

cover to retract until it latches into place. Latching positions are located every 30cm along the rails. The clicking 
sound is the spring-loaded latches mounted inside the handle. The latches are designed to bypass the latching 
positions as the cover is being closed and to stop the cover as it is being retracted. 

3.  To  close  the  cover,  pull  on  the 

strap to draw it back toward the 
tailgate.  When it is within easy 
reach, grasp the handle  by the 
hand grip and pull the cover to 
the  latching  position  against 
the tailgate. 


 OPERATING INSTRUCTIONS 

ACTUATOR KNOB 

PULL 
STRAP 

FIG 11A 

UNCONTROLLED 

DOCUMENT

Summary of Contents for Roll-Top Xtreme

Page 1: ...Installing Rail Kickstands 6 STEP 7 Installing Tailgate Drain Tubes 7 STEP 8 Lubricating Sweep Seals 8 STEP 9 Installing Canister Drain Tubes 8 STEP 10 Attach the Pull Strap 8 Operating Instructions 9 Maintenance 9 Warranty Statement 10 ARV1 1705 INSTALLATION INSTRUCTIONS VOLKSWAGEN AMAROK TABLE OF CONTENTS Truckman Unit 14 Narrowboat Way Dudley West Midlands DY2 0EZ Telephone 44 0 1384 485405 htt...

Page 2: ...ANISTER DRAIN HOLE LOCATIONS STEP 1 REMOVE FROM PACKAGING AND REVIEW CONTENTS Tape Measure Side Cut or Needle Nose Pliers Masking tape 7 16 11mm Nut Driver 2 Phillips Screwdriver Utility Knife Note There should be no drilling into the truck body needed on most standard or full size trucks PACKAGING CONTENTS Complete Canister Assembly Top Cover Canister Drain Tubes Clamp Pack Rails Left and Right H...

Page 3: ...er is centered in the bed will help with rail installation in the next step STEP 2 POSITIONING CANISTER STEP 3 INSTALLING RAILS FIG 2A FIG 2B Elevating Canister needs to be high enough to have rail install clearance Remove the protective paper from the foam on the underside of the Rail flanges This is for packaging purposes only Next identify the left and right side rails FIG 3A The rail flange an...

Page 4: ...ne up the Rail sill vertical between the 3rd and 4th Rib of the Rail Guide Spacer FIG 3B Then hook the Outside Groove of the rail into the Rail Guide and rotate down until the rail and rail guide are level FIG 3C 3D Now push the rail all the way forward FIG 3E Finally you can install the Rail Screw Flat and Lock Washer securing the rail to the canister FIG 3G Rail Guide Spacer Rotate Down while re...

Page 5: ...rew Canister FIG 3G BLACK TOP COVER SCREW x 2 180cm OF FOAM INSTALLATION TOOL x 1 FIG 4C Another way to set the tailgate cap seals is to use the Tailgate Seal Gauge as shown in figure 4B 4C You should be able to just slide the Tailgate Seal Gauge in between the Tailgate Cap Seal and the Bottom Cap WARNING Proper Tailgate Cap Seal Engagement is important for getting the best possible water resistan...

Page 6: ...E CLAMPS Next mark where the front of the rails sit and mark this position with masking tape this will be a guide for placing your foam FIG 4D Now pull the cover back until there is room to apply the foam Lay the foam on the front sill of the truck from rail to rail trimming the excess with a utility knife FIG 4E Now move the rails and canister back on the foam and double check that your tailgate ...

Page 7: ... opening unintentionally and in severe cases it may fall between the rail tracks and damage the cover There are Stick on Shims in the hardware pack that can be added to the brackets if too loose Part number is on the serial number label in the upper left corner of the canister looking from tailgate Rail Metal Handle Stop FIG 5F Slide the 4 Grip pieces on the rails as shown in Figure 6A Position Th...

Page 8: ... Cap TAILGATE DRAIN TUBES X 2 DRAIN FITTINGS X 2 Fasten the pre assembled Kickstand Assembly on the Grip using the provided mounting bolt flat washer lock washer and wingnut FIG 6E Next swing up the kickstand so that the adjusting bolt is as perpendicular to the Truck Bed wall as possible FIG 6F If you need more or less engagement you can change the length of the Kickstand by flipping Kickstand Ba...

Page 9: ...rt the drain tube fittings into the pre drilled holes on the underside of the canister by pushing them in place from under the canister Drain Fitting should click into place Place the other end of the drain tube through the plastic rubber access port or through the pre drilled holes in the floor or the front wall of the truck bed If routing through the front wall ensure that the drain tubes are in...

Page 10: ...ove the drain tubes reach under the canister grab the drain tube fitting and turn it while applying light downward pressure When the retaining tabs align with notches in the bottom of the canister the Drain Tube and Fitting will drop out FIG 9A and FIG 12A Drain Tube Fitting Retaining Tab Foam Washer Canister Drain Tube FIG 12A MAINTENANCE Rail Cover Fabric Panel Wearstrip Sweep Seal FIG 8A 1 To o...

Page 11: ...p Xtreme by Truckman retractable tonneau that is found to be defective under the terms of this warranty will be repaired or replaced using either new or reconditioned parts at the discretion of the MFG In determining what constitutes a failure under the terms of this warranty the decision of the MFG shall be final This warranty is extended to the original purchaser only and is not transferable to ...

Page 12: ...U N C O N T R O L L E D D O C U M E N T ...

Reviews: