INST
ALLA
TION
OVERVIE
W
WARRANT
Y
MAINTENANC
E
OPERA
19
20
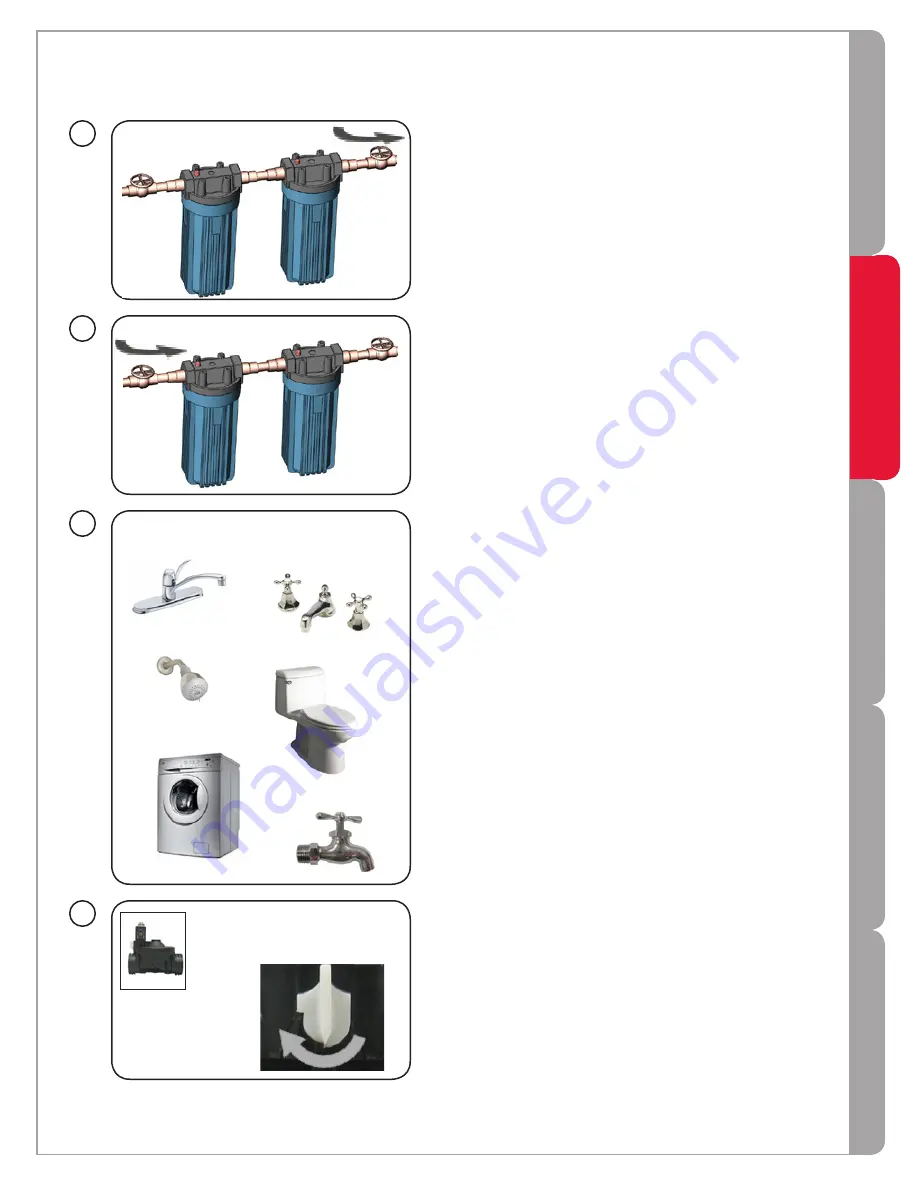
Flush all water outlets until bleach can no longer be smelled (at least 5 minutes).
Turn off solenoid valve override (if so equipped)
.
17
18
13
Page 1: ...this system you have taken the first step in ensuring safe drinking water Designed using the most advanced UV technology available today your UV system is designed to provide you with years of trouble...
Page 2: ...INSTRUCTIONS GROUNDING This product must be grounded If it should malfunction or breakdown grounding provides a path of least resistance for electric current to reduce the risk of electrical shock Th...
Page 3: ...Components 4 Specifications 5 Dimensions and layout 7 Installation 9 Installing the UV system 9 Disinfecting the water lines 11 Operation 14 Control panel 14 Troubleshooting 15 Low UV alarms 16 Maint...
Page 4: ...t Part 602984 Lamp Pro10 G G part 602854 Pro20 H H part 602855 Pro30 J J part 602856 Chamber Pro10 G G part 650565 003 Pro20 H H part 650565 007 Pro30 J J part 650565 011 Power cord 120V part 602636 2...
Page 5: ...FNPT General All Models Rated flow dose of 30 mJ cm2 up to 19 GPM 72 LPM 20 39 GPM 76 148 LPM 40 45 GPM 151 170 LPM Rated flow dose of 40 mJ cm2 10 GPM 38 LPM 20 GPM 76 LPM 30 GPM 114 LPM up to 15 GPM...
Page 6: ...ontrol package Optional Solenoid valve Optional Optional Optional Controls Audible alarm mute button Yes Yes Yes New lamp button Yes Yes Yes Lamp age indicator Yes Yes Yes Lamp operation indicator Yes...
Page 7: ...OPERATION INSTALLATION WARRANTY MAINTENANCE OPERATION OVERVIEW DIMENSIONS LAYOUT L Model Pro10 G G 21 4 55 cm 12 30cm 4 10cm 48 122cm 72 182cm 72 182cm 6 5 16 5cm 13 33cm Pro20 H H 30 8 78cm 12 30cm...
Page 8: ...lTouchTM fan Removes excess heat from stagnant water in chamber during periods without water flow Sample valve Allows for verification of sampling of water immediately following UV treatment necessary...
Page 9: ...l of the lamp and sleeve Make all necessary plumbing connections Attach chamber to wall vertically 4 1 3 2 10 Wet O ring with water then place over top end of sleeve 5 6 7 8 9 Do not touch glass with...
Page 10: ...a Ground Fault Circuit Interrupter GFCI 4 1 16 10 4cm 1 2 1 2 Do not touch glass with bare hands Be sure to rotate lamp completely Let water flow to one faucet or other water outlet then close the ou...
Page 11: ...ownstream of the UV system has been contaminated it is critical that these water lines be chemically disinfected Disinfection of the water lines is therefore required after initial system installation...
Page 12: ...leach then stop the flow Repeat procedure at all water outlets Remember to include all faucets washing machines toilets outside taps and other water outlets Note You will likely run out of bleach if y...
Page 13: ...INSTALLATION OVERVIEW WARRANTY MAINTENANCE OPERATION 19 20 Flush all water outlets until bleach can no longer be smelled at least 5 minutes Turn off solenoid valve override if so equipped 17 18 13...
Page 14: ...ug in system again UV dose is below minimum required see Low UV Alarm section Sensor inactive due to lamp or ballast failure Solenoid valve open If equipped with solenoid Not applicable Solenoid valve...
Page 15: ...ighten Leak detected from area of chamber Condensation of moist air on cold chamber slow accumulation O ring damaged deteriorated or incorrectly installed Sleeve bolt not tight enough Control humidity...
Page 16: ...n the Installation section Pro and Plus Series are equipped with a unique patented sensor that is capable of self diagnosis Simply press the button located at the top of the sensor and hold until the...
Page 17: ...quired follow the instructions below and re install the current lamp Lamp replacement The amount of UV light created by the lamp decreases over time requiring that the lamp be replaced The system will...
Page 18: ...RVIEW WARRANTY MAINTENANCE OPERATION 4 Let the system cool for 10 minutes 3 2 6 5 1 Solenoid representative only Not on all systems Solenoid 10 7 Close after all water has drained 8 9 Pinch wireform t...
Page 19: ...completely cleaned or if it appears scratched or cracked 13 1 2 1 12 2 1 11 Do not touch glass with bare hands 2 16 Remove sleeve Water will escape have bucket under chamber 14 Sleeve removal tool Ins...
Page 20: ...is fully rotated until positive stop 23 1 2 Ensure sleeve bolt is fully rotated until positive stop 26 1 2 Ensure sleeve bolt is fully rotated until positive stop 21 Do not touch glass with bare hands...
Page 21: ...CE OPERATION 31 33 If lamp was replaced Press and hold New Lamp button for 5 seconds until you hear a beep 35 Disinfect the water lines Refer to Disinfecting the Water Lines in Installation section 36...
Page 22: ...omes equipped with one functioning and one spare 250V 2A fuse To access the fuses first unplug system and disconnect the power cord from the power supply Remove the fuse door by pushing in the tab on...
Page 23: ...Trojan warrants original lamps sleeves and UV sensors to be free from defects in material and workmanship for a period of one 1 year from the date of purchase During this time Trojan will repair or re...
Page 24: ...afe drinking water The system is intended to be installed on visually clear water not colored cloudy or turbid water If this system is used for the treatment of surface waters a prefilter found to be...