background image

Printer Environment

1-32

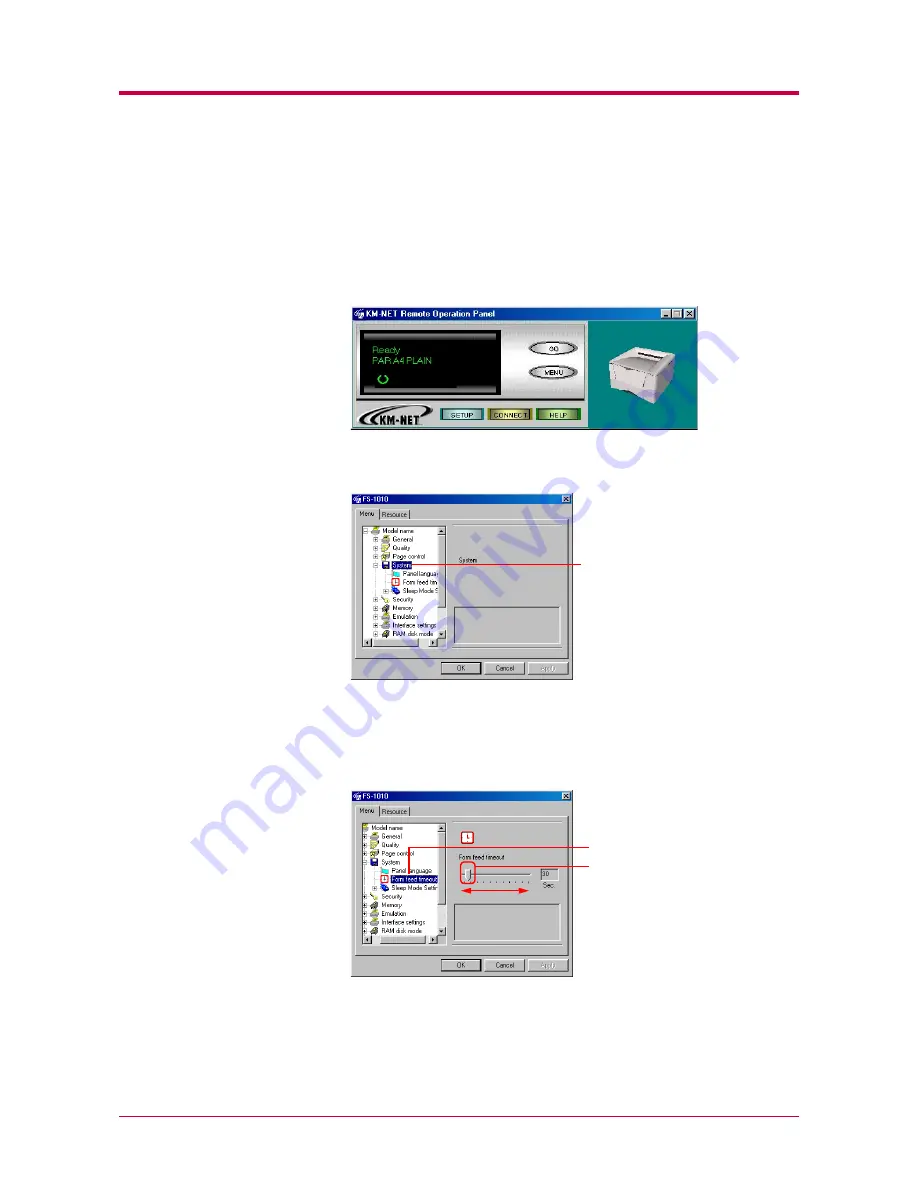
1.5.5 Form Feed Timeout

You can set the amount of time before the last page automatically prints 

when print data ends without end of page information. The default setting 

is 30 seconds.

1

Click the 

MENU

 button on the start-up screen.

2

The 

Menu

 dialog box appears. Select and double click 

System

.

3

Click 

Form feed timeout

. Use the mouse to move the slider on the 

right side of the screen to the left or right. You can set the time in 5-

second intervals from 0 to 495 seconds. To disable form feed timeout, 

set the time to 0.

4

After you have set a time, click on the 

OK

 button to return to the 

start-up screen. The form feed timeout time is changed.

System

Slider

Form feed timeout

Summary of Contents for LP 4014

Page 1: ...INSTRUCTION HANDBOOK LP 4014 ...

Page 2: ......

Page 3: ...any copyrightable subject must contain the same copyright notice as the material from which the copying is done Regarding Tradenames PRESCRIBE is a registered trademark of Kyocera Corporation KPDL and KIR Kyocera Image Refinement are trademarks of Kyo cera Corporation Diablo630isaproductofXeroxCorporation IBMProprinterX24EisaproductofInternationalBusinessMachinesCorporation Epson LQ 850 is a produ...

Page 4: ...AND FITNESS FOR A PARTICULAR PUR POSE Some jurisdictions do not allow the exclusion of implied warranties so the above exclusion may not apply to you SUPPLEMENT TO AGREEMENT FOR SOFTWARE BUNDLING AND DISTRIBUTION FOR ALDC 3 Limitation of Remedies IBM s entire liability under this license is the following 1 For any claim including fundamental breach in any form related in any way to this license IB...

Page 5: ... perform in accordance with Agfa Japan published specifications Agfa Japan does not warrant that the Software is free from all bugs errors and omissions THE PARTIES AGREE THAT ALL OTHER WARRANTIES EXPRESSED OR IMPLIED INCLUDING WARRANTIES OF FIT NESS FOR A PARTICULAR PURPOSE AND MERCHANTABILITY ARE EXCLUDED 8 Your exclusive remedy and the sole liability of Agfa Japan in connection with the Softwar...

Page 6: ... 17 1 4 1 Number of Copies to be Printed 1 17 1 4 2 Page Orientation 1 18 1 4 3 Paper Source 1 19 1 4 4 Paper Size 1 20 1 4 5 Media Type Settings for Paper Sources 1 22 1 4 6 Paper Source Properties 1 24 1 4 7 Setting the Weight of the Custom Paper Type 1 25 1 5 Printer Environment 1 27 1 5 1 Setting the Print Density of the Custom Paper Type 1 27 1 5 2 KIR 1 29 1 5 3 EcoPrint 1 30 1 5 4 Resolutio...

Page 7: ...om Windows Applications 2 19 2 3 1 Basic Printing Task 2 19 2 3 2 Setting Custom Paper Size 2 21 2 3 3 Advanced Media Settings 2 23 2 3 4 Printing Multiple Pages per Sheet 2 29 2 3 5 Changing the Size of the Document 2 31 2 3 6 Printing on Both Sides of Paper Manual Duplex 2 32 2 3 7 Changing the Resolution 2 36 2 3 8 Adjusting Grayscale 2 38 2 3 9 TrueType Fonts 2 39 Chapter 3 Maintenance 3 1 3 1...

Page 8: ...x A Fonts A 1 A 1 Internal Fonts A 2 A 2 List of Fonts A 3 A 2 1 Internal Scalable and Bitmap Fonts and KPDL Fonts A 3 Appendix B Options B 1 B 1 Available Options B 2 B 2 Expansion Memory Installation B 3 B 3 Memory CompactFlash Card B 8 B 4 Network Interface Card B 10 Appendix C Host Computer Interface C 1 C 1 Parallel Interface C 2 C 1 1 Parallel Interface Communication Modes C 2 C 1 2 Interfac...

Page 9: ...232C Cable Connection C 12 C 5 1 Obtain a Suitable RS 232C Cable C 12 C 5 2 Connecting the Printer to the Computer C 12 Appendix D Printer Specifications D 1 Printer Specifications D 2 Appendix E Glossary E 1 Index Index 1 ...

Page 10: ...ption and Auto Media Type Selection function that selects automatically media before print This section explains the following topics Guide to the Manuals Guide to the Manuals Guide to the Manuals Guide to the Manuals Guide to the Operation Guide Guide to the Operation Guide Guide to the Operation Guide Guide to the Operation Guide ...

Page 11: ... Operation Guide this manual Guides you through topics concerning the operations and maintenance of the printer PRESCRIBE Programming Manual Describes how to use the PRESCRIBE commands and their parameters in detail for experienced users PDF417 Two Dimensional Bar Code Implementation Manual Includes a PDF417 overview and explains PRESCRIBE commands for use with two dimensional barcodes ...

Page 12: ...are for your printer Chapter 4 Troubleshooting This chapter explains how to handle printer problems that may occur such as paper jams Chapter 5 Paper Selection This chapter explains the types of paper that can be used with the printer Appendix A Fonts This appendix explains about and lists the printer s internal fonts Appendix B Options This appendix explains available options how to expand the pr...

Page 13: ...Utility KM NET Remote Operation Panel Utility KM NET Remote Operation Panel Utility KM NET Remote Operation Panel Utility Configuring the Printer Configuring the Printer Configuring the Printer Configuring the Printer Paper Paper Paper Paper Printer Environment Printer Environment Printer Environment Printer Environment Other Settings Other Settings Other Settings Other Settings ...

Page 14: ...rs light flash and go off in combination indicating the printer s status The keys perform operations such as canceling data switching the printer mode between online and offline status and printing status pages The numbers used in the above figure are referred to in the Reference column of the table on the following page 1 2 3 4 5 6 Note ...

Page 15: ...topped because an error has occurred 2 Data indicator Green Lit The printer is processing data Flashing The printer is receiving data 3 Attention indicator Red Lit The printer cover is open Flashing A paper jam has occurred The paper cassette is not inserted properly or the paper has run out Off The printer status is normal 4 Toner indicator Red Lit The printer has stopped because the toner is exh...

Page 16: ...lowing is the printout of a typical standard status page Its contents are explained in detail on the next page Items and values on the status page may vary depending on the printer s firmware version 1 3 10 11 5 6 7 2 8 4 9 Note ...

Page 17: ...ly available memory and the current status of the RAM disk see page 1 40 1 40 1 40 1 40 6 Installation Options This shows the option s currently installed in the printer 7 Emulation This shows all available emulations and the currently selected emulation marked with an asterisk The printer is shipped from the factory with PCL 6 emulation selected 8 Error Log This shows the last three instances of ...

Page 18: ...rface Information This information shows all interfaces installed in the printer and the currently selected interface marked with an asterisk The Font section shows the font that is automatically selected when the printer starts up default font It is possible to set different default fonts for each interface 11 KIR Test Pattern This shows the KIR test pattern You can confirm whether KIR is on or o...

Page 19: ... the computer screen 1 2 1 Requirements The Remote Operation Panel utility is designed to run under Windows 95 98 Me or Windows NT 4 0 2000 operating systems With Windows 95 98 Me it can be used with either local parallel or serial or network TCP IP or IPX SPX connection With Windows NT 4 0 2000 it can only be used over a network The Remote Operation Panel utility does not run under any other oper...

Page 20: ...indow opens If this screen does not appear click the Windows Start button and select Run Type the following in the Command Line text box CD drive letter setup Click the OK button After a few moments the License Agreement window appears 2 Click View License Agreement The License Agreement PDF opens Read the terms and conditions If you do not have Adobe Acrobat Reader installed on your computer the ...

Page 21: ...Remote Operation Panel to start Remote Operation Panel utility installation Starting the Remote Operation Panel Once you have installed the Remote Operation Panel click the Windows Start button then click Remote Operation Panel from Programs KYOCERA MITA km net The Remote Operation Panel starts ...

Page 22: ...erface SER Optional serial interface RS 232C 422A OPT Optional network interface 3 Paper size of the currently selected paper cassette 4 Paper type of the currently selected paper cassette When an error occurs details of the error are displayed on the upper and lower lines 2 Displays a suitable icon according to the printer s status The printer is ready to print The paper is exhausted or the casse...

Page 23: ...ty to the Printer Remote Operation Panel Utility to the Printer Remote Operation Panel Utility to the Printer on page 1 15 1 15 1 15 1 15 5 HELP button Displays help messages 6 GO button This button appears only when the printer is connected to the computer via a network It has the same function as the printer s key and does the following Switches the printer online and offline prints and feeds ou...

Page 24: ...setting depending on the application software or printer driver settings 1 3 1 Basic Settings for the Remote Operation Panel Before operating the Remote Operation Panel you can change settings for polling error notification and whether you want to use the 3D virtual printer to monitor the printer status 1 Click the SETUP button on the start up screen 2 The KM NET Remote Operation Panel dialog appe...

Page 25: ...hanges at regular intervals This duration of the interval can be configured by moving the slider with the mouse The default setting is 15 seconds Polling must normally be left activated check box checked Error notification Each of the following functions are activated when the appropriate check box is checked These settings allow you to determine the way your computer notifies you of errors Audibl...

Page 26: ... image Show 3D image This displays the 3D virtual printer for monitoring the printer status You can select the position of the animation in reference to the Remote Operation Panel utility as well as the motion of the animation from Static Rotating and Random Show 3D image ...

Page 27: ...rough a network interface TCP IP or IPX SPX To establish the connection to the printer proceed as follows 1 Click the CONNECT button on the start up screen 2 On the connection wizard a Click Local Printer to connect to a locally attached printer b Click Network Printer to connect to a network printer 3 Depending on the connection type you have chosen above follow the instructions displayed by the ...

Page 28: ... current settings by clicking each item The contents displayed will vary depending on the optional devices installed and whether the connection is through a network or local through a parallel or serial interface If you have set a password for the Remote Operation Panel utility a password prompt appears Enter your password and click the OK button The Menu dialog box appears For details on password...

Page 29: ...reen 2 The Menu dialog box is displayed Select and double click Page control then click Copy count 3 Click the or button in the combo box on the right or directly input the number of copies you want to set in the combo box You can make settings up to 999 4 After you have input the number of copies click the OK button to return to the start up screen The number of copies to be printed is changed Co...

Page 30: ...ears Select and double click Page control then click Orientation Using the radio buttons on the right select either Portrait or Landscape as the page orientation 3 After you have selected the orientation click the OK button to return to the start up screen 4 Turn the printer s power off and on again to make the new setting effective Orientation Page control Orientation ...

Page 31: ...Menu dialog box appears Select and double click Input Tray 3 Click the button next to the pull down menu on the right side of the screen to display the available paper sources Select the paper source you want to set 4 After you have selected a paper source click the OK button to return to the start up screen The default paper source is changed Input Tray Current Feeder ...

Page 32: ... U S A and Canada and A4 for all other countries 1 Click the MENU button on the start up screen 2 The Menu dialog box appears Select and double click Input Tray and the printer s paper sources are displayed 3 Select and double click Cassette 1 then click Paper Size Input Tray Paper Sources Paper Size Cassette 1 ...

Page 33: ...or paper sizes that can be fed from the printer see Chapter 5 Chapter 5 Chapter 5 Chapter 5 5 To set the paper size for the multi purpose tray select and double click Multi Purpose Tray and repeat the above procedure 6 After you have selected a paper size click the OK button to return to the start up screen The new paper size is set for the paper source Paper Size ...

Page 34: ...rce The default setting is plain 1 Click the MENU button on the start up screen 2 The Menu dialog box appears Select and double click Input Tray and the printer s paper source is displayed 3 Select and double click Multi Purpose Tray then click Media Type Input Tray Paper Sources Multi Purpose Tray Media Type ...

Page 35: ...r Type Custom Paper Type on page 1 25 1 25 1 25 1 25 5 To make the paper type settings for the Cassette 1 select and double click Cassette 1 and repeat the above procedure 6 After you have selected a paper type click the OK button to return to the start up screen The paper type for each paper source settings are changed Paper Source Paper Source Paper Source Paper Source Paper Type Paper Type Pape...

Page 36: ... screen 2 The Menu dialog box appears Select and double click Input Tray The printer s paper sources are displayed If the optional paper feeder is installed Cassette 2 is displayed under Cassette 1 3 Click the paper source whose properties you wish to confirm Input Tray Paper Sources The maximum number of pages the paper source can accommodate Indicates whether the paper source is empty or not ...

Page 37: ... or light for each custom paper type custom 1 8 The default setting is normal 1 Click the MENU button on the start up screen 2 The Menu dialog box appears Select and double click Media Type and the paper types are displayed 3 Select and double click Custom 1 then click Weight Media Type Media type Custom 1 Paper weight ...

Page 38: ...ocedure 6 After you have selected a paper thickness click the OK button to return to the start up screen The paper weight thickness settings for the custom paper types are changed Paper thickness setting Paper thickness setting Paper thickness setting Paper thickness setting Corresponding paper weight Corresponding paper weight Corresponding paper weight Corresponding paper weight Light Less than ...

Page 39: ... the print density for each custom paper type You can choose between five levels of density where 1 is the lightest and 5 is the darkest The default setting is 3 1 Click the MENU button on the start up screen 2 The Menu dialog box appears Select and double click Media Type and the paper types are displayed Media Type ...

Page 40: ... the screen to the left light and right dark 4 To set the density for the other custom paper type select and double click Custom 2 to 8 and repeat the above procedure 5 After you have selected the density click the OK button to return to the start up screen The paper source print density setting is changed Slider Dark Light Density ...

Page 41: ...etting is On 1 Click the MENU button on the start up screen 2 The Menu dialog box appears Select and double click Quality then click KIR mode You can toggle the KIR mode On and Off using the radio buttons on the right side of the screen 3 After you have selected On or Off click the OK button to return to the start up screen The KIR mode is changed With KIR Off With KIR On Q KIR mode Quality KIR mo...

Page 42: ...ting speed 1 Click the MENU button on the start up screen 2 The Menu dialog box appears Select and double click Quality then click EcoPrint You can toggle the EcoPrint mode On and Off using the radio buttons on the right side of the screen 3 After you have selected On or Off click the OK button to return to the start up screen The EcoPrint mode is changed Note With EcoPrint Off default With EcoPri...

Page 43: ...screen 2 The Menu dialog box appears Select and double click Quality then click Resolution 3 Press the button next to the pull down menu on the right side of the screen and select Fast 1200 mode 600 dpi or 300 dpi 4 After you have selected a resolution click the OK button to return to the start up screen The resolution is changed Quality Resolution Resolution ...

Page 44: ...up screen 2 The Menu dialog box appears Select and double click System 3 Click Form feed timeout Use the mouse to move the slider on the right side of the screen to the left or right You can set the time in 5 second intervals from 0 to 495 seconds To disable form feed timeout set the time to 0 4 After you have set a time click on the OK button to return to the start up screen The form feed timeout...

Page 45: ... 1 34 1 34 1 34 1 Click the MENU button on the start up screen 2 The Menu dialog box appears Select and double click System 3 Select and double click Sleep Mode Setting then click Sleep Mode Use the mouse to move the slider on the right side of the screen to the left or right You can toggle the sleep mode On and Off using the radio buttons on the right side of the screen 4 After you have selected ...

Page 46: ...p Mode Sleep Mode Sleep Mode Sleep Mode on page 1 33 1 33 1 33 1 33 1 Click the MENU button on the start up screen 2 The Menu dialog box appears Select and double click System 3 Select and double click Sleep Mode Setting then click Sleep time Use the mouse to move the slider on the right side of the screen to the left or right You can set the time in 5 minute intervals from 0 to 240 minutes 4 Afte...

Page 47: ... 1 Click the MENU button on the start up screen 2 The Menu dialog box appears Select and double click Emulation The available interfaces are displayed 3 Click the interface whose emulation you want to change The current emulation is displayed in the pull down menu box on the right side of the screen Interfaces Emulation Current emulation ...

Page 48: ...n emulation The printer emulates operation of the following printers Line printer IBM Proprinter DIABLO 630 EPSON LQ 850 PCL default KPDL KPDL AUTO 5 After you have selected an emulation click the OK button to return to the start up screen 6 Turn the printer s power off and on again to make the new setting effective ...

Page 49: ...rface If these settings are changed you must also change the serial interface parameters on your computer 1 Click the MENU button on the start up screen 2 The Menu dialog box appears Select and double click Interface settings and Serial in that order The serial interface items are displayed on the screen 3 Click the item you want to change then select the value you want to set from the pull down m...

Page 50: ...en 5 After making the above changes change the corresponding settings for the serial interface on the computer Once changes are complete start the Remote Operation Panel Parameter Parameter Parameter Parameter Default value Default value Default value Default value Bit per second 9600 Data bits 8 Stop bit 1 Parity None Flow control DTR positive and XON XOFF ...

Page 51: ...pears Select and double click Interface settings and Network interface in that order The network board properties are displayed as shown in the figure 3 Click on an item to display its contents on the right side of the screen The example below shows the screen that appears when you click on IP address 4 After confirming the properties click the OK button to return to the start up screen Network In...

Page 52: ...is turned off The RAM disk is set from the printer s user available memory Print speed may be slowed or insufficient memory warnings may occur if the RAM disk size is inappropriate or if the print data is too complex 1 Click the MENU button on the start up screen 2 The Menu dialog box appears Select and double click RAM disk mode Using the radio buttons on the right side of the screen you can togg...

Page 53: ... total memory The default RAM disk value is 7 MB 16 MB minus 9 MB When the total memory size is 21 MB or more 144 MB max the RAM disk size on the Remote Operation Panel is factory set to display 12 MB regardless of the actual total memory which can be set to the desired RAM size 135 MB max with the button 4 After making settings click the OK button to return to the start up screen 5 Turn the print...

Page 54: ...double click Consumable then click Toner The remaining amount of the toner is displayed on the right side of the screen When you have replaced the toner container be sure to reset the toner counter otherwise the remaining amount on this tab will not be shown correctly For more information about resetting the toner counter see the note on page 3 5 Note ...

Page 55: ...or the Remote Operation Panel message display English U S A U K Australia French German Italian Spanish and Portuguese The default setting is English U S A 1 Click the MENU button on the start up screen 2 The Menu dialog box appears Select and double click System 3 Click Panel language System Panel language ...

Page 56: ...xample 5 After you have selected a language click the OK button to return to the start up screen The screen changes to the selected display language Panel language The display language is changed to German The language on the panel buttons automatically reflect the language of the Windows operating system on which the Remote Operation Panel utility is installed ...

Page 57: ...rt up screen 2 The Menu dialog box appears Select and double click General and the property items are displayed 3 Click the item you want to confirm to display the contents on the right side of the screen Total page count was clicked to display the following sample screen 4 After confirming settings click the OK button to return to the start up screen Property items General Total page count Total ...

Page 58: ...tion Panel However you can print without entering the password A password can be an ASCII character string of up to 15 characters and is case sensitive The space character is not allowed as part of the password 1 Click the MENU button on the start up screen 2 The Menu dialog box appears Select and double click Security then click Printer password 3 Click the Password button The Password settings d...

Page 59: ...e Menu dialog box appears To Change the Password Perform the following procedure when you want to change your password or remove the password function from the Remote Operation Panel utility Display the password settings screen page 1 46 1 46 1 46 1 46 and enter your current password in Old password To set a new password enter your new password in New password and Retype new password then click th...

Page 60: ...reen 2 The Menu dialog box appears Select and double click Memory to display the memory items 3 Click on Free and Total Memory to confirm the free memory and total memory for the printer Click on Memory slots to see the number of the memory slots in the printer 1 For Host buffer items see the next section 4 After confirming the printer s memory status click the OK button to return to the start up ...

Page 61: ...stores data arriving at the USB interface The default setting is Fix When Host buffer mode is set to Auto the print data arriving from the computer is stored in whichever of the three buffers is empty As data begins arriving at the other interface it is stored in the other host buffer The size of each host buffer can be changed by using Host buffer size The factory setting is 500 kB for the total ...

Page 62: ...though that can be increased or decreased in 1 kB increments You can input the host buffer size directly in the number field 4 Turn the printer s power off and on again The setting becomes effective when you restart the printer We recommend that you leave the default settings for Host buffer mode and Host buffer size unchanged Host buffer size Note ...

Page 63: ... Remote Operation Panel utility 1 Click the MENU button on the start up screen 2 The Menu dialog box appears Select and double click on General and then on User defined setting 3 Click the Asset number and enter the asset number for that item in the text box on the right side of the screen 4 After making the settings click the OK button to return to the start up screen The settings are changed Use...

Page 64: ...e list including fonts programs macros and or host data 1 Click the Resource tab 2 Click the check box that corresponds to the resource you want to display 3 Click the View button A list of all items for that resource are displayed 4 After confirming click the OK button to return to the start up screen Resource tab Font check box View ...

Page 65: ...s menu to confirm and change the printer s internal settings when either in local or network connection FRPO For details on PRESCRIBE commands and FRPO settings refer to the Programming Manual provided on the CD ROM supplied with the printer 1 Click the MENU button on the start up screen 2 The Menu dialog box appears Click Broadcast 3 Click Broadcast to display the dialog box shown below Note Broa...

Page 66: ... printer s cassette 1 To confirm the current value for an FRPO parameter To confirm the current value for an FRPO parameter To confirm the current value for an FRPO parameter To confirm the current value for an FRPO parameter 1 Enter the parameter for example R4 in FRPO 2 Click on GET The current value is shown in Value To change the value for an FRPO parameter To change the value for an FRPO para...

Page 67: ...r driver may vary depending on the version of the print driver The diagrams used throughout this chapter are only for examples This chapter explains the following topics Installing the Printer Driver Installing the Printer Driver Installing the Printer Driver Installing the Printer Driver Using USB Interface Using USB Interface Using USB Interface Using USB Interface Setting Up the Default Propert...

Page 68: ...r the setup screen is automatically displayed To install the printer driver follow the on screen instructions 1 Set the Kyocera Mita Digital Library CD ROM in your computer s CD ROM drive After a few moments the License Agreement window opens If this screen does not appear click the Windows Start button and select Run Type the following in the Command Line text box CD drive letter setup Click the ...

Page 69: ...k the Yes button and install it 3 Close the License Agreement PDF On the previous License Agreement window click Accept to accept the agreement After a few moments the Main Menu appears 4 Click Install Drivers The Kyocera Mita Setup Wizard begins Click the Next button 5 In the Select a device model window click FS 1010 Click the Next button ...

Page 70: ... the Printer Driver 2 4 6 In the Select a driver language window click the language you want Click the Next button 7 Kyocera Mita FS 1010 KX is highlighted in the Available drivers list box Click the Next button ...

Page 71: ...rueType screen fonts and or Prologue Epilogue tab Click the appropriate option s Click the Next button 9 In the Device connection window select the type of connection between the printer and your computer If you want to connect to a network contact your network administrator Click the Next button ...

Page 72: ...select the interface you want to use for connecting to the printer Click the Next button 11 In the Select a device name window enter a unique name for the printer if desired Click the Next button 12 If you want to use the printer as the default printer click the Yes button ...

Page 73: ...Installing the Printer Driver 2 7 13 In the Begin installation window click the Next button 14 Click the Finish button to restart the computer ...

Page 74: ...w 2 Right click the Kyocera Mita FS 1010 KX icon and select Properties The following dialog will open Click the Details tab to make sure the port you have selected in step 11 step 11 step 11 step 11 on page 2 6 2 6 2 6 2 6 is shown in the Print to the following port list Click the OK button to close the window Proceed to section 2 2 2 2 2 2 2 2 Setting Up the Default Properties Setting Up the Defa...

Page 75: ...ing Support This section explains you how to install the USB Printing Support as well as the printer driver onto your Windows 98 computer If you are using Windows Me or 2000 you can use the similar procedure Follow the instructions displayed on the screen 1 Turn on the computer and the printer then insert the Kyocera Mita Digital Library CD ROM into the computer s CD ROM drive 2 Connect the printe...

Page 76: ...stalling the Printer Driver 2 10 4 Select Search for the best driver for your device Click the Next button 5 Select Specify a location In the box below enter CD ROM drive letter usb Click the Next button ...

Page 77: ...n found Make sure CD ROM drive letter USB USBPRINT INF is shown on the dialog box Click the Next button The installation of USB Printing Support will start 7 The following dialog box will open when the installation has been completed The above completes installing the USB Printing Support Proceed to the next section Click the Finish button ...

Page 78: ...r 2 12 Installing the Printer Driver for USB 1 Subsequently the installation of the printer driver will begin Click the Next button on the dialog box below 2 Select Search for the best driver for your device Click the Next button ...

Page 79: ...talling the Printer Driver 2 13 3 Click the Specify a location check box then enter CD ROM drive letter Drivers Multi in the box below Click the Next button 4 Click the Next button on the dialog box below ...

Page 80: ... will open Follow the instructions shown on the wizard and complete the installation of the printer driver 6 Click the Windows Start button point Setting and click Printers to make sure the Kyocera Mita FS 1010 KX icon has been added to the Printers window ...

Page 81: ...ta FS 1010 KX icon and select Properties The following dialog will open Click the Details tab to make sure USB 001 Virtual printer port for USB is selected for the Print to the following port list Click the OK button to close the window Proceed to the next section ...

Page 82: ...ngs select File Print Properties from a Windows application See section 2 3 Printing from Windows Applications on page 2 19 2 2 1 Using the Option Paper Feeder To configure the printer default properties you should access the printer Properties dialog box as follows 1 Click the Windows Start button point to Settings and then click Printers 2 Right click the Kyocera Mita FS 1010 KX icon and click P...

Page 83: ...he PostScript language A page description language is referred to as an emulation in Remote Operation Panel in Chapter 1 Chapter 1 Chapter 1 Chapter 1 To configure the printer default properties you should access the printer Properties dialog box as follows 1 Click the Windows Start button point to Settings and then click Printers 2 Right click the Kyocera Mita FS 1010 KX icon and click Properties...

Page 84: ...etting Up the Default Properties 2 18 4 In the Page Description Language drop down list select the appropriate one The available options are PCL XL PCL 5e and KPDL Click the OK button to close the window ...

Page 85: ...m Paper Size Setting Custom Paper Size Setting Custom Paper Size on page 2 21 2 21 2 21 2 21 and later 1 Set the paper of the size specified in the application for the document into the printer s paper cassette For details on how to set paper refer to the Installation Guide Installation Guide Installation Guide Installation Guide In the Remote Operation Panel utility make sure if each paper source...

Page 86: ...tton The Properties dialog box opens 8 On the Media tab select the paper size that matches the paper size of the document from the Page Size drop down list The printer will automatically switch to the paper source the paper cassette MP tray or the option paper feeder if installed so that the correct paper will be used 9 Click the OK button to close the Properties dialog box and return to the Print...

Page 87: ...l size Note the MP tray can accommodate paper whose sizes are ranging from 70 to 216 mm in width and 148 to 297 mm in length To set the custom size 1 Display the printer driver s Properties dialog box from the application software 2 Click the Custom button on the Media tab The Custom Paper Sizes dialog box appears 3 Click the Add button The Edit Paper Size dialog box appears 4 Enter a descriptive ...

Page 88: ...g box to be accessed by clicking the User button on the Device Settings tab 6 Click the OK button The custom paper size is added to the Customized Paper Sizes list 7 Click the OK button The Media tab is displayed again 8 Select the Custom Size from the Page Size drop down list 9 Click the OK button again to return to the Print dialog box 10 Click the OK button to start printing Note ...

Page 89: ...O T0 0 EXIT to the printer from the Remote Operation Panel section 1 6 7 Sending PRESCRIBE Commands to the Printer on page 1 53 For FRPO commands refer to the Programming Manual on the CD ROM supplied with the printer Cover Mode In the Cover mode the first cover page or the first and back cover pages of a document will be added to the document using the different paper from the paper used for the ...

Page 90: ...he cover pages on the different paper 1 Display the printer driver s Properties dialog box from the application software 2 Click the Settings button on the Media tab The Advanced Media Settings dialog box opens 3 Click the Cover Mode check box 6 5 4 3 ...

Page 91: ... etc should be loaded on the MP tray 7 Click the OK button to return to the Print dialog box 8 Load the paper you want to use for the cover s onto the paper source specified in step 6 step 6 step 6 step 6 9 Click the OK button to start printing Page Insert With Page Insert the printer inserts a blank or printed page before any page s of the document that you specify This function will allow you to...

Page 92: ...e a separator sheet in the document 1 Display the printer driver s Properties dialog box from the application software 2 Click the Settings button on the Media tab The Advanced Media Settings dialog box opens 3 Click the Page Insert check box 5 4 6 3 ...

Page 93: ...een pages 9 and 10 will be printed as page 10 when you select this check box 6 Select the paper source for the separators from the Source for Page drop down list Note that thick paper colored paper etc should be loaded on the MP tray 7 Click the OK button to return to the Print dialog box 8 Load the paper you want to use for the separator s onto the paper source specified in step 6 step 6 step 6 s...

Page 94: ...ver s Properties dialog box from the application software 2 Select Multi Purpose Feeder MP tray from the Source list box and Transparency from the Media Type list 3 Click the Settings button on the Media tab The Advanced Media Settings dialog box opens 4 Click the Transparency Interleaving check box 4 6 5 ...

Page 95: ...tep 5 9 Click the OK button to start printing 2 3 4 Printing Multiple Pages per Sheet You can print multiple pages on a single sheet of paper in groups of 1 2 4 6 9 12 16 or 25 pages You can also select the layout of the pages printed on a sheet 1 Display the printer driver s Properties dialog box from the application software 2 Click the Layout tab 3 Select the number of pages to be printed from ...

Page 96: ...lications 2 30 4 To select the relative position of each page printed on the sheet select an option from the Layout drop down list 5 Click the OK button to return to the Print dialog box 6 Click the OK button to start printing ...

Page 97: ...ill be scaled according to the percentage selected The range for the scaling percentage is 20 to 500 1 Display the printer driver s Properties dialog box from the application software 2 Click the Layout tab 3 Select the desired percentage from the Scaling box 4 Click the OK button to return to the Print dialog box 5 Click the OK button to start printing ...

Page 98: ...to keep this box on until you get used to the duplex print operation The instruction sheet to be printed will vary depending on the binding options you have selected Flip on Long Edge or Flip on Short Edge You can use long edge or short edge binding combined with either landscape or portrait printing Use Orientation options on the Media tab to select the page orientation as follows These are 1 por...

Page 99: ... Display the printer driver s Properties dialog box from the application software 2 Select either the printer s paper cassette or option paper feeder if installed from the Source list box 3 Click the Layout tab 4 Select the Print on Both Sides Manual Duplex check box 5 7 4 6 ...

Page 100: ...o set the width of the gutter click the Gutter Settings button and enter the desired value in the Gutter field The width of the gutter ranges from 5 00 to 25 4 mm or from 0 20 to 1 00 inch 8 Click the OK button to return to the Print dialog box 9 Click the OK button to start printing The following message box will appear on the screen Wait until all the even pages are printed and put the printed p...

Page 101: ... the instruction sheet back into the same paper source with the instruction sheet facing up and the arrows on the sheet pointing toward the printer Nothing will be printed on the instruction sheet 11 Click the OK button on the Manual Duplex Instruction message box shown in step 9 step 9 step 9 step 9 above All the odd pages will be printed Note Portrait Long edge Binding Landscape Short edge Bindi...

Page 102: ...ion of the print job Available options are High Quality Fast 1200 mode Proof 600 dpi Draft 300 dpi and Custom 1 Display the printer driver s Properties dialog box from the application software 2 Click the Imaging tab 3 Select the resolution of the print job from the Print Quality drop down list ...

Page 103: ...mage Refinement and EcoPrint individually choose Custom and click the button next to the Print Quality drop down list Select the options you need in the Print Quality Settings dialog box 5 Click the OK button to return to the Print dialog box 6 Click the OK button to start printing ...

Page 104: ...ted graphic images are too light too gray or too dark Text is unaffected by the Grayscale Adjustment settings 1 Display the printer driver s Properties dialog box from the application software 2 Click the Imaging tab 3 To lighten or darken the graphic images drag the Brightness slider 4 To control the levels of gray use the Contrast slider 5 Click the OK button to return to the Print dialog box 6 ...

Page 105: ...ow TrueType fonts are sent to the printer select one of the options from TrueType Fonts Select Download TrueType fonts as outline to reduce the file size for printing a large document especially if it contains several fonts or several font sizes This is the default setting Select Download TrueType fonts as bitmap for a print job with fewer fonts and similar font sizes though file size will be larg...

Page 106: ... Font Substitution button to open the Font Substitution dialog box In the System Fonts box select the font in your document In the Available Device Fonts box select the font to substitute Click the OK button to go back to the Properties dialog box 5 Click the OK button to return to the Print dialog box 6 Click the OK button to start printing ...

Page 107: ...r container and how to clean parts such as the registration roller and charger wire This chapter explains the following topics Toner Container Replacement Toner Container Replacement Toner Container Replacement Toner Container Replacement Cleaning Cleaning Cleaning Cleaning ...

Page 108: ...nted pages In the case of a new printer in which a toner kit has been installed for the first time the number of copies that can be printed will be approximately 3 000 Toner Kit to be Used Toner Kit to be Used Toner Kit to be Used Toner Kit to be Used Name TK 17 Description Toner container Wiper cloth Plastic bag Installation Guide The kit supplied with the printer only contains the toner containe...

Page 109: ...he printer s top cover 2 Pull lock lever 1 to the release UNLOCK position then pull lock lever 2 to the release right position 3 Gently remove the old toner container Put it in the supplied plastic bag and dispose of it Top Cover Lock Lever 1 Lock Lever 2 Plastic Bag ...

Page 110: ...oner container horizontally at least 5 times This ensures that the toner is evenly distributed inside 5 Carefully remove the protective seal orange colored 6 Install the new toner container in the printer Push firmly on the top of the container at the positions marked PUSH HERE until you hear it click in place New Toner Container Protective Seal ...

Page 111: ...ow indication flashes or remains lit after installing the new toner container take the toner container out once shake it well then install again After you have replaced the toner container be sure to reset the toner counter Next time you turn on the power to the printer keep pushing the key until the Ready indicator lights up LOCK UNLOC K LO CK UN LO CK Lock Lever 1 Note ...

Page 112: ...Interior To avoid print quality problems due to paper dust and debris clean the interior of the printer in the following manner 1 Open the printer s top and front covers 2 Lift the process unit together with the toner container out of the printer The drum in the process unit is sensitive to light Never expose the drum even to normal office lighting 500 lux for more than five minutes Note Top Cover...

Page 113: ...cleaning be careful to avoid touching the transfer roller the black roller 4 Slide the charger cleaner knob green colored back and forth 2 to 3 times then return it to its CLEANER HOME POSITION After cleaning make sure you restore the charger cleaner to its home position Note NO NO NO NO Registration Roller Transfer Roller Note Charger Cleaner Knob ...

Page 114: ...age the next time you use the printer 5 After cleaning is done put the process unit back in the printer To do so carefully align the guides at both ends of the process unit with the slots in the printer 6 Close the front cover 7 Close the top cover by pressing down on the front left and right corners of the top cover Note Process Unit Front Cover Top Cover ...

Page 115: ... Kyocera Mita dealer This chapter explains the following topics General Guide General Guide General Guide General Guide Print Quality Problems Print Quality Problems Print Quality Problems Print Quality Problems Indicators Indicators Indicators Indicators Correcting a Paper Jam Correcting a Paper Jam Correcting a Paper Jam Correcting a Paper Jam ...

Page 116: ... computer s connection to the network Also look through the items below and check anything that seems relevant Print quality is not good See section 4 2 4 2 4 2 4 2 Print Quality Problems Print Quality Problems Print Quality Problems Print Quality Problems on page 4 3 4 3 4 3 4 3 Paper is jammed See section 4 4 4 4 4 4 4 4 Correcting a Paper Jam Correcting a Paper Jam Correcting a Paper Jam Correc...

Page 117: ...3 Chapter 3 Chapter 3 Chapter 3 Black or white vertical streaks Check the operator panel Check the operator panel Check the operator panel Check the operator panel When the toner indicator flashes install a new toner kit Clean the printer after replacement See Chapter 3 Chapter 3 Chapter 3 Chapter 3 Clean the charger wire Clean the charger wire Clean the charger wire Clean the charger wire Open th...

Page 118: ...ocess unit Check the process unit Open the printer s top cover and front cover then check that the process unit is properly installed Dirt on the top edge or back of the paper Check the transfer roller Check the transfer roller Check the transfer roller Check the transfer roller Open the printer s top and front covers Remove the process unit from the printer and check whether the transfer roller i...

Page 119: ... classified into three categories maintenance errors and normal In the following table indicators are shown to be lit flashing or off Further flashing is divided into two speeds fast and slow By using the Remote Operation Panel utility you can monitor the printer s status from the computer When a printer error occurs the error message is displayed on the computer s screen The Remote Operation Pane...

Page 120: ... is no paper in the paper cassette there is no paper in the paper cassette there is no paper in the paper cassette there is no paper in the paper cassette Set paper of the size and type specified in the print data into the cassette 1 or 2 to resume printing When you want to feed from a other paper source press the key to switch the paper source The printer prints on the paper size and type set in ...

Page 121: ...ong Clean the printer after replacement See Chapter 3 Chapter 3 Chapter 3 Chapter 3 No indication patterns available Warning image adapt The print job cannot be done at current resolution The print job cannot be done at current resolution The print job cannot be done at current resolution The print job cannot be done at current resolution because there is not enough internal memory because there i...

Page 122: ...rrective Action Corrective Action None Main motor error 2000 error Main motor error 2000 error Main motor error 2000 error Main motor error 2000 error Contact your Kyocera Mita dealer None Scanner motor error 4000 error Scanner motor error 4000 error Scanner motor error 4000 error Scanner motor error 4000 error Contact your Kyocera Mita dealer None Scanner pin photo error 4200 error Scanner pin ph...

Page 123: ... is full 7990 error The waste toner reservoir is full 7990 error The waste toner reservoir is full 7990 error The waste toner reservoir is full 7990 error Same as above 100 000 pages printing or more None Controller check sum error F010 error Controller check sum error F010 error Controller check sum error F010 error Controller check sum error F010 error Contact your Kyocera Mita dealer None Contr...

Page 124: ...r Communication error F040 error Contact your Kyocera Mita dealer None Engine ROM check sum error F050 error Engine ROM check sum error F050 error Engine ROM check sum error F050 error Engine ROM check sum error F050 error Contact your Kyocera Mita dealer Indicator Indicator Indicator Indicator Remote Operation Remote Operation Remote Operation Remote Operation Panel display Panel display Panel di...

Page 125: ...ity of the memory card is insufficient Clean up files 05 Specified file not on memory card 06 No memory for use by memory card Expand printer memory Press the key to resume printing You can abandon printing by pressing the key Memory overflow Press GO Printing cannot continue because there is not enough memory Printing cannot continue because there is not enough memory Printing cannot continue bec...

Page 126: ...ng removing a memory card No indication patterns available Format error Memory card This message appears when the printer is in the ready state and This message appears when the printer is in the ready state and This message appears when the printer is in the ready state and This message appears when the printer is in the ready state and the memorycard is not formatted andtherefore cannotbe read o...

Page 127: ...When the printer is switched on for the first time after the toner container is installed Adding toner also appears Processing The printer is receiving data Processing The printer is processing data Waiting The printer is waiting for the end of job command before printing the last page Pressing the key allows you to obtain the last page immediately Form Feed Timeout The printer is printing the las...

Page 128: ...n in Chapter 5 Chapter 5 Chapter 5 Chapter 5 Also look for tiny pieces of paper that may have been torn apart and overlooked when the jammed paper was removed If you cannot solve the problem by changing the paper there may be a problem with the printer Call a service person When pulling the paper pull it gently so as not to tear it Torn pieces of paper are difficult to remove and may be easily ove...

Page 129: ...the error The printer then automatically warms up and resumes printing Follow the same steps for clearing the jammed paper at the option paper feeder s paper cassette 4 4 3 Jam Inside the Printer When a paper jam occurs inside the printer clear it using the following procedure 1 Open the printer s top and front covers Paper Feeder s Paper Cassette Paper Feeder Option Paper Cassette Top Cover Front...

Page 130: ...as shown in the figure When the jammed paper appears to be pinched by rollers pull it along the normal paper running direction 4 After you have removed the jammed paper put the process unit back into the printer 5 Close the printer s front cover and top cover The printer then automatically warms up and resumes printing Process Unit Note ...

Page 131: ...eneral Guidelines General Guidelines General Guidelines General Guidelines Selecting the Right Paper Selecting the Right Paper Selecting the Right Paper Selecting the Right Paper Special Paper Special Paper Special Paper Special Paper Paper Type Paper Type Paper Type Paper Type ...

Page 132: ...rough the printer This is affected by the smoothness size and moisture content of the paper and the way in which the paper is cut The higher the grade of paper you use the less risk there will be of paper jams and other problems and the higher the level of quality your printed output will reflect Differences between paper from different suppliers can also affect the printer s performance A high qu...

Page 133: ...e printer are as follows Condition of the Paper Avoid using paper that is bent at the edges curled dirty torn embossed or contaminated with lint clay or paper shreds Use of paper in these conditions can lead to illegible printing misfeeding and paper jams and can shorten the life of the printer In particular avoid using paper with a surface coating or other surface treatment The paper should have ...

Page 134: ...lems The proper weight is 60 to 105 g m2 for the paper cassette and 60 to 163 g m2 for the MP tray Multi Purpose tray Multi Purpose tray Multi Purpose tray Multi Purpose tray Size Size Size Size Cassette or multi purpose tray Cassette or multi purpose tray Cassette or multi purpose tray Cassette or multi purpose tray Size Size Size Size Monarch 3 7 8 7 1 2 inches Legal Not available with the MP tr...

Page 135: ...edges expand becoming wavy in appearance When the relative humidity is low and the paper loses moisture the edges shrink and tighten and print contrast may suffer Wavy or tight edges can cause misfeeding and alignment anomalies The moisture content of the paper should be 4 to 6 To ensure the proper moisture content it is important to store the paper in a controlled environment Some tips on moistur...

Page 136: ...teract the curl Printed sheets will then come out flat Electrostatic properties Electrostatic properties Electrostatic properties Electrostatic properties During the printing process the paper is electrostatically charged to attract the toner The paper must be able to release this charge so that printed sheets do not cling together in the output tray Whiteness Whiteness Whiteness Whiteness The con...

Page 137: ... causes harm to the machine or operator Before purchasing any type of special paper test a sample on the printer and check that printing quality is satisfactory Specifications for each type of special paper are given below 5 3 1 Transparency overhead projection film Transparency must be able to withstand the heat of fusing during the printing process It should satisfy the conditions in Table 5 3 T...

Page 138: ...also called the linear or backing sheet holds the labels until use Due to the complexity of its composition adhesive backed label paper is particularly likely to give trouble in printing Figure 5 1 Adhesive backed label Adhesive label paper must be entirely covered by its top sheet with no spaces between the individual labels Labels with spaces in between are apt to peel off causing serious paper ...

Page 139: ...rinting can cause premature printer wear To avoid jamming due to curled envelopes do not leave more than approximately 10 printed envelopes stacked in the paper trays during multiple envelope printing Colored Paper Colored paper should satisfy the same conditions as white bond paper listed in Table 5 1 Table 5 1 Table 5 1 Table 5 1 on page 5 2 5 2 5 2 5 2 In addition the pigments used in the paper...

Page 140: ...at meets the same specifications as the white bond paper see Table 5 1 Table 5 1 Table 5 1 Table 5 1 on page 5 2 5 2 5 2 5 2 except whiteness Before purchasing recycled paper test a sample on the printer and check that the printing quality is satisfactory Note ...

Page 141: ...pe on page 1 25 1 25 1 25 1 25 The following types of paper can be set Table 5 5 Paper Type This is a paper type defined and registered by the user Up to eight types of user settings may be defined For details see section 1 4 7 1 4 7 1 4 7 1 4 7 Setting the Weight of the Custom Paper Type Setting the Weight of the Custom Paper Type Setting the Weight of the Custom Paper Type Setting the Weight of ...

Page 142: ...s chapter describes the types of fonts you can use with the printer This appendix explains the following topics Internal Fonts Internal Fonts Internal Fonts Internal Fonts List of Fonts List of Fonts List of Fonts List of Fonts ...

Page 143: ...nual Programming Manual Programming Manual Programming Manual provided on the CD ROM supplied with the printer spacing pitch height style stroke weight and typeface family The printer comes with 80 preinstalled PCL PS compatible fonts and a line printer bitmap font Fonts may also be downloaded to the printer s memory These are referred to as downloadable or soft fonts The printer accepts as many d...

Page 144: ... to a network See section 1 6 6 1 6 6 1 6 6 1 6 6 Displaying the Resource List Displaying the Resource List Displaying the Resource List Displaying the Resource List on page 1 52 1 52 1 52 1 52 A 2 1 Internal Scalable and Bitmap Fonts and KPDL Fonts Font number Font samples 0 1 2 3 4 5 6 7 8 9 10 11 12 13 14 15 16 17 18 19 20 21 22 23 24 25 26 27 28 29 30 ...

Page 145: ...List of Fonts A 4 Font number Font samples 31 32 33 34 35 36 37 38 39 40 41 42 43 44 45 46 47 48 49 50 51 52 53 54 55 56 57 58 59 60 61 62 63 64 65 66 67 68 69 ...

Page 146: ...List of Fonts A 5 Font number Font samples 70 71 72 73 74 75 76 77 78 79 80 ...

Page 147: ...List of Fonts A 6 Font KPDL Fonts 1 ...

Page 148: ...List of Fonts A 7 Font KPDL Fonts 2 ...

Page 149: ...able Options Available Options Available Options Available Options Expansion Memory Installation Expansion Memory Installation Expansion Memory Installation Expansion Memory Installation Memory CompactFlash Card Memory CompactFlash Card Memory CompactFlash Card Memory CompactFlash Card Network Interface Card Network Interface Card Network Interface Card Network Interface Card ...

Page 150: ...al Interface Board Kit Network Interface Card Contact your Kyocera Mita dealer for information on purchasing the network interface card that is best suited for use with this printer Only network interface cards operating on DC 3 3 V can be used in this printer Memory CompactFlash Card Contact your Kyocera Mita dealer for information on purchasing the memory card that is best suited for use with th...

Page 151: ...imum of 144 MB The expansion memory should be installed only by a Kyocera Mita authorized dealer or Kyocera Mita certified technician Kyocera Mita shall not be liable for damage due to improper installation of the expansion memory The following instructions are intended for the technician only Notes on Handling the Main Circuit Board and DIMM Protect the electronics by taking these precautions Bef...

Page 152: ... Either an 8 MB 16 MB 32 MB 64 MB or 128 MB DIMM can be used for memory expansion Installing the DIMM Insert the DIMM into the socket as follows 1 Turn the printer s power off then unplug the printer s power cable and disconnect the printer from the host computer 2 Remove the screw from the rear of the printer 3 Remove the side cover as shown in the figure Side Cover ...

Page 153: ...he DIMM socket on top of the main circuit board 4 Remove the DIMM from its package 5 Open the clips on both ends of the DIMM socket 6 Insert the DIMM into the DIMM socket so that the notches on the DIMM align with the corresponding protrusions in the slot DIMM socket Clips DIMM ...

Page 154: ...ards and pull the DIMM out of the socket Testing the Expansion Memory After you have finished installing DIMM in the printer test the printer to see if installation succeeded To test the expansion memory proceed as follows 1 Make sure the power switch is off Plug the power cord into the printer and turn on the power 2 When the printer is online press and hold the key for 3 seconds or more 3 If the...

Page 155: ...printer driver so that the printer can use the memories efficiently 1 Click the Windows Start button point to Settings then click Printers 2 Right click the Kyocera Mita FS 1010 KX icon and click Properties The Properties dialog box will open Click the Device Settings tab 3 Enter the total memory size installed to the printer up to 144 MB in the Memory box ...

Page 156: ...confirmed on the status page printout For details of available memory cards contact your Kyocera Mita dealer 1 Turn off the printer Never insert or remove a memory card while the printer power is on Failure to turn the power switch off will immediately halt the printer with the four indicators turned on It also could result in damage to the printer s electronic parts or the memory card Turn the po...

Page 157: ...serial interface board and remove it 3 Insert the memory card in the slot Insert as shown in the figure Push it in all the way 4 Close and secure the slot cover If the network interface card or the serial interface board kit is removed in the step 2 above reinstall and secure the card or the kit Network Interface Card or Serial Interface Board Screws Memory Card ...

Page 158: ...slot at the rear of the printer The network interface card enables the printer to be used in a network 1 Turn off the printer and disconnect the power cord and printer cable 2 Remove the two screws from the option interface slot cover and remove the slot cover 3 Insert the network interface card and secure it with the screws removed in step 2 Note Screws Option Interface Slot Cover Network Interfa...

Page 159: ...use the printer in a multi computer environment This appendix explains the following topics Parallel Interface Parallel Interface Parallel Interface Parallel Interface USB Interface USB Interface USB Interface USB Interface Serial Interface Option Serial Interface Option Serial Interface Option Serial Interface Option RS 232C RS 422A Protocol RS 232C RS 422A Protocol RS 232C RS 422A Protocol RS 23...

Page 160: ...ave this setting unchanged Nibble high Nibble high Nibble high Nibble high High speed data communication is used in compliance with the IEEE 1284 standard Normal Normal Normal Normal The printer uses the standard communication method prescribed for Centronics interfaces High speed High speed High speed High speed This mode enables faster data transmission between the printer and the host computer ...

Page 161: ... 4 6 In Data 4 Data 5 7 In Data 5 Data 6 8 In Data 6 Data 7 9 In Data 7 Data 8 10 Out Acknowledge nAck 11 Out Busy Busy 12 Out Paper Empty PError 13 Out Online Select Select 14 In Ignored nAutoFd 15 Not connected 16 0V DC 17 Chassis GND 18 5V DC 19 Ground return 20 Ground return 21 Ground return 22 Ground return 23 Ground return 24 Ground return 25 Ground return 26 Ground return 27 Ground return 2...

Page 162: ...Error Pin 12 Paper Empty PError Pin 12 Paper Empty PError Pin 12 This signal goes high when the printer runs out of paper Online Select Pin 13 Online Select Pin 13 Online Select Pin 13 Online Select Pin 13 This signal is high when the printer is online and low when the printer is offline It goes low when the upper unit is raised or when the key is pressed to set the printer offline The Paper Empty...

Page 163: ...Ready Pin 35 This signal is high when the printer s power is on Select In nSelectIn Pin 36 Select In nSelectIn Pin 36 Select In nSelectIn Pin 36 Select In nSelectIn Pin 36 This signal is used in some versions of the Centronics interface to enable the computer to force the printer online ...

Page 164: ...ptacle female with upstream port Cable B type plug male Cable Use shielded cable that complies with the USB Revision 1 1 standards and not longer than 5 meters 16 feet Transfer Mode Full speed max 12 Mbps Power Control Self power device C 2 2 Interface Signals Table C 2 USB Connection Pin Assignment Pin Pin Pin Pin Signal Signal Signal Signal Description Description Description Description 1 Vbus ...

Page 165: ...TXD Transmit Data Pin 2 This output carries asynchronous data sent by the printer to the computer It is used mainly in handshaking protocols RXD Receive Data Pin 3 RXD Receive Data Pin 3 RXD Receive Data Pin 3 RXD Receive Data Pin 3 This input carries serial asynchronous data sent by the computer to the printer RTS Request To Send Pin 4 RTS Request To Send Pin 4 RTS Request To Send Pin 4 RTS Reque...

Page 166: ...interface can be changed to the RS 422A mode In the RS 232C mode In the RS 232C mode In the RS 232C mode In the RS 232C mode the printer can be connected to a personal computer or similar device equipped with an RS 232C serial interface The serial interface is set to the RS 232C mode as the factory default In the RS 422A mode In the RS 422A mode In the RS 422A mode In the RS 422A mode the printer ...

Page 167: ...ive Data Inverted Pin 3 RDA Receive Data Inverted Pin 3 These pins carry asynchronous data sent from the computer to the printer differential input SDB Send Data Pin 10 SDB Send Data Pin 10 SDB Send Data Pin 10 SDB Send Data Pin 10 SDA Send Data Inverted Pin 9 SDA Send Data Inverted Pin 9 SDA Send Data Inverted Pin 9 SDA Send Data Inverted Pin 9 These pins carry asynchronous data sent from the pri...

Page 168: ...d their identification codes are given below H1 Baud rate H1 Baud rate H1 Baud rate H1 Baud rate The factory setting is 9600 baud H2 Data bits H2 Data bits H2 Data bits H2 Data bits 7 or 8 factory set to 8 H3 Stop bits H3 Stop bits H3 Stop bits H3 Stop bits 1 or 2 factory set to 1 H4 Parity H4 Parity H4 Parity H4 Parity The factory setting is None 0 on the status printout Parameter value Parameter...

Page 169: ...e This is the size of the input buffer specified in units of 10 Kbytes The factory set value is 6 meaning 60 Kbytes Since DTR DSR protocol is not used with the RS 422A standard select a parameter value other than 0 1 or 2 for the H5 setting when using the RS 422A interface C 4 1 PRESCRIBE FRPO D0 Command The PRESCRIBE FRPO D0 command provides control over XON XOFF operation when an error occurs on...

Page 170: ...erface cable into the printer s RS 232C connector and screw it in place 4 Plug the other end of the cable into the computer s RS 232C interface connector 5 Switch on the printer s power 6 The printer s RS 232C parameters are factory set to the following values Baud rate 9600 bps data bits character length 8 bits stop bits 1 parity none The two RS 232C protocols are XON XOFF and DTR The printer per...

Page 171: ...rol Panel from among the items displayed 2 The control panel folder opens Double click on System 3 System Properties opens Click on the Device Manager tab then click on the COM port to be used 4 Click on Properties button 5 The Properties sheet is displayed for the selected COM port Click on the Port Settings tab and set the port properties 6 After setting the properties click OK button ...

Page 172: ...owing commands C MODE COM1 96 N 8 1 P C MODE LPT1 COM1 To test the interface enter the following CTRL P C DIR CTRL P The software settings made using the above procedures are temporary On most computers permanent settings must be made with DIP switches ...

Page 173: ...D 1 Appendix D Printer Specifications D ...

Page 174: ...in charger Main charger Positive scorotron charger Transferring Transferring Transferring Transferring Negative charger roller Separation Separation Separation Separation Curvature separation Drum cleaning Drum cleaning Drum cleaning Drum cleaning Blade cleaner Drum discharging Drum discharging Drum discharging Drum discharging Illumination by eraser LED array Fuser Fuser Fuser Fuser Heat roller a...

Page 175: ...9 Operating noise in accordance with ISO 7779 Operating noise in accordance with ISO 7779 Operating noise in accordance with ISO 7779 Bystander Position sound pressure level at Bystander Position sound pressure level at Bystander Position sound pressure level at Bystander Position sound pressure level at the front the front the front the front During printing LpA 50 dB A During standby LpA 28 dB A...

Page 176: ...E 1 Appendix E Glossary E ...

Page 177: ...ay Because the MP tray default setting is set to first mode priority printing from the MP tray if there is paper inserted in the MP tray the first paper will always feed from there even if another paper source is selected First mode is specified as the factory default but you can change this setting from the Remote Operation Panel IEEE1284 This is a standard used when connecting a printer to a com...

Page 178: ...nications PRESCRIBE commands This is the Kyocera Mita page printer control language installed on Kyocera Mita printers PRESCRIBE commands enable most print settings necessary for pagination and are easy to understand because they are written in text format allowing you to do programming yourself For information on the commands and how to use them refer to the Programming Manual Programming Manual ...

Page 179: ... amount of time before the printer goes into sleep mode from the Remote Operation Panel The default setting is 5 minutes Status page This lists printer conditions such as the printer s memory the total number of copies printed and paper source settings You can print the status page by pressing the key for 3 seconds or more USB Universal Serial Bus An interface standard for low to middle speed seri...

Page 180: ...Index 1 Index ...

Page 181: ...work interface card 1 39 B 2 B 10 O Online Offline 1 3 E 3 Operator panel 1 2 E 3 Optional network interface 1 39 Options B 2 P Paper adhesive label 5 8 colored paper 5 9 condition 5 3 envelope 5 9 grain 5 5 preprinted paper 5 9 recycled paper 5 10 selection 5 1 size 1 20 2 20 2 21 5 4 special paper 5 7 specifications 5 2 thickness 5 5 transparency 5 7 type 1 22 5 11 weight 1 25 5 4 Paper cassette...

Page 182: ...it IB 10E 1 37 B 2 C 7 Setup 1 12 Side cover B 4 Simple Network Management Protocol SNMP E 4 Sleep mode 1 33 E 2 E 4 Sleep time 1 34 Specifications D 1 D 2 Status page 1 3 1 4 E 4 T Toner counter 3 5 Toner kit TK 17 3 2 installing 3 3 plastic bag 3 3 protective seal 3 4 replacement 3 3 4 7 toner container 3 2 wiper cloth 3 7 Top cover 3 3 4 6 Transfer roller 3 7 4 4 Transparency 2 27 5 7 Troublesh...

Reviews: