Installation of tip
and guard
Montage de la buse
et du garde-buse
IInstalación de la
boquilla y el
portaboquillas
Spitze-und
Schutz-Installation
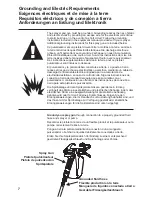
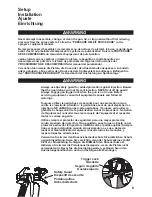
Attach a properly grounded fluid hose to the fluid hose connection fitting on
the bottom of the handle of your spray gun. Use two (2) wrenches - one on
the gun and one on the hose. Tighten securely.
Raccorder un flexible produit correctement mis à la terre à la fixation du
raccord du flexible produit sur le bas de la poignée du pistolet pulvérisateur.
Utiliser deux (2) clés : l'une sur le pistolet et l'autre sur le flexible. Bien
serrer
Conecte una manguera de líquido debidamente conectada a tierra al
dispositivo de conexión de la manguera, en la parte inferior de la
empuñadura de la pistola. Utilice dos (2) llaves, una para la pistola y otra en
la manguera. Apriete fuerte.
Bringen Sie einen ordentlich geerdeten Flüssigkeitsschlauch an das
Flüssigkeitsschlauchverbindungsstück unten am Halter Ihrer Sprühpistole
an. Verwenden Sie zwei (2) Schlüssel - einen für die Pistole und einen für
den Schlauch. Sicher festziehen.
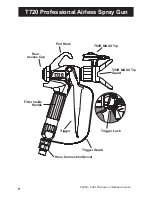
If the T720 spray gun model you own came with the tip included, follow the instructions below to install the guard
and tip. If you are using a different tip, follow the installation instructions provided with the tip you are using.
Si votre modèle de pistolet pulvérisateur T720 comporte une buse, suivez les instructions ci-dessous pour installer
le garde-buse et la buse. Si vous utilisez une buse différente, suivez les instructions de montage fournies avec la
buse que vous utilisez.
Si la pistola de pulverización modelo T720 que ha comprado vino con la boquilla incluida, siga las instrucciones a
continuación para instalar el portaboquillas y la boquilla. Si utiliza otra boquilla, siga las instrucciones de instalación
que la acompañan.
Wurde das Spritzpistolenmodell T720, das Ihnen gehört, mit Düse geliefert, befolgen Sie die Anweisungen unten,
um den Schutz und die Düse zu installieren. Verwenden Sie eine andere Düse, befolgen Sie die
Installationsanweisungen, die mit der Düse bereitgestellt wurden, die Sie verwenden.
A. Use seal alignment tool on T93R tip handle to insert seal and pressure
gasket into back of guard, turn to align with tip shaft opening.
B. Insert tip into opening on T93R guard. NOTE: Narrow end of tip handle
should be in forward position for spraying.
Thread the guard onto gun head until it stops. Tighten slightly with wrench -
DO NOT OVER TIGHTEN.
A. Utiliser l'outil d'alignement du joint sur la poignée de la buse T93R pour
insérer le joint et le joint statique de pression à l'arrière du garde-buse,
tourner pour aligner avec l'ouverture de l'arbre de la buse.
B. Insérer la buse dans l'ouverture sur le garde-buse T93R. REMARQUE :
Le collet de la poignée de la buse doit être placé en position avant pour
la pulvérisation.
Faire passer le garde-buse sur la tête du pistolet jusqu'au blocage. Serrer
légèrement avec une clé. NE PAS TROP SERRER.
A. Utilice una herramienta de alineación de sello en la empuñadura de la
boquilla T93R para introducir el sello y la junta de presión en la parte
posterior del protector, gire para alinear con la abertura del eje de la
boquilla.
B. Inserte la boquilla en la abertura del protector de T93R. OBSERVACIÓN:
El extremo angosto de la empuñadura de la boquilla debe estar en
posición delantera para pulverizar.
Inserte el protector en el cabezal de la pistola hasta que se detenga. Apriete
levemente mediante una llave apropiada: NO APRIETE DEMASIADO.
A. Verwenden Sie das Dichtungsabgleichwerkzeug beim T93R Düsenhalter,
um Dichtung und Druckabdichtung auf der Rückseite des Schutzen
einzufügen und drehen Sie es um es mit der Achsenöffnung auszurichten.
B. Fügen Sie die Düse in die Öffnung des T93R-Schutzes ein. HINWEIS:
Das schmale Ende des Düsenhalters sollte sich in Vorwärtsstellung für
Sprühen befinden.
Bringen Sie den Schutz auf den Pistolenkopf an, bis er stoppt. Leicht mit
Schlüssel anziehen - NICHT ZU STARK ANZIEHEN.
A.
B.
10
Spray Gun
Pistolet pulvérisateur
Pistola de pulverización
Spritzpistole
Grounded fluid hose - Flexible produit mis à la terre
Manguera de líquidos conectada a tierra - Geerdeter Flüssigkeitsschlauch
13
Filter Cleaning and Replacement
Nettoyage et remplacement du filtre
Limpieza y cambio de filtro
Filter säubern und ersetzen
Filter Removal
Démonter
le filtre
Extracción
del filtro
Filter entfernen
IMPORTANT! YOU MUST RELIEVE ALL FLUID PRESSURE FROM
YOUR ENTIRE SPRAY SYSTEM INCLUDING THE SPRAYER, HOSE
AND GUN BEFORE DISCONNECTING THE HOSE!
Turn off your sprayer
and follow the pressure relief procedure as instructed in your equipment
owner's manual. Engage trigger lock. Disconnect the hose from the
connection at the bottom of your gun.
IIMPORTANT ! ENLEVER OBLIGATOIREMENT TOUTE LA PRESSION
LIQUIDE DE L'ENSEMBLE DU SYSTEME DE PULVERISATION Y
COMPRIS DU PULVERISATEUR, DU FLEXIBLE ET DU PISTOLET
AVANT DE DEMONTER LE FLEXIBLE !
Fermer le pulvérisateur et suivre
la procédure de décompression comme indiqué dans le manuel d'utilisateur.
Verrouiller la gâchette. Désolidariser le flexible du raccord situé en bas du
pistolet.
IMPORTANTE: ¡ANTES DE DESCONECTAR LA MANGUERA, ES
PRECISO LIBERAR TODA LA PRESIÓN DEL LÍQUIDO EN TODO EL
SISTEMA DE PULVERIZACIÓN, INCLUIDO EL PULVERIZADOR, LA
MANGUERA Y LA PISTOLA!
Desactive el pulverizador y siga las
instrucciones de descompresión que se incluyen en el manual del usuario
del equipo. Trabe el seguro del gatillo. Desconecte la manguera de la
conexión en la parte inferior de la pistola.
WICHTIG! SIE MÜSSEN DEN GESAMTEN FLÜSSIGKEITSDRUCK AUS
DEM GESAMTEN SPRÜHSYSTEM, EINSCHLIESSLICH DER
SPRÜHANLAGE, DES SCHLAUCHS UND DER PISTOLE ENTFERNEN,
BEVOR SIE DEN SCHLAUCH ENTFERNEN!
Schalten Sie Ihre
Sprühanlage aus und befolgen Sie den Druckausgleichablauf wie im
Handbuch zur Ausrüstung angegeben. Auslösersperre aktivieren. Trennen
Sie den Schlauch von der Verbindung unten an Ihrer Pistole.
!
Unscrew and remove
fitting here
Dévisser et enlever la
fixation à ce niveau
Desenrosque y retire el
accesorio de conexión
Schrauben Sie die
Verbindung hier ab und
entfernen Sie sie
Disconnect fluid hose from base of gun. Using a 3/4" or 19mm wrench or an
adjustable wrench, unscrew and remove the handle from the head of the
gun using the flat areas at the base of the handle. Be sure to retain the
white nylon gasket between the gun handle and gun head.
Disconnect fluid hose from base of gun. Using a 3/4" or 19mm wrench or an
adjustable wrench, unscrew and remove the handle from the head of the
gun using the flat areas at the base of the handle. Be sure to retain the
white nylon gasket between the gun handle and gun head.
Disconnect fluid hose from base of gun. Using a 3/4" or 19mm wrench or an
adjustable wrench, unscrew and remove the handle from the head of the
gun using the flat areas at the base of the handle. Be sure to retain the
white nylon gasket between the gun handle and gun head.
Disconnect fluid hose from base of gun. Using a 3/4" or 19mm wrench or an
adjustable wrench, unscrew and remove the handle from the head of the
gun using the flat areas at the base of the handle. Be sure to retain the
white nylon gasket between the gun handle and gun head.
T720
T720


