4
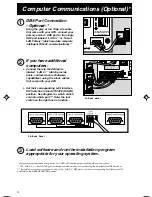
DB9 Port Connection
–Optional–*
Using the grey or tan Tripp Lite cable
that came with your UPS, connect your
primary server’s DB9 port to the single
DB9 port labeled “LAN 4.1” or "Smart
LAN Primary" (which provides complete
intelligent RS-232 communications).**
If you have additional
computers:
Connect them to the DB9 ports
labeled “LAN 2.1” (which provide
basic, contact-closure shutdown
capabilities) using the black cables
that came with your UPS.
Set their corresponding LAN Interface
DIP Switches to the ACTIVATE (DOWN)
position. See diagram for which switch
controls which port.*** Note: the last
switch on the right has no function.
3
2
1
* Computer communications are optional. Your UPS will function properly without these connections.
** The “LAN 4.1” or "Smart" DB9 port is always enabled and is not controlled by the LAN Interface DIP Switches.
*** If you do not connect a computer to any of the “LAN 2.1” DB9 ports, set their corresponding LAN Interface DIP
Switches to the DEACTIVATE (UP) position.
a.
b.
2a. Back panel
Load software and run the installation program
appropriate for your operating system.
2b. Back Panel
CAUTION: DO NOT UNPLUG WHILE
OPERATING OR ARCING WILL OCCUR
36VDC 175 AMPS MAX
IN: 230VAC 50/60HZ 5000VA 4500W
OUT-LINE: 230VAC NOM 50/60HZ 5000VA 3700W
OUT-BAT: 230VAC NOM 50HZ 5000VA 3700W
CA
OPE
Computer Communications (Optional)*
9905251 230V SmartPro Datacenter OM.p65
8/8/00, 2:02 PM
4


