background image

3

Installation

A

B

A

C

D

Mounting the PDU

The PDU supports five primary mounting configurations: 1U Rack, 0U Rack (Vertical), Wall,  

Under-Counter and Reduced-Depth. 

Note:

 Regardless of configuration, the user must determine the fitness of hardware and procedures before mounting. The PDU 

and included hardware are designed for common rack and rack enclosure types and may not be appropriate for all applications. 

Exact mounting configurations may vary. Screws for attaching the mounting brackets to the PDU are included. Use only the screws 

supplied by the manufacturer, or their exact equivalent (#6-32, 3/16" flat head).

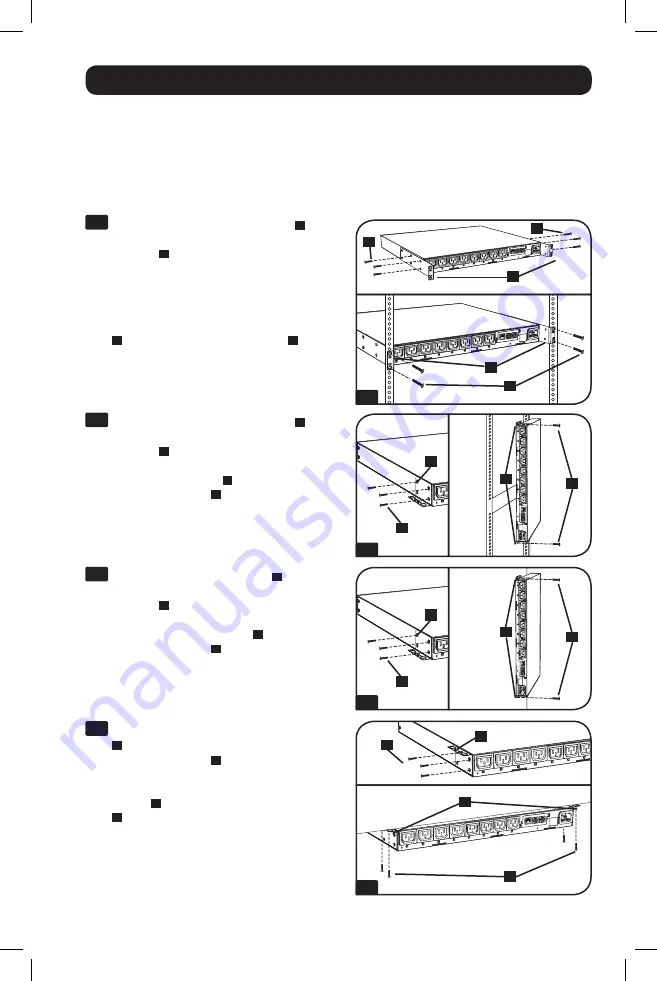
1-1

 1U Rack Mounting: 

Use 3 screws 

A

 to 

attach each of the 2 longer mounting 
brackets 

B

 to the PDU as shown. You 

can mount the PDU in a recessed 
position by attaching the mounting 

brackets so they extend beyond the front 
panel of the PDU. Mount the PDU in the 
rack by inserting 4 user-supplied screws 

C

 through the mounting brackets 

D

 and 

into the mounting holes of the rack rails.

1-2

 0U Rack Mounting:

 Use 3 screws 

A

 to 

attach each of the 2 shorter mounting 
brackets 

B

 to the PDU as shown. Mount 

the PDU vertically by inserting 2 or more 

user-supplied screws 

C

 through the 

mounting brackets 

D

 and into mounting 

points in the rack or rack enclosure. 

1-3

 Wall Mounting: 

Use 3 screws 

A

 to 

attach each of the 2 shorter mounting 
brackets 

B

 to the PDU as shown. Mount 

the PDU to the wall by inserting 2 or 

more user-supplied screws 

C

 through the 

mounting brackets 

D

 and into secure 

mounting points.

1-4

 Under-Counter Mounting: 

Use 3 screws 

A

 to attach each of the 2 shorter 

mounting brackets 

B

 to the PDU as 

shown. Mount the PDU under the counter 
by inserting 2 or more user-supplied 
screws 

C

 through the mounting brackets 

D

 and into secure mounting points.

1-1

A

B

C

D

A

B

C

D

A

B

C

D

1-2

1-3

1-4

15-04-186-93341D.indb   3

4/16/2015   9:19:49 AM

Summary of Contents for PDUMH20HVNET

Page 1: ...ranty and Product Registration 9 Espa ol 10 Fran ais 19 PROTECT YOUR INVESTMENT Register your product for quicker service and ultimate peace of mind You could also win an ISOBAR6ULTRA surge protector...

Page 2: ...its and earth faults The electrical outlets supplying power to the equipment should be installed near the equipment and easily accessible Do not connect the PDU to an ungrounded outlet or to extension...

Page 3: ...e front panel of the PDU Mount the PDU in the rack by inserting 4 user supplied screws C through the mounting brackets D and into the mounting holes of the rack rails 1 2 0U Rack Mounting Use 3 screws...

Page 4: ...should not share a circuit with a heavy electrical load Note When connecting the PDU it should be provided with over current protection and a maximum 20A branch rated over current protection device 2...

Page 5: ...PoE Power over Ethernet applications The PDU will attempt to obtain an IP address via DHCP This may take as long as several minutes depending on your network environment 3 1 3 2 Discover IP Address Co...

Page 6: ...an IP address has been assigned to the PDU attempt to access it with a Web browser that supports frames forms and Java Open a Web browser on a computer connected to the LAN and enter the IP address a...

Page 7: ...equipment When an outlet is live the associated LED illuminates Digital Load Meter Ammeter The total electrical current drawn by connected equipment is displayed on the meter in amperes Longer Mounti...

Page 8: ...the network with a standard Ethernet patch cable The Status LED A and Link LED B indicate several operating conditions as shown in the table below This port is not compatible with PoE Power Over Ether...

Page 9: ...te for details FCC Notice Class A This device complies with part 15 of the FCC Rules Operation is subject to the following two conditions 1 This device may not cause harmful interference and 2 this de...

Page 10: ...0HVNET N mero de Serie AGPD6684 Instrucciones de seguridad importantes 11 Instalaci n 12 Caracter sticas 16 Soporte t cnico 17 Garant a 18 English 1 Fran ais 19 1111 W 35th Street Chicago IL 60609 USA...

Page 11: ...conexi n a tierra Los tomacorrientes el ctricos que suministran energ a al equipo deben instalarse pr ximos al equipo y ser f cilmente accesibles No conecte El PDU a un toma corriente que no est a tie...

Page 12: ...tidor insertando cuatro tornillos suministrados por el usuario C a trav s de los soportes de montaje D y los hoyos de montaje en los rieles del bastidor 1 2 Montaje en Bastidor 0U Vertical Use 3 torni...

Page 13: ...p blica Nota La fuente de energ a CA no deber compartir un circuito con una carga el ctrica pesada Nota Al conectar el PDU debe estar equipado con protecci n contra sobrecorriente y un dispositivo de...

Page 14: ...ible con la aplicaci n PoE Power over Ethernet Energ a sobre la Ethernet El PDU tratar de obtener una direcci n IP a trav s de DHCP Esto puede tomar varios minutos dependiendo de su entorno de red 3 2...

Page 15: ...spu s que una direcci n IP ha sido asignada al PDU trate de acceder con navegador de Web que soporte frames marcos forms formas y Java Abra un Navegador de Web en una computadora conectada al LAN Loca...

Page 16: ...a de corriente est viva el LED asociado se ilumina Medidor Digital de Carga Amper metro La corriente el ctrica total utilizada por el equipo conectado se muestra en amperes en el medidor Soportes Mont...

Page 17: ...A y el LED de Liga B indican algunas condiciones de operaci n como se muestra en la siguiente tabla Este puerto no es compatible con la aplicaci n PoE Power over Ethernet Energ a sobre la Ethernet Con...

Page 18: ...cos pero usted puede tener otros derechos que var an de jurisdicci n a jurisdicci n ADVERTENCIA El usuario individual debe encargarse de determinar antes de usarlo si este dispositivo es apropiado ade...

Page 19: ...MH20HVNET N mero de S rie AGPD6684 Importantes consignes de s curit 20 Installation 21 Caract ristiques 25 Assistance technique 26 Garantie 27 English 1 Espa ol 10 1111 W 35th Street Chicago IL 60609...

Page 20: ...ircuits et les d fauts la terre Les prises lectriques qui alimentent l quipement doivent tre install es proximit de l quipement et tre facilement accessibles Ne pas connecter la PDU dans une prise non...

Page 21: ...anneau avant de l unit Montez l unit de distribution dans le b ti en ins rant 4 vis fournies par vous C dans les supports de fixation D et dans les trous sur les rails du b ti 1 2 Montage en b ti 0U v...

Page 22: ...charge lectrique lourde Remarque Lors du branchement de la PDU elle devrait recevoir une protection contre les surcharges et un dispositif de protection contre les surcharges d une section nominale d...

Page 23: ...et La PDU tentera d obtenir une adresse IP via DHCP Cela pourrait prendre plusieurs minutes selon l environnement de votre r seau 3 2 Trouver l adresse IP Communiquez avec votre administrateur de r se...

Page 24: ...ne adresse IP affect e la carte essayer d y acc der l aide d un navigateur Web qui supporte les cadres les masques de saisie et Java Ouvrir un navigateur sur un ordinateur connect au r seau local et e...

Page 25: ...t du courant alternatif l quipement connect Quand une prise est sous tension le voyant DEL correspondant s allume Indicateur de charge num rique amp rem tre La totalit du courant lectrique utilis par...

Page 26: ...voyant DEL Status tat A et le voyant DEL Link lien B indiquent les conditions de fonctionnement telles qu indiqu es dans le tableau ci dessous Incompatible avec les applications PoE Power Over Ethern...

Page 27: ...ssus pourraient ne pas s appliquer vous Cette garantie vous donne des droits l gaux sp cifiques et vous pourriez avoir d autres droits selon les juridictions MISE EN GARDE L utilisateur devra prendre...

Page 28: ...28 1111 W 35th Street Chicago IL 60609 USA www tripplite com support 15 04 186 93 341D_RevA 15 04 186 93341D indb 28 4 16 2015 9 20 01 AM...

Reviews: