background image

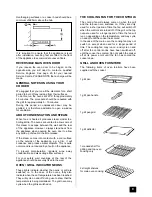
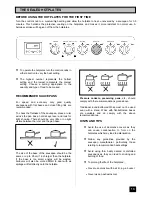
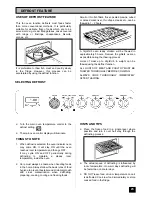
To correctly locate the grill pan on the shelf, ensure
that the cut out on the underside of the handle
bracket locates over the front bar of the shelf.

To check the progress of the food being grilled, the
grill pan should be withdrawn on the shelf to tend the
food during cooking, or the carrier shelf can be lifted
away from the cooker and rested on a heat resistant
work surface.

HINTS AND TIPS

l

Food should be thoroughly dried before
grilling to minimise splashing.  Brush  lean
meats and fish lightly with a little oil or melted
butter to keep them moist during cooking.

l

Adjust the grid and grill pan runner position to
allow for different heights of food.

l

Place food on the grill pan grid or directly
onto the grill pan base.

l

Accompaniments such as tomatoes and
mushrooms may be placed around the outer
edges or underneath the grid when grilling meats.

l

When toasting bread use the shelf in position 2
with the grid in the high position and placing the
bread in the centre of the grid.

l

Preheat the grill on a full setting for five minutes
before cooking. Adjust the shelf as necessary
during cooking.

l

The food should be turned over during cooking
as required.

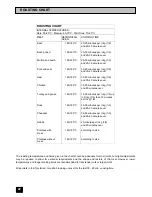
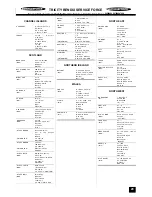
GRILLING CHART

FOOD

SHELF

GRILL TIME

(mins)

Bacon  Rashers

Beefburgers

Chicken Joints

Chops - Lamb
              Pork

Fish - Whole
          Trout/Mackerel

Fillets - Plaice/Cod

Kebabs

Kidneys - Lamb/Pig

Liver - Lamb/Pig

Sausages

Steaks - Rare
              Medium
              Well Done

Toasted Sandwiches

2 crk.

2 crk.

2 crk.

2 crk.
2 crk.

2 crk.

2 crk.

2 crk.

2 crk.

2 crk.

2 crk.

2 crk.
2 crk.
2 crk.

2 crk.

2-3 each side

6-10 each side

15-20 each side

7-10 each side

10-15 each side

8-12 each side

4-6 each side

10-15 each side

4-6 each side

5-10 each side

10-15 each side

3-6 each side
6-8 each side

7-10 each side

1¼-1½ each

side

crk. = cranked shelf                      
Shelf positions are counted from the bottom
upwards.

The times quoted above are given as a guide and
should be adjusted to suit personal taste.

16

16

Summary of Contents for SI 322

Page 1: ...MODEL NO SI 322 SI 323 OPERATING AND INSTALLATION INSTRUCTIONS ...

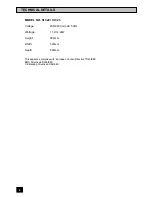
Page 2: ...ltage 230 240 Volts AC 50Hz Wattage 11 2 12 2kW Height 900mm Width 500mm Depth 600mm This appliance complies with European Council Directive 73 23 EEC EMC Directive 89 336 EEC CE Marking Directive 93 68 EEC 2 TECHNICAL DETAILS ...

Page 3: ...el 10 The Electronic Minute Minder 11 The Sealed Hotplates 13 Recommended Saucepans 13 Hints and Tips 13 Deep Fat Frying 14 Preserving 14 The Grill 15 Selecting the Grill 15 Things to Note 15 The Grill Pan and Handle 15 Hints and Tips 16 Grilling Chart 16 The Top Oven 17 Uses of the Top Oven 17 Selecting the Top Oven 17 Things to Note 17 To Fit the Top Oven Shelf 17 Hints and Tips 17 The Main Fan ...

Page 4: ...ate Trims 24 Things To Note 24 Cleaning the Outside of the Cooker 24 Cleaning the Grill Pan Grill Pan Grid and Oven Shelves 25 Cleaning Inside the Grill Oven Compartments 25 Care of Stayclean Surfaces 25 Hints and Tips 25 Cleaning between the Outer and Inner Door Glass 26 Something not Working 27 Service and Spare Parts 28 Customer Service Centres 29 Guarantee Conditions 31 4 CONTENTS ...

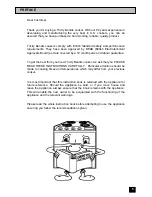
Page 5: ...our new Tricity Bendix cooker we ask that you PLEASE READ THESE INSTRUCTIONS CAREFULLY Particular attention should be made to cooking times and temperatures which may differ from your previous cooker It is most important that this instruction book is retained with the appliance for future reference Should the appliance be sold or if you move house and leave the appliance always ensure that the boo...

Page 6: ...ith wet hands This appliance is designed to be operated by adults Young children must not be allowed to tamper with the product or play with the controls Accessible parts especially around the grill area may become hot when the appliance is in use Children should be kept away until it has cooled Take great care when heating fats and oils as they will ignite if they become too hot This product has ...

Page 7: ...should be kept clean at all times A build up of fats or other foodstuffs could result in a fire especially in the grill pan Do not leave utensils containing foodstuffs e g fat or oil in or on the appliance in case it is inadvertently switched ON Cookers and hobs become very hot and retain their heat for a long period of time after use Children should be kept well away from the appliance until it h...

Page 8: ... with at least 3mm contact separation The cable must have conductors of sufficiently high cross sectional area to prevent overheating and deterioration The cable should be routed away from potentially hot areas marked by X in the diagram below To move the cooker open the main oven door and lift the cooker by holding inside the top of the compartment This is a type X appliance which means it is fre...

Page 9: ...e normal and is not caused by a fault on the appliance To prevent discolouration regularly wipe away condensation and also soilage from surfaces For your safety wall coverings at the rear of the appliance should be securely fixed to the wall OVEN GRILL INDICATOR NEONS These lights indicate whether the ovens or grill are switched on In the case of the ovens they also indicate when the set temperatu...

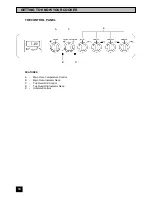
Page 10: ...HE CONTROL PANEL FEATURES A Main Oven Temperature Control B Main Oven Indicator Neon C Top Oven Grill Control D Top Oven Grill Indicator Neon E Hotplate Controls 10 GETTING TO KNOW YOUR COOKER A C B D E ...

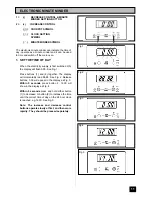
Page 11: ... Press buttons 1 and 2 together The display will momentarily read 88 88 See Fig 2 Release buttons 0 00 will appear in the display as Fig 3 Within 5 seconds press button 2 12 00 will show in the display as Fig 4 Within 5 seconds press and hold either button 1 to decrease or button 2 to increase the time until the correct time of day on the 24 hour clock is reached e g 14 30 See Fig 5 Note The incre...

Page 12: ...okpot symbol will go out see Fig 9 If using the main oven it will come on again once button 1 has been depressed The second oven will remain on When cooking is complete remove food and turn OFF oven temperature control 3 TO CANCEL THE MINUTE MINDER Press and release button 1 Press and hold button 1 and the display will count down in one minute intervals to 0 00 See Fig 10 Release button 1 After a ...

Page 13: ...ure cookers preserving pans etc should comply with the recommendations given above Traditional round bottomed Woks must not be used even with a stand Woks with flat bottomed bases are available and do comply with the above recommendations HINTS AND TIPS l Avoid the use of decorative covers as they can cause condensation to form on the hotplates which may lead to deterioration l Follow any guidelin...

Page 14: ...the chips for a few minutes at 170 C 340 F to seal the outside Remove the chips from the oil Increase the temperature of the oil to 190 C 375 F to finish cooking and brown the chips Chips may be kept for several hours after the first frying before finishing off with the second frying 6 Frying temperatures Celsius Fahrenheit Scale o C Scale o F 150 300 First frying of potatoes 170 340 175 350 180 3...

Page 15: ...splashes may be evident as the grill cleans itself The top oven cannot be operated when the grill is in use Only the inner element will operate when grilling THE GRILL PAN AND HANDLE The grill pan is supplied with a removable handle To insert the handle press the button on the handle with the thumb and pivot the handle slightly upwards inserting the lip into widest part of the bracket Move the han...

Page 16: ...rilling meats l When toasting bread use the shelf in position 2 with the grid in the high position and placing the bread in the centre of the grid l Preheat the grill on a full setting for five minutes before cooking Adjust the shelf as necessary during cooking l The food should be turned over during cooking as required GRILLING CHART FOOD SHELF GRILL TIME mins Bacon Rashers Beefburgers Chicken Jo...

Page 17: ...d be fitted with the straight rods uppermost on the frame and the forms towards the back of the oven If not fitted correctly the anti tilt and safety stop mechanism will be affected HINTS AND TIPS l All cooking should be carried out using an oven shelf positioned in one of the shelf runners l Stand dishes on a suitably sized baking tray on the shelf to prevent spillage onto the oven base and to he...

Page 18: ... and finish of the baking trays and dishes will affect the degree of base browning of the food Enamelware dark heavy or non stick utensils increase base browning Shiny aluminium or polished steel trays reflect the heat away and give less base browning l DO NOT use the grill pan as a baking tray as this will increase base browning of the food l Because of the smaller cooking space lower temperature...

Page 19: ...e fan oven quickly reaches its temperature so it is not usually necessary to preheat the oven Without preheating however you may find you need to add an extra 5 10 minutes on the recommended cooking times For recipes needing high temperatures e g bread pastries scones soufflés etc best results are achieved if the oven is preheated first COOKING TEMPERATURES Fan oven cooking generally requires lowe...

Page 20: ...od e g Victoria sandwich cakes those of similar size will be cooked in the same time l It is recommended that when baking larger quantities the shelf positions should be evenly spaced to suit the load being cooked A slight increase in cooking time may be necessary l Do not place dishes or baking trays directly on the oven floor as it interferes with the oven air circulation and can lead to base bu...

Page 21: ...es Milk Puddings Pasta Lasagne etc Pastry Choux Eclairs Profiteroles Flaky Puff Pies Shortcrust Mince Pies Meat Pies Quiche Tarts Flans Patés and Terrines Roasting Meat Poultry Scones Shepherd s pie Soufflés Vegetables Baked Jacket Potatoes Roast Potatoes Stuffed Marrow Stuffed Tomatoes Yorkshire Puddings large individual that oven shelves are evenly spaced when more than one is used 170 190 190 2...

Page 22: ...over 30 40 minutes per kg 1lb and 30 40 minutes over 15 20 minutes per kg 1lb and 20 minutes over 15 20 minutes per kg 1lb up to 3 kg 7lb then 10 minutes per kg 1lb 25 35 minutes per kg 1lb and 25 30 minutes over 35 40 minutes per kg 1lb and 35 40 minutes over 20 minutes per kg 1lb and 20 minutes over according to size according to size The roasting temperatures and times given in the chart should...

Page 23: ...me Always follow the basic rules of food hygiene to prevent bacterial and microbial growth and cross contamination when defrosting preparing cooking cooling and freezing foods Small or thin fish fillets frozen peeled prawns cubed or minced meat liver thin chops steaks etc can be thawed in 1 2 hours A 1kg 2 lb oven ready chicken will be thawed in approximately 5 hours Remove the giblets as soon as ...

Page 24: ...eaner or a Brillo pad You may have to rub hard for several minutes Rinse off cleaning agents thoroughly with a damp cloth Switch to a low or medium setting for a few minutes until the hotplate is thoroughly dry CLEANING THE HOTPLATE TRIMS The stainless steel trims may become straw coloured during use Using a proprietary stainless steel cleaner e g Shiny Sinks will help maintain a bright appearance...

Page 25: ...re prevent it from splashing onto the Stayclean finish HINTS AND TIPS l Manual cleaning of the Stayclean linings IS NOT recommended Damage will occur if oven sprays or abrasives of any kind are used l Slight discolouration and polishing of the Stayclean linings may occur in time This does not affect the Stayclean properties in any way l A good time to allow the oven to run on is after the weekly r...

Page 26: ... it is damaged it will not work Ensure that all parts are well rinsed and thoroughly dry before attempting to replace the outer door TO REPLACE THE OUTER GLASS 1 Holding the oven door glass with both hands gently place the locators into the holes of the brackets at the bottom of the oven door 2 Push the top of the oven glass towards the oven door ensuring the screw location holes line up 3 Hold th...

Page 27: ...nce has been wired in and is switched on at the wall Check that the main cooker fuse is working Check that the timer is set to manual The oven temperature is too high or low Check that the recommended temperatures and shelf positions are being used see page 21 Be prepared to adjust the temperatures up or down by 10 C to achieve the results you want The hotplates and main oven work but the grill do...

Page 28: ... on the following pages headed Tricity Bendix Service Force Before calling out an engineer please ensure you have read the details under the heading Something Not Working and have the model number and purchase date to hand Please note that all enquiries concerning service should be addressed to your local Service Centre For general enquiries concerning your Tricity Bendix cooker or for further inf...

Page 29: ...S Bolts Shetland Ltd 26 North Road Lerwick Shetland ZE1 0PE WHALSAY OWN SALES Leask Electrical Harlsdale Symbister Whalsay Shetland ZE2 9AA NORTHERN IRELAND BELFAST M27 Owenmore House Kilwee Industrial Estate Upper Dunmury Lane Belfast BT17 0HD WALES CARDIFF M28 Guardian Industrial Estate Clydesmuir Road Tremorfa Cardiff CF2 2QS CLYWD M14 Unit 6 7 Coed Parc Abergele Road Rhuddlan Clwyd Wales LL18 ...

Page 30: ...side Ind Est Works Road Letchworth Herts SG6 1LA LONDON M76 66 Paddenswick Road Hammersmith London W6 OUB MAIDENHEAD M60 Reform Road Maidenhead Berkshire SL6 8BY 7MOLESEY M61 10 Island Farm Avenue West Molesey Surrey KT8 2UZ NEWBURY M24 PO Box 5627 Newbury Berkshire RG14 5GF IPSWICH M48 Unit 2B Elton Park Business Centre Hadleigh Road Ipswich IP2 0DD NORWICH M52 2b Trafalgar Street Norwich NR1 3HN...

Page 31: ...ncurred for calls to put right an appliance which is improperly installed or calls to appliances outside the United Kingdom l Appliances found to be in use within a commercial environment plus those which are subject to rental agreements l Products of Tricity Bendix manufacture which are not marketed by Tricity Bendix European Guarantee If you should move to another country within Europe then your...

Page 32: ...development we reserve the right to alter models and specifications without prior notice This handbook is accurate at the date of printing but will be superseded and should be disregarded if specifications or appearance are changed 4 MODEL NO PART NO 311311705 SI 322 SI 323 TRICITY BENDIX PO BOX 47 NEWBURY BERKSHIRE RG14 5XL TELEPHONE 01635 525542 ...

Reviews: