


INSTINCT NATURAL TO PROPANE CONVERSION INSTRUCTIONS
WARNING
!
Failure to retain the O-ring gasket between the venturi
and the blower will cause an improper seal resulting
in a potential risk of a gas leak. A gas leak can result in
substantial property damage, serious injury, or death.
WARNING
!
Ensure the correct venturi for the model is installed.
Natural gas venturis have a white identification label
and LP venturis have a black label. Failure to comply
will affect input rate and combustion of the boiler
which can result in substantial property damage,
serious injury, or death.
NOTICE
Do not use adhesive on any gaskets or O-rings during the
reassembly process.
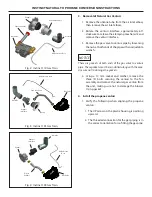
2. Using a 10 mm socket and ratchet, reinstall the
three (3) bolts securing the venturi to the fan
assembly
3. Reassemble the gas valve to venturi pipe to the
gas valve and venturi taking care to ensure that the
gaskets are seated properly before tightening the
nut.
4. Install the venturi interface on the venturi and
rotate counterclockwise until locked into place.
5. Install the air inlet elbow then attach the silicone
tube.
WARNING
!
Failure to properly install the air inlet elbow and attach
the silicone tube can affect combustion of the boiler
which can result in substantial property damage,
serious injury, or death.
6. Open the manual gas shut off valve to the unit.
Before placing the boiler back into operation, test
all gas connections for leaks and repair if leaks are
found.
WARNING
!
Do not check for gas leaks with an open flame. Use a
bubble test. Failure to test for gas leaks can result in
substantial property damage, serious injury, or death.
7. Attach the propane conversion label to the gas
valve and the propane conversion rating label next
to the existing rating label
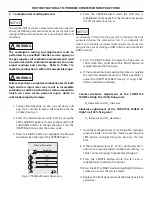
8. Enter the propane (LP) appliance code from the
propane rating label supplied in the conversion kit:
1. Press and hold the UP and DOWN buttons
together see Fig. 5.
2.
3.
Fig. 5: CTRLMax Navigation Control
4. Enter the installer access code “054” by using
the LEFT and RIGHT buttons to select a digit and
the UP and DOWN buttons to change the digit.
Press the center button to enter the access code.
5. With the CH/DHW Settings icon highlighted,
press the center button.
6. Press the DOWN button to highlight the Boiler
Settings icon then press the center button.
7. Scroll down to highlight Appliance Setting then
press the center button.
8. Enter the propane (LP) appliance code from
the rating label by using the LEFT and RIGHT
buttons to select a character and the UP and
DOWN buttons to change the character. Press
the center button to enter the appliance code.