background image

RR 511 DAB

22

3.   Appuyez sur le bouton REC pour démarrer l’enregistrement et commencer à parler 

depuis l’avant de l’appareil.

4.   Utilisez le bouton PAUSE (5) pour arrêter temporairement l’enregistrement, appuyez 

à nouveau dessus pour le reprendre.

5.   Appuyez sur le bouton STOP / EJECT (6) pour arrêter définitivement l’enregistrement.

ÉCOUTEURS

1.   Insérez le casque dans la prise casque.
2.   Démarrez la lecture souhaitée et réglez le volume.

LES PARAMÈTRES DU SYSTÈME

1.   Appuyez longuement sur le bouton MENU (10). Déplacez-vous dans les menus et 

confirmez les options choisies à l’aide du bouton-poussoir (13).

2.   Sélectionnez SYSTEM et confirmez avec le bouton (13).
3.   Divers éléments de menu sont disponibles:
 

Alarm: il est possible de régler la fonction d’alarme (voir le chapitre correspondant 
pour les réglages).


Time: il est possible de régler la date / heure actuelle (voir le chapitre correspondant 
pour les réglages).


Sleep: il est possible d’activer l’arrêt automatique de l’unité (veille) après un certain 
temps. Réglez l’heure d’arrêt automatique souhaitée et confirmez en appuyant sur 
le bouton (13); il est possible de sélectionner entre 90, 60, 45, 30, 15 minutes et 
OFF (fonction veille non active).


Language: il est possible de définir une langue différente pour le menu (par défaut: 
anglais).


Factory reset: il est possible de restaurer les paramètres aux valeurs d’usine.


Software upgrade: le menu est réservé aux centres d’assistance technique, ne pas 
utiliser.


SW Version: affiche la version actuelle du logiciel.

AJUSTEMENT DE L’HEURE ET DE LA DATE

1.   L’appareil étant en veille, appuyez sur le bouton MENU (10). Déplacez-vous dans les 

menus à l’aide du bouton (13).

2.   L’indication SYSTEM apparaît à l’écran, confirmez et sélectionnez l’élément TIME, 

confirmez à nouveau.

3.   Sélectionnez l’élément SET TIME / DATE et réglez l’heure et la date actuelles.
4.   Sélectionnez l’élément SET DATE FORMAT pour régler l’affichage de la date.
5.   Sélectionnez l’élément AUTO UPDATE pour le réglage automatique de l’heure / date 

via la radio FM, DAB ou à partir des deux sources.

Pour éviter d’éventuels dommages auditifs, limiter le temps 
d’écoute à volume élevé.

FR

ANÇAISE

Summary of Contents for RR 511 DAB

Page 1: ...this product see www trevi it RR 511 DAB Guida d uso User Guide RADIO REGISTRATORE CON DAB FM USB SD MP3 BT RADIO CASSETTE RECORDER WITH DAB FM USB SD MP3 BT RADIO MAGNETOPHONE AVEC DAB FM USB SD MP3 BT RADIO CASSETTE RECORDER MIT DAB FM USB SD MP3 BT REGISTRADOR DE RADIO CASSETTE CON DAB FM USB SD MP3 BT ita eng fra deu esp ...

Page 2: ...CHER SCHLÄGE NICHT DER FEUCHTIGKEIT UND DEM REGEN AUSSETZEN ACHTUNG DAS GERÄT NICHT ÖFFNEN IM INNERN BEFINDEN SICH KEINEVOM BENUTZER SELBST INSTANDSETZBARENTEILE UNDAUCH KEINE ERSATZTEILE FÜR JEGLICHE SERVICEARBEITEN WENDEN SIE SICH BITTE AN EINE TREVI AUTORISIERTEN KUNDENDIENSTSTELLE ATTENTION ATTENTION NE PAS OUVRIR L APPAREIL A L INTERIEUR IL N YA PAS DE COMMANDESA MANIPULER PAR L UTILISATEUR O...

Page 3: ...empre che il cavo di alimentazione e il cavo di collegamento siano installati correttamente L adattatore di corrente deve essere collegato a una presa vicina al dispositivo e deve essere facilmente accessibile Se si nota un calore eccessivo sul dispositivo o sull adattatore di corrente scollegare immedia tamente la spina dalla presa di corrente principale Non tirare il cavo di alimentazione Conser...

Page 4: ...TTE 9 TASTO LETTURA CASETTE 10 SEZIONEDICONTROLLOEDISPLAYLCD 11 SELETTORE FUNZIONI 12 NON UTILIZZATO 13 MANOPOLA UP DOWN TASTO CON FERMA 14 MICROFONO 15 INGRESSO SD 16 INGRESSO USB 17 PRESA ALIMENTAZIONE RETE LCD DISPLAY MODE PRESET INFO MENU SCAN PLAY FUNCTION DAB OFF DOWN UP ENTER 230V MIC REC VANO BATTERIE PRESA CUFFIE LCD DISPLAY MODE PRESET INFO MENU SCAN PLAY DAB OFF DOWN ENTER 230V 10 16 15...

Page 5: ...telescopica per tutta la sua lunghezza 2 Premere a lungo il tasto SCAN 10 per effettuare la sintonia e memorizzazione automatica delle stazioni radio Possono essere salvate fino a 30 stazioni radio 3 Per selezionare una stazione radio salvata premere il tasto PRESET nella sezione comandi 10 selezionare e confermare con il tasto manopola 13 4 Per effettuare la ricerca manuale di una stazione radio ...

Page 6: ...icerca manuale delle stazioni DAB presenti DRC permette di abilitare disabilitare la funzione DRC per migliorare il suono durante l ascolto in ambienti rumorosi È possibile impostare il livello di DRC in alto high basso low o Off spento PRUNE permette di eliminare dalle lista delle stazioni memorizzate tutte le radio trovate ma non disponibili scarso segnale NOTA Per ottenere la migliore ricezione...

Page 7: ...oSTOP EJECT 6 per fermaredefinitivamentelariproduzione premerlo nuovamente per estrarre la cassetta REGISTRAZIONE DA ALTRE SORGENTI Nota assicurarsi che la linguetta di abilitazione delle registrazioni sia presente altrimenti non sara possibile registrare la cassetta 1 Posizionare il selettore sulla sorgente desiderata Radio lettore Usb SD Bluetooth ed avviare la riproduzione 2 Inserire la cassett...

Page 8: ...pristino delle impostazioni ai valori di fabbrica Software upgrade menu riservato ai centri di assistenza tecnica non utilizzare SW version mostra la versione del software corrente REGOLAZIONE ORA E DATA 1 Con l apparecchio in standby premere il tasto MENU 10 Muoversi all interno dei menu tramite il tasto manopola 13 2 Sul display compare l indicazione SYSTEM confermare e selezionare la voce TIME ...

Page 9: ... sui rifiuti di apparecchiature elettriche ed elettroniche RAEE Il simbolo del cassonetto barrato riportato sull apparecchiatura indica che il prodotto alla fine della propria vita utile deve essere raccolto separatamente dagli altri rifiuti L utente dovrà pertanto conferire l apparecchiatura integra dei componenti essenziali giunta a fine vita agli idonei centri di raccolta differenziata dei rifi...

Page 10: ...the appliance Before turning on the appliance always check that the power cable and the connection cable are installed correctly The power adapter must be connected to an outlet near the device and must be easily accessible If you notice excessive heat on the device or on the power adapter immediately disconnect the plug from the main power socket Do not pull on the power cable Keep this manual fo...

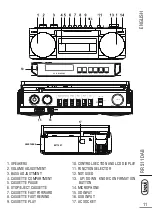
Page 11: ...NCTION DAB OFF DOWN UP ENTER 230V 10 16 15 17 1 SPEAKERS 2 VOLUME ADJUSTMENT 3 BASS ADJUSTMENT 4 CASSETTE COMPARTMENT 5 CASSETTE PAUSE 6 STOP EJECT CASSETTE 7 CASSETTE FAST FORWARD 8 CASSETTE FAST REWIND 9 CASSETTE PLAY 10 CONTROL SECTION AND LCD DISPLAY 11 FUNCTION SELECTOR 12 NOT USED 13 UP DOWN KNOB CONFIRMATION BUTTON 14 MICROPHONE 15 SD INPUT 16 USB INPUT 17 AC SOCKET ...

Page 12: ...sition FM RADIO 1 Open the telescopic antenna along its entire length 2 Long press the SCAN button 10 to automatically tune in and store radio stations Up to 30 radio stations can be saved 3 To select a saved radio station press the PRESET button in the control section 10 select and confirm with the button knob 13 4 To manually search for a radio station turn the knob 13 to search for the desired ...

Page 13: ...e available FULL SCAN to carry out a new scan of the available DAB radio stations MANUAL TUNE to perform a manual search of the DAB stations present DRC allows you to enable disable the DRC function to improve the sound when listening in noisy environments You can set the DRC level to high high low low or Off off PRUNE allows you to delete all the radios found but not available from the list of st...

Page 14: ...ack 5 Press the PAUSE 5 button to stop playback momentarily press it again to resume it 6 To fast forward the tape press the F FWD button 7 7 To rewind the tape quickly press the REW 8 button 8 Press the STOP EJECT button 6 to stop playback permanently press it again to eject the cassette REGISTRATION FROM OTHER SOURCES Note make sure that the record enabling tab is present otherwise it will not b...

Page 15: ...ired automatic switch off time and confirm by pressing the knob button 13 it is possible to select between 90 60 45 30 15 minutes and OFF Sleep function not active Language it is possible to set a different language for the menu default English Factory reset it is possible to restore the settings to factory values Software upgrade menu is reserved for technical assistance centers do not use SW ver...

Page 16: ... the alarm press the button knob 13 TECHNICAL FEATURES Power supply 230V 50Hz 4 D batteries UM 1 batteries not included Reception range FM 87 5 108 0 MHz DAB 174 240 MHz Bluetooth transmission power 2 5mW Bluetooth transmission frequency 2 4GHz Dimensions 317 x 114 x 89mm Precautions for correct disposal of the product The symbol shown on the equipment indicates that waste must be disposed of in s...

Page 17: ...ppareil Avant d allumer l appareil vérifiez toujours que le câble d alimentation et le câble de connexion sont correctement installés L adaptateur secteur doit être connecté à une prise à proximité de l appareil et doit être facilement accessible Si vous constatez une chaleur excessive sur l appareil ou sur l adaptateur secteur débranchez immédiatement la fiche de la prise de courant principale Ne...

Page 18: ...TURE DE CASSETTE 10 SECTION DE CONTRÔLE ET ÉCRAN LCD 11 SÉLECTEUR DE FONCTIONS 12 NON UTILISÉ 13 BOUTON HAUT BAS BOUTON DE CON FIRMATION 14 MICROPHONE 15 ENTRÉE SD 16 ENTRÉE USB 17 AC SOCKET LCD DISPLAY MODE PRESET INFO MENU SCAN PLAY FUNCTION DAB OFF DOWN UP ENTER 230V MIC REC LCD DISPLAY MODE PRESET INFO MENU SCAN PLAY FUNCTION DAB OFF DOWN UP ENTER 230V 10 16 15 17 HEADPHONE FRANÇAISE ...

Page 19: ...électeur 11 sur la position TAPE OFF RADIO FM 1 Ouvrez l antenne télescopique sur toute sa longueur 2 Appuyez longuement sur le bouton SCAN 10 pour accorder et mémoriser automati quementlesstationsderadio Jusqu à30stationsderadiopeuventêtreenregistrées 3 Pour sélectionner une station de radio enregistrée appuyez sur le bouton PRESET dans la section de contrôle 10 sélectionnez et confirmez avec le ...

Page 20: ...adio DAB déplacez vous dans les menus et confirmez avec le bouton bouton 13 Les paramètres suivants sont disponibles FULL SCAN pour effectuer un nouveau scan des stations de radio DAB disponibles MANUAL TUNE pour effectuer une recherche manuelle des stations DAB présentes DRC permet d activer désactiver la fonction DRC pour améliorer le son lors de l écoute dans des environnements bruyants Vous po...

Page 21: ...émarrer la lecture 5 Appuyez sur le bouton PAUSE 5 pour arrêter momentanément la lecture appuyez de nouveau pour la reprendre 6 Pour avancer rapidement la bande appuyez sur le bouton F FWD 7 7 Pour rembobiner rapidement la bande appuyez sur le bouton REW 8 8 Appuyez sur le bouton STOP EJECT 6 pour arrêter définitivement la lecture appuyez de nouveau pour éjecter la cassette INSCRIPTION AUPRÈS D AU...

Page 22: ...unité veille après un certain temps Réglez l heure d arrêt automatique souhaitée et confirmez en appuyant sur le bouton 13 il est possible de sélectionner entre 90 60 45 30 15 minutes et OFF fonction veille non active Language il est possible de définir une langue différente pour le menu par défaut anglais Factory reset il est possible de restaurer les paramètres aux valeurs d usine Software upgra...

Page 23: ...appuyez sur le bouton 13 CARACTÉRISTIQUES TECHNIQUES Alimentation 230V 50Hz 4 piles D UM 1 piles non incluses Plage de réception FM 87 5 108 0 MHz DAB 174 240 MHz Puissance de transmission Bluetooth 2 5 mW Fréquence de transmission Bluetooth 2 4 GHz Dimensions 317 x 114 x 89 mm Recommandations pour l élimination correcte du produit Le symbole figurant sur l appareil indique que le produit fait l o...

Page 24: ...sNetzkabelunddasVerbindungskabel richtig installiert sind Das Netzteil muss an eine Steckdose in der Nähe des Geräts angeschlossen und leicht zugänglich sein Wenn Sie am Gerät oder am Netzteil übermäßige Hitze bemerken ziehen Sie sofort den Stecker aus der Hauptsteckdose Ziehen Sie nicht am Netzkabel Bewahren Sie dieses Handbuch zum späteren Nachschlagen auf PFLEGE UND WARTUNG Zur Reinigung empfeh...

Page 25: ...E FAST REWIND 9 CASSETTE PLAY 10 STEUERTEIL UND LCD ANZEIGE 11 FUNKTIONSAUSWAHL 12 NICHT VERWENDET 13 AUF AB KNOPF BESTÄTIGUNGSTASTE 14 MIKROFON 15 SD EINGANG 16 USB EINGANG 17 AC STECKDOSE LCD DISPLAY MODE PRESET INFO MENU SCAN PLAY FUNCTION DAB OFF DOWN UP ENTER 230V MIC REC LCD DISPLAY MODE PRESET INFO MENU SCAN PLAY FUNCTION DAB OFF DOWN UP ENTER 230V 10 16 15 17 HEADPHONE ...

Page 26: ...io oder das FM Radio auszuwählen 3 Schalten Sie das Radio aus indem Sie den Wahlschalter 11 auf TAPE OFF stellen FM RADIO 1 Öffnen Sie die Teleskopantenne über ihre gesamte Länge 2 Drücken Sie lange die SCAN Taste 10 um Radiosender automatisch einzustellen und zu speichern Es können bis zu 30 Radiosender gespeichert werden 3 Um einen gespeicherten Radiosender auszuwählen drücken Sie die PRESET Tas...

Page 27: ...call angezeigt Mit der Taste dem Knopf 13 auswählen und bestätigen 6 Drücken Sie die INFO Taste 10 um verschiedene von Radiosendern übertragene Informationen auf dem Display anzuzeigen 7 Drücken Sie die Taste MENU 10 um auf das DAB Radio Einstellungsmenü zu zugreifen bewegen Sie sich innerhalb der Menüs und bestätigen Sie mit der Taste dem Knopf 13 Folgende Einstellungen stehen zur Verfügung FULLS...

Page 28: ...uswählen indem Sie den Knopf 13 drehen und den Messwert über die PLAY Taste 10 anhalten aktivieren KASSETTENSPIELER KASSETTENREPRODUKTION 1 Stellen Sie den Wahlschalter auf die Position TAPE OFF und öffnen Sie das Kasset tenfach mit dem Schlüssel 6 2 Legen Sie eine Kassette mit der Seite die Sie hören möchten nach außen in das Fach ein 3 Stellen Sie die Lautstärke nach Ihren Wünschen ein 4 Drücken...

Page 29: ...ste 10 Bewegen Sie sich innerhalb der Menüs und bestätigen Sie die ausgewählten Optionen mit dem Knopf 13 2 Wählen Sie SYSTEM und bestätigen Sie mit dem Knopf 13 3 Es stehen verschiedene Menüpunkte zur Verfügung Alarm Die Alarmfunktion kann eingestellt werden Einstellungen siehe Kapitel Time Es ist möglich das aktuelle Datum die aktuelle Uhrzeit einzustellen Einstel lungen finden Sie im entspreche...

Page 30: ... und bestätigen Sie die ausgewählten Optionen mit dem Knopf 13 2 Die Anzeige SYSTEM erscheint auf dem Display bestätigen Sie Wählen Sie das Element ALARM und bestätigen Sie 3 Wählen Sie ALARM1 SETUP oder ALARM2 SETUP 4 Stellen Sie die Alarmaktivierungszeit ein ON TIME 5 Stellen Sie die Dauer des Alarms ein DURATION 6 Stellen Sie die Aktivierungsfrequenz DAILY jeden Tag ONCE einmal WEEKENDS Samstag...

Page 31: ... Gemeindeverwaltung eingerichteten Wertstoffsammelstellen bringen oder dem Händler beim Kauf eines neuen Produkts übergeben Die getrennte Müllsammlung und anschließende Aufbereitung Wiederverwertung und Entsorgung fördern die Herstellung von Geräten unter Verwendung wiederverwerteter Materialien und vermindern die negativen Auswirkungen auf die Umwelt und Gesundheit in Folge einer falschen Müllver...

Page 32: ...ón estén instalados correctamente El adaptador de corriente debe estar conectado a una toma de corriente cerca del dispositivo y debe ser fácilmente accesible Si nota un calor excesivo en el dispositivo o en el adaptador de corriente desconecte inmedia tamente el enchufe de la toma de corriente principal No tire del cable de alimentación Guarde este manual para referencia futura CUIDADO Y MANTENIM...

Page 33: ...LECTOR DE CASSETTE 10 SECIÓN DE CONTROL Y PANTALLA LCD 11 SELECTOR DE FUNCIONES 12 NO UTILIZADO 13 BOTÓN ARRIBA ABAJO BOTÓN DE CONFIRMACIÓN 14 MICRÓFONO 15 ENTRADA SD 16 ENTRADA USB 17 TOMA DE AC CORENTE LCD DISPLAY MODE PRESET INFO MENU SCAN PLAY FUNCTION DAB OFF DOWN UP ENTER 230V MIC REC LCD DISPLAY MODE PRESET INFO MENU SCAN PLAY FUNCTION DAB OFF DOWN UP ENTER 230V 10 16 15 17 HEADPHONE ...

Page 34: ...ena telescópica en toda su longitud 2 Mantenga presionado el botón SCAN 10 para sintonizar y almacenar estaciones de radio automáticamente Se pueden guardar hasta 30 estaciones de radio 3 Para seleccionar una estación de radio guardada presione el botón PRESET en la sección de control 10 seleccione y confirme con el botón perilla 13 4 Para buscar manualmente una estación de radio gire la perilla 1...

Page 35: ...onfiguraciones están disponibles FULL SCAN para realizar un nuevo escaneo de las estaciones de radio DAB dispo nibles MANUALTUNE pararealizarunabúsquedamanualdelasestacionesDABpresentes DRC le permite habilitar deshabilitar la función DRC para mejorar el sonido cuando escucha en entornos ruidosos Puede establecer el nivel de DRC en alto alto bajo bajo o apagado apagado PRUNE le permite eliminar to...

Page 36: ...ción momentáneamente presiónelo nuevamente para reanudarlo 6 Para avanzar rápidamente la cinta presione el botón F FWD 7 7 Para rebobinar la cinta rápidamente presione el botón REW 8 8 Presione el botón STOP EJECT 6 para detener la reproducción permanentemente presiónelo nuevamente para expulsar el cassette REGISTRO DE OTRAS FUENTES Nota asegúrese de que la pestaña de activación de grabación esté ...

Page 37: ...do automático deseado y confirme presionando el botón de mando 13 es posible seleccionar entre 90 60 45 30 15 minutos y APAGADO la función de reposo no está activa Language es posible establecer un idioma diferente para el menú predeterminado inglés Factory reset es posible restaurar la configuración a los valores de fábrica Software upgrade el menú está reservado para centros de asistencia técnic...

Page 38: ...a Para apagar la alarma presione la perilla de botón 13 CARACTERÍSTICAS TÉCNICAS Fuente de alimentación 230V 50Hz 4 baterías D UM 1 baterías no incluidas Rango de recepción FM 87 5 108 0 MHz DAB 174 240 MHz Potencia de transmisión Bluetooth 2 5mW Frecuencia de transmisión de Bluetooth 2 4GHz Dimensiones 317 x 114 x 89 mm Advertencias para la correcta eliminación del producto El símbolo que aparece...

Page 39: ...RR 511 DAB 39 NOTE ...
Page 40: ...ION OF CONFORMITY Hereby TREVI Spa declares that the radio equipment type RR 511 DAB is in compliance with directive 2014 53 EU The full text of the EU declaration of conformity is available at the following internet address https www trevi it dms zidi TREVI DOCRR511DAB pdf Trevi S p A Strada Consolare Rimini San Marino 62 47924 Rimini RN Italy Tel 0541 756420 Fax 0541 756430 www trevi it e mail i...

Reviews: