background image


- 37 - 

z


Setting:

 This option contains the relative FTP server settings. 

-


User: 

S


elect a user from the drop-down menu or check All 

Accounts.


-


Path:


Click Open and select the destination folder from the 

internal/USB drive for FTP server.


-


Root: 

Check the Root box to select the root level of all the 

drives at once. 

-


Authority:

 Select Read Only or Read/Write from the drop-

down menu. 

-


Add:

 Click Add to save your share/permissions. 

-


Max user: 

Select the maximum number of users allowed to 

connect via FTP at one time from the drop-down menu.   

-


Idle time: 

Select the idle time (1-10 minutes).    Users will be 

disconnected when idle for the specified amount of time. 

-


Port: 

You may change the port used for FTP. The default port 

is 21. 

-


Flow control: 

Choose Unlimited or enter a data rate (x10 KB) 

for restricted data flow. This setting is only necessary where 
network traffic is significant and can be affected by FTP 
server activity. 

z


FTP Server Status:


Displays the current information regarding 

the FTP 


- 38 - 

Advanced 

J

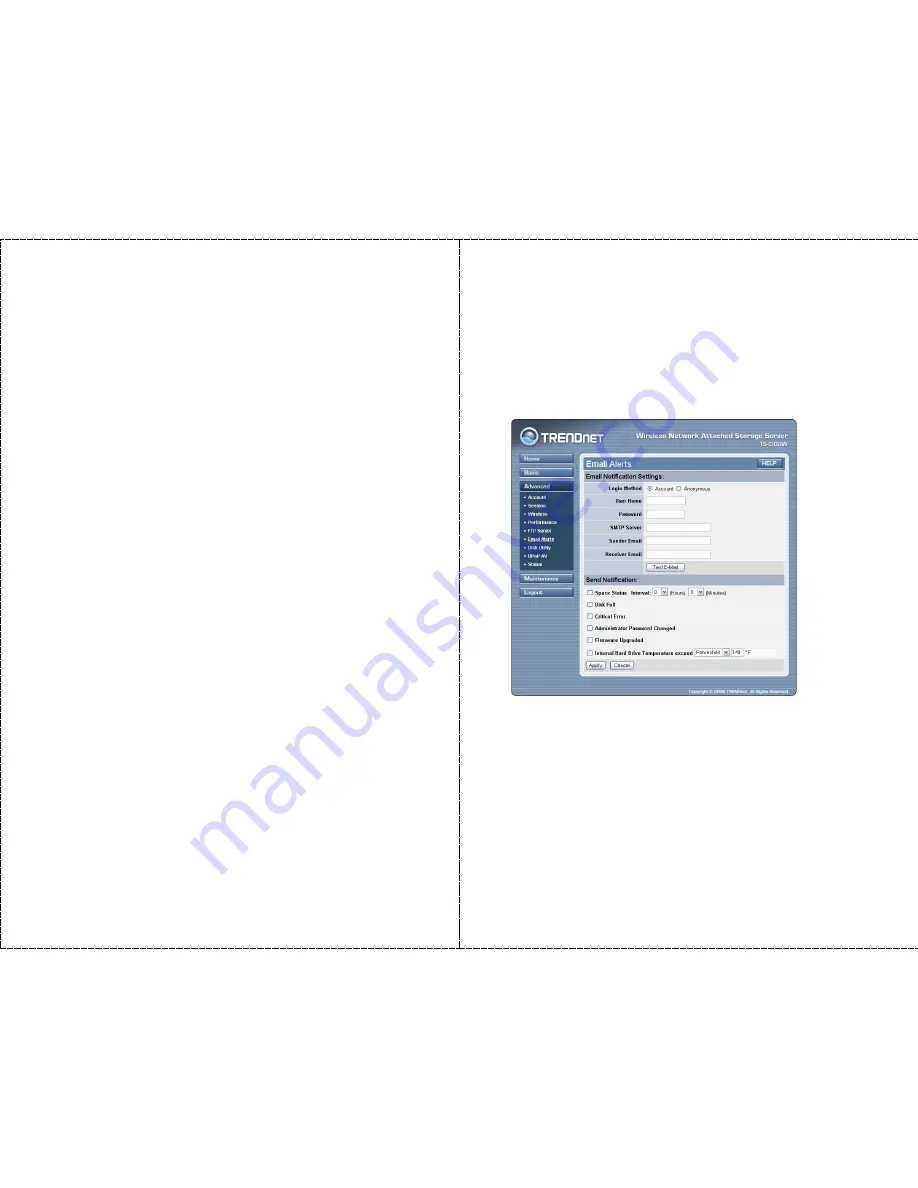
 E-mail Alerts 

The 

E-mail alerts

 submenu contains the options that allow you to 

receive the e-mail messages from the system. 


Advanced Menu – E-mail alerts 

You have to set up the e-mail account by entering the required 
information in the boxes of the 

Email Notification Settings

 field. 

You can click 

Test E-mail

 to test your e-mail account.


Then, you can choose one event for receiving the notification, such as 

Space Status

Disk Full

Critical Error

Administrator Password 

Changed

Firmware Upgraded

. In addition, you can setup the 

Internal HDD Temperature 

to protect your HDD. 

Summary of Contents for TS-I300 - NAS Server - ATA-133

Page 1: ...NSTALLING THE HDD 12 INSTALLING THE STORAGE SERVER 14 Connecting to the Network 14 Connecting to a Client Workstation 14 Expanding the USB Devices 14 USING THE STORAGE SERVER 15 Configuring a Fixed IP...

Page 2: ...al 53 EMI Compliance 54 4 ABOUT THIS GUIDE This manual provides instructions and illustrations on how to use your Network Attached Storage with Wireless AP Client including z Chapter 1 Getting Started...

Page 3: ...ents 6 General Features Compact sized design Provide one 10 100Mbps LAN port support Auto MDI MDIX Provide two USB2 0 ports support Hot plug function Support external USB storage drives Hard disk Flas...

Page 4: ...le RJ 45 connector Four mounting screws of fixed to HDD One Quick Installation Guide One Installation CD ROM that contains the manual files If any item contained is damaged or missing please contact y...

Page 5: ...iving transmitting data from to the wireless network HDD Full USB WLAN three LEDs Press the Reset button for 5 seconds until these three LEDs are blinking transfer to revolving lamp When factory defau...

Page 6: ...e following diagram explains the application of your storage server Storage Server in Your Network Environment 12 Installing the HDD 1 Disconnect the power cord Remove two screws on the rear panel to...

Page 7: ...ct the power adapter of the storage server to the wall outlet This will supply power to the storage server immediately Connecting to a Client Workstation For some specific purposes you may need to con...

Page 8: ...dress range 1 Click Start Control Panel to open the Control Panel window 2 Double click the Network Connection icon to open the Network Connection window Double click 16 3 Right click the Local Area C...

Page 9: ...18 Accessing the Storage server Since you have made the connection between your computer and the storage server and configured the computer s IP address you can access the storage server through the f...

Page 10: ...The users can only access the Download Scheduling Easy Search To access and manage the storage server easily the conveniently utility Easy Search is provided for you in the Installation CD ROM Easy Se...

Page 11: ...on again Clicking the Connect to webpage button will lead you to the web configuration utility z Setting Assign the Hostname and Workgroup for the storage server z LAN Select one storage server in the...

Page 12: ...us section The Home menu will display as below 24 There is a menu bar in the top of the configuration page containing five items that allow you to set up your storage server The Menu Bar z Home main s...

Page 13: ...AN Basic J LAN The first step is to configure the LAN settings These options in this step display the current IP address and DHCP service of the storage server and can be modified manually When comple...

Page 14: ...one according to your location When completed click Apply 28 Configuration Advanced The Advanced menu contains eleven submenus Account Session LAN Wireless Performance FTP server E mail alerts Disk ut...

Page 15: ...ver uses four pre defined accounts in the firmware which cannot be used as the users account names including root admin ftp and nobody 2 The password must be longer than five characters 30 Advanced J...

Page 16: ...ssion You can remove the tasks by selecting the corresponding check box and click Apply see the illustration on page 32 z Security You can configure the security function by selecting NO Allow IP and...

Page 17: ...tings in this submenu Advanced Menu Wireless z Wireless Setting In this field set up the respective settings according to your wireless network environment the options includes Access Point or Station...

Page 18: ...ragmentation DTIM Interval Preamble Type and CTS Mode Advanced Menu Performance You are recommended to keep the system default settings in this field If you have to adjust the wireless performance ple...

Page 19: ...FTP The default port is 21 Flow control Choose Unlimited or enter a data rate x10 KB for restricted data flow This setting is only necessary where network traffic is significant and can be affected by...

Page 20: ...select the desired disk first and select to scan All disk or Fix Then click Scan Disk 40 Advanced J Time Zone The Time zone submenu displays the current time setting of the storage server For system...

Page 21: ...ured images from the external video player Advanced Menu UPnP AV Click the Open button to configure the destination folder on your storage server When completed click Apply 42 Advanced J Status The St...

Page 22: ...h 44 as power failure Always confirm that the storage server is powered on during the procedure Maintenance J Configuration The Configuration submenu allows you to reload the factory default settings...

Page 23: ...Alternately if you set up a new user for the storage server you can login the utility using the given user account 46 4 DOWN LOADING FILES Entering Download Page 1 If you are in the configuration mode...

Page 24: ...sks z Logout clicks to exit the download page 48 Download Scheduling Click the Download Scheduling menu to set up your download tasks Enter the required information in the relative fields Setup Screen...

Page 25: ...ld file in the folder z Backup You can enable disable the backup function of your storage server by selecting None Every Day Every Week Every Month Or you can setup the function to backup the differen...

Page 26: ...r the correct username and password again or contact your network administrator 52 5 PRODUCT SPECIFICATION Standards Network Standards IEEE 802 3 IEEE 802 3u Wireless LAN Standard IEEE 802 11b g UPnP...

Page 27: ...ram Operating System Support Windows 98 ME Windows NT Windows 2000 XP Mac OS X Linux SMB Environmental and Physical Power Supply 12VDC 3 0 Amp Operating Temperature 5 40 C Storage Temperature 20 50 C...

Page 28: ...ARRANTED ABOVE THE CUSTOMER S SOLE REMEDY SHALL BE AT TRENDNET S OPTION REPAIR OR REPLACEMENT THE FOREGOING WARRANTIES AND REMEDIES ARE EXCLUSIVE AND ARE IN LIEU OF ALL OTHER WARRANTIES EXPRESSED OR I...

Page 29: ...57...

Reviews: