background image


TRENDnet User’s Guide


TEW-820AP 

PIN (Personal Identification Number) 

Wireless > Wi-Fi Protected Setup 

If your wireless device has WPS PIN (typically an 8-digit code printed on the wireless 

device product label or located in the wireless device wireless software utility), you can 

use this method. 
 
1. Log into your access point management page (see “

Access your access point 

management

 page” on page 8). 

2. Click on 

Wireless

, and click on 

Wi-Fi Protected Setup

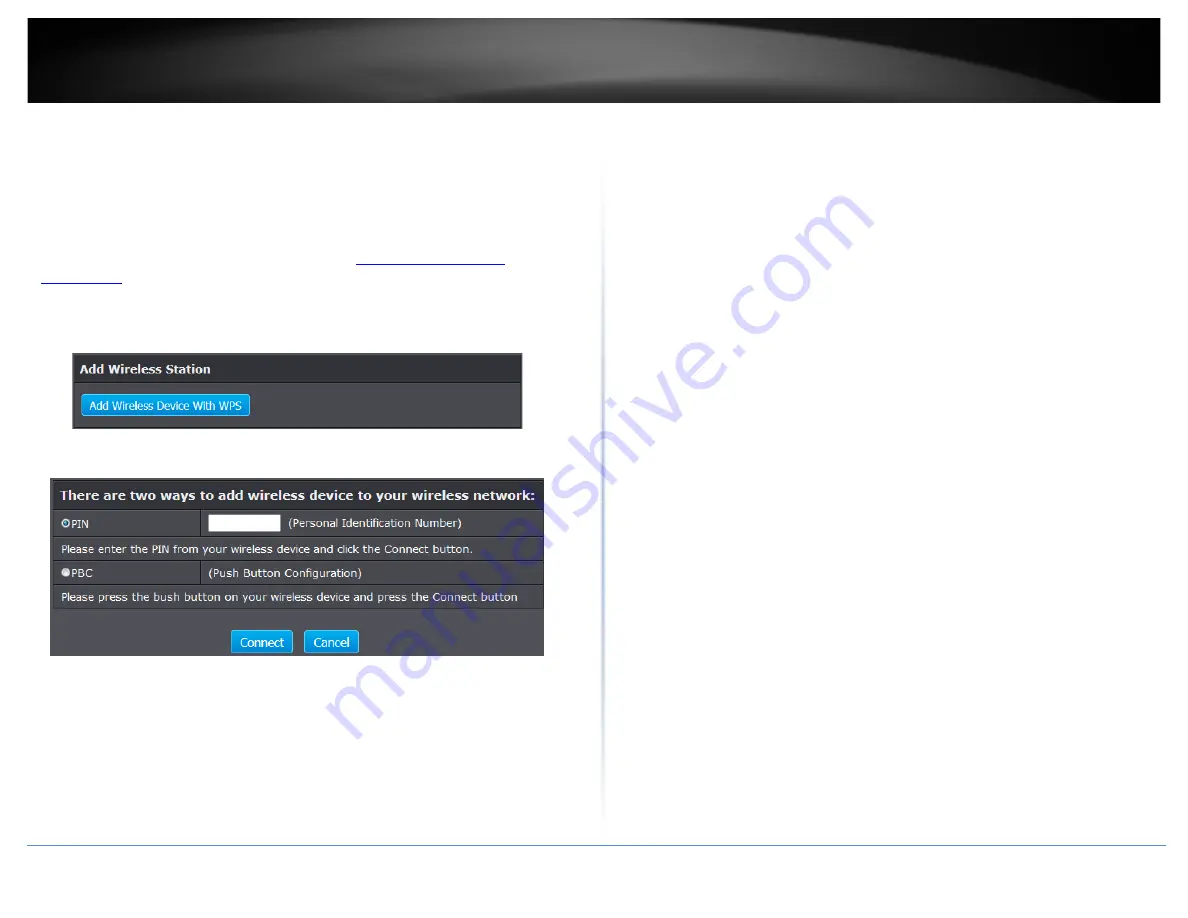
3. To add a wireless device to your network, enter the 8-digit numeric PIN number of 

the wireless client device and click 

Add Enrollee

.  


4. Select 

PIN

 option and click 

Connect

.  


5. Then press the PIN activation on your wireless device (consult wireless device’s User’s 

Guide for length of time) you are connecting. 

6. Wait for your access point to finsh the WPS process. 


Steps to improve wireless connectivity 


There are a number of factors that can impact the range of wireless devices. Follow 

these tips to help improve your wireless connectivity: 
 
1.


Keep the number of obstructions to a minimum. Each obstruction can reduce the 

range of a wireless device.  Position the wireless devices in a manner that will 

minimize the amount of obstructions between them. 

a.


For the widest coverage area, install your access point near the center of your 

home, and near the ceiling, if possible. 

b.


Avoid placing the access point on or near metal objects (such as file cabinets and 

metal furniture), reflective surfaces (such as glass or mirrors), and masonry walls. 

c.


Any obstruction can weaken the wireless signal (even non-metallic objects), so 

the fewer obstructions between the access point and the wireless device, the 

better. 

d.


Place the access point in a location away from other electronics, motors, and 

fluorescent lighting. 

e.


Many environmental variables can affect the access point’s performance, so if 

your wireless signal is weak, place the access point in several locations and test 

the signal strength to determine the ideal position. 

2.


Building materials can have a large impact on your wireless signal. In an indoor 

environment, try to position the wireless devices so that the signal passes through 

less dense material such as dry wall.  Dense materials like metal, solid wood, glass 

or even furniture may block or degrade the signal. 

3.


Antenna orientation can also have a large impact on your wireless signal. Use the 

wireless adapter’s site survey tool to determine the best antenna orientation for 

your wireless devices. 

4.


Interference from devices that produce RF (radio frequency) noise can also impact 

your signal. Position your wireless devices away from anything that generates RF 

noise, such as microwaves, radios and baby monitors.  

 
If possible, upgrade wireless network interfaces (such as wireless cards in computers) 

from older wireless standards to 802.11n or 802.11ac. If a wirelessly networked device 

uses an older standard, the performance of the entire wireless network may be slower. 

If you are still experiencing low or no signal consider repositioning the wireless devices, 

installing additional access points or wireless extenders. 


© Copyright 2014 TRENDnet. All Rights Reserved. 


15


Summary of Contents for TEW-820AP

Page 1: ...TRENDnet User s Guide Cover Page...

Page 2: ...WDS 21 Creating a Wireless Bridge WDS 23 Bridging additional WDS supported devices 27 Client 28 Set the device to client bridge mode 29 Configure Client mode 29 Link Status 29 Advanced Access Point Se...

Page 3: ...he box Easy Setup Install the upgrader in minutes with a quick guided setup wizard One Touch Connection Securely connect Wireless AC enabled devices to the TEW 820AP at the touch of the Wi Fi Protecte...

Page 4: ...S is activated Front View Power LED WPS Button Wi Fi Protected Setup The indicator is solid green when your access point is powered on Otherwise if this LED indicator is off there is no power to your...

Page 5: ...s access points and many Internet capable media devices such as TVs game consoles and Internet cameras Modem Connects a computer or router to the Internet or ISP Internet Service Provider Router Conne...

Page 6: ...e 5 Plug in the power adapter and make sure that the LEDs are turned on 6 The setup wizard utility will automatically detect the TEW 820AP Select your device and click Configure If the utility does no...

Page 7: ...nfigure 9 Select how to configure the LAN settings of the TEW 820AP For installation it is recommended to select Dynamic IP Address Configuration and click Next to continue 10 Select Manual Setup to m...

Page 8: ...n Selecting WPA or WPA2 option allows both WPA PSK and WPA2 PSK encryption types In the Pre Shared Key section enter your security password This password will be used to wirelessly connect to the TEW...

Page 9: ...oint management page Ex Access Point IP address changed to 192 168 0 100 255 255 255 0 example computer address 192 168 0 25 255 255 255 0 1 Open your web browser and go to URL domain namehttp tew 820...

Page 10: ...tablish network and Internet connectivity Set the device to access point mode Main Device Mode Note By default the device is set to function in access point mode 1 Log into your access point managemen...

Page 11: ...what your wireless devices support Wireless Channel Click the drop down list and select the desired Channel for wireless communication The goal is to select the Channel that is least used by neighbori...

Page 12: ...eds TRENDnet recommends setting your access point to this encryption standard If you find that one of your wireless network devices does not support WPA2 encryption then set your access point to eithe...

Page 13: ...ssword or key that is used to connect your computer to this access point wirelessly Selecting WPA Personal In the Security Mode drop down list select WPA Personal Please review the WPA Personal settin...

Page 14: ...192 168 10 250 RADIUS Port Enter the port your RADIUS server is configured to use for RADIUS authentication Note It is recommended to use port 1812 which is typical default RADIUS port RADIUS server S...

Page 15: ...he access point will automatically create an encryption key that is 64 characters long This 64 character key will then have to be used if one has to connect computers to the access point using the tra...

Page 16: ...irrors and masonry walls c Any obstruction can weaken the wireless signal even non metallic objects so the fewer obstructions between the access point and the wireless device the better d Place the ac...

Page 17: ...rk This acronym stands for Service Set Identifier and is the name of your wireless network It differentiates your wireless network from others around you Security Mode Select the security type you wou...

Page 18: ...ess network resources from multiple groups of network devices as well as the Internet The diagram below illustrates examples of WDS WDS AP Allows the device to establish wireless bridging and function...

Page 19: ...TRENDnet User s Guide TEW 820AP The diagram below illustrates an example of multiple WDS wireless bridge links Copyright 2014 TRENDnet All Rights Reserved 18...

Page 20: ...he access point in order to access network resources from multiple groups of network devices as well as the Internet The diagrams below illustrate examples of WDS with Access Point WDS Strictly for es...

Page 21: ...TRENDnet User s Guide TEW 820AP The diagram below illustrates an example of multiple WDS wireless bridge links with access point functionality Copyright 2014 TRENDnet All Rights Reserved 20...

Page 22: ...ocal client devices automatically Please make sure that only one device on your network has DHCP server enabled and disabled on all others to avoid IP address conflicts 4 WDS bridging requires all WDS...

Page 23: ...dress blue to prevent IP address conflict The wired router is the only single DHCP server gray providing automatic IP address assignment for all client devices in the network The WDS parameters requir...

Page 24: ...access points Make note of the wireless MAC address of both access points See page XX for checking the status page Example AP1 Access Point 1 5GHz Wireless MAC Address 00 11 22 AA BB C2 AP2 Access Po...

Page 25: ...our wireless network name for client devices to connect Please refer to the section Wireless Bridge WDS Mode page 17 for details on this mode WDS AP Recommended Select this option to establish wireles...

Page 26: ...elect this option if you are uncertain what your wireless devices support Wireless Channel Click the drop down list and select the desired Channel for wireless communication The goal is to select the...

Page 27: ...our wireless network name for client devices to connect Please refer to the section Wireless Bridge WDS Mode page 17 for details on this mode WDS AP Recommended Select this option to establish wireles...

Page 28: ...reless networks and the channel used must match on all WDS devices Channel Width Select the appropriate channel width for your wireless network This setting only applies to 802 11n For greater 802 11n...

Page 29: ...ection from the wireless network to the LAN port located on the back of the device Client devices with wired network capability such as in a media or entertainment center ex Smart TV Game Console DVR...

Page 30: ...to connect and copy the settings of the selected wireless network 5 If your wireless network requires wireless security you will be prompted to enter your wireless key Enter your Wireless Key require...

Page 31: ...all others Turn MAC Filtering ON and DENY computers listed to access the network Only Deny computers devices with MAC addresses listed to access to the access point management page and the Internet Al...

Page 32: ...ce Name field enter the new device name to display on your network to identify the access point Click Save Settings to apply changes Note The access point s device name is used to access the device us...

Page 33: ...c IP Choose this option to manually configure the IP address settings of the access point IP Address Enter the new access point IP address e g 192 168 0 100 Subnet Mask Enter the new access point subn...

Page 34: ...information Enable NTP Server Select this option to set your router date and time to synchronize with an NTP Network Time Protocol server address e g pool ntp org Enter the NTP server address next to...

Page 35: ...Reset your Access Point to factory defaults Tools Settings Management You may want to reset your access point to factory defaults if you are encountering difficulties with your access point and have...

Page 36: ...utomatically to the web browser settings default download folder Default Filename config bin To restore your access point configuration 1 Log into your access point management page see Access your acc...

Page 37: ...omputer 2 Unzip the file to a folder on your computer Please note the following Do not interrupt the firmware upgrade process Do not turn off the device or press the Reset button during the upgrade If...

Page 38: ...to the last log page Previous Page Click to view the previous log page Next Page Click to view the next log page Clear Log Click to clear all log entries Refresh Click to refresh log entries 5 To sav...

Page 39: ...he current MAC address of your wireless client Check the access point system information Status Device Info You may want to check the system information of your access point such as IP address setting...

Page 40: ...n page 8 2 Click on Status and click on IPv6 IPv6 Connected Type Displays the IPv6 connection type assigned to your access point LAN IPv6 Address Displays the IPv6 IP address assigned to your access p...

Page 41: ...TRENDnet User s Guide TEW 820AP Wireless Statistics Copyright 2014 TRENDnet All Rights Reserved 40...

Page 42: ...cess Point o WDS o WDS AP o Security Advanced Security o MAC Filter WPS Wi Fi Protected Setup Status Device Info Logs Statistics Wireless Client IPv6 Access MAC Filter Multi SSID User Limit Management...

Page 43: ...CC 5 150 5 250 GHz 5 725 5 850 GHz ETSI 5 150 5 350 GHz 5 470 5 725 GHz Wireless Channels FCC 36 40 44 48 149 153 157 161 165 ETSI 36 40 44 48 Modulation BPSK QPSK 16 QAM 64 QAM 256 QAM with OFDM Medi...

Page 44: ...ternet Protocol Version TCP IPv4 and then click Properties d Then click Obtain an IP address automatically and click OK Windows XP 2000 a Go into the Control Panel double click the Network Connections...

Page 45: ...culties please contact your computer or operating system manufacturer for assistance How to configure your network settings to obtain an IP address automatically or use DHCP Note Please note that alth...

Page 46: ...ndows Vista a Go into the Control Panel click Network and Internet b Click Manage Network Connections right click the Local Area Connection icon and click Properties c Click Internet Protocol Version...

Page 47: ...order to connect to the network 5 Enter in the security key corresponding to the wireless network and click OK Windows Vista 1 Open Connect to a Network by clicking the Start Button and then click Co...

Page 48: ...not accessible by the end user Operations in the 5 15 5 25GHz band are restricted to indoor usage only RoHS This product is RoHS compliant Europe EU Declaration of Conformity This device complies wit...

Page 49: ...CE e 2009 125 CE Latviski Latvian Ar oTRENDnetdeklar ka TEW 820AP atbilstDirekt vas 1999 5 EK 2006 95 EK un 2009 125 EK b tiskaj mpras b m un citiemar to saist tajiemnoteikumiem Lietuvi Lithuanian iu...

Page 50: ...TRENDNET PRODUCT DOES NOT OPERATE AS WARRANTED ABOVE THE CUSTOMER S SOLE REMEDY SHALL BE AT TRENDNET S OPTION REPAIR OR REPLACE THE FOREGOING WARRANTIES AND REMEDIES ARE EXCLUSIVE AND ARE IN LIEU OF A...

Page 51: ......

Reviews: