TRENDnet TEW-712BR User Manual Download Page 49


© Copyright 2012 TRENDnet. All Rights Reserved. 


TRENDnet User’s Guide


TEW-712BR 

46


Configure your router log 

Status > Log Setting 

You may want send your router log to your e-mail address or to an external log server 
(also known as Syslog server) so you can check it periodically while away from home. 
You may also want to only see specific categories of logging. 


Send router logs to your e-mail address 


1. Log into your router management page (see “Access your router management page” 
on 

page 27

). 


2. Click on 

Status

 and click on 

Log Setting


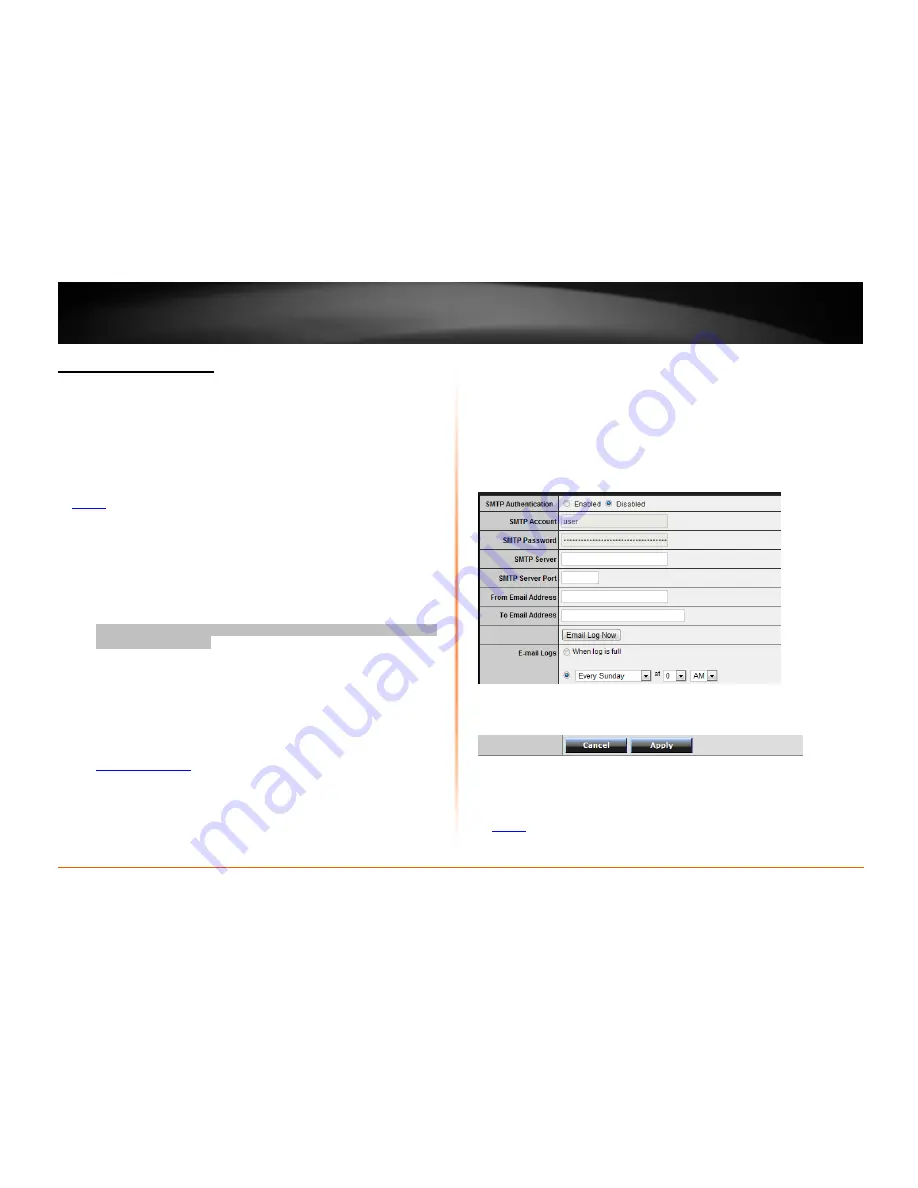
3. Review the e-mail log settings. 


SMTP Authentication

 – Set this option to 

Enabled

 if your e-mail service 

requires authentication. If not, leave this setting to 

Disabled

.


Note: 

If you are unsure of this setting check with your e-mail service provider if 

authentication is required. 


SMTP Account

 – Enter your account user name for your e-mail service. 


SMTP Password

 – Enter your password for your e-mail service. 


SMTP Server 

– Enter the IP address (e.g. 

10.10.10.10

) or domain name (e.g. 

mail.trendnet.com

) of your e-mail server.  


SMTP Server Port

 – Enter the port used by your e-mail service. (e.g. 

Default 

SMTP Server Port: 25


From Email Address

 – Enter a sender e-mail address. (e.g. 

[email protected]

)


Note: 

This does not need to be real e-mail address, only used for identification 

purposes when checking your e-mail.  


To Email Address 

– Enter your e-mail address. 


Email Log Now

 – Click this option to send an e-mail with the current router log 

using your email settings. 


Email Logs

 – Select when you want the router log to be e-mailed. 

o


When log is full

 – The router log will be e-mailed to your e-mail 

address when router internal log is full. 

o


Click the drop-down list and configure to e-mail logs according to a set 
schedule. Once on a specific day of the week or once every day. 


4. To save changes, click 

Apply


Send router logs to an external log server 


1. Log into your router management page (see “Access your router management page” 
on 

page 27

). 


Summary of Contents for TEW-712BR

Page 1: ...TRENDnet User s Guide Cover Page TEW 712BR N150 Wireless Router...

Page 2: ...Filters 23 Protocol IP filters 24 Firewall rules 24 Advanced Router Setup 26 Access your router management page 26 Change your router login password 27 Set your router date and time 27 Manually confi...

Page 3: ...e 43 Check the router system information 44 View your router log 45 Configure your router log 46 View your router packet statistics 47 View wireless devices connected to your router 47 Capture packets...

Page 4: ...s Network wired devices to the four Fast Ethernet ports on the back of the router 4 x 10 100Mbps Auto MDIX LAN ports 1 x 10 100Mbps Auto MDIX WAN port Internet High speed data rates of up to 150Mbps b...

Page 5: ...s Rear View Reset Button Use an item such as a paperclip to push and hold this button for 15 seconds and release to reset your router to its factory defaults LAN Ports Connect Ethernet cables also cal...

Page 6: ...nnected to the modem Network port also called network port successfully with a Network cable The LED indicator will be blinking green while data is transmitted or received through the WAN port of your...

Page 7: ...the modem typically supplied by your ISP Internet Service Provider and physically connected to it from the router s WAN port to the modem s network port which connects to the Internet Wireless signals...

Page 8: ...ctions How to set up a home network 1 For a network that includes Internet access you ll need Computers devices with an Ethernet port also called network port or wireless networking capabilities A mod...

Page 9: ...matically User Name _________ Password ________________ Verify Password ________________ 4 PPPoE with a fixed IP address User Name _________ Password ________________ Verify Password ________________...

Page 10: ...WAN port on the router to your modem 5 Using another Network cable connect your computer to one of the four LAN ports on the router 6 Plug in the power adapter connect it to the router s power port an...

Page 11: ...sword admin 3 The Setup Wizard will automatically appear Click Next Note If the Setup Wizard does not automatically appear click Wizard the bottom button on the left tab 4 Enter a new login password f...

Page 12: ...ter to obtain an IP address automatically Do not change the default setting of Obtain IP Automatically and click next to proceed Note If you know that your ISP requires a configuration other than Obta...

Page 13: ...ure your wireless network on page 13 for information on configuring wireless security 2 Once wireless security is enabled on your router each wireless device connecting to your router must be configur...

Page 14: ...Check the status of the LED indicators 1 2 3 or 4 on the front panel of your router to ensure the physical cable connection from your computer or device Note If you encounter issues connecting to you...

Page 15: ...r computers with old embedded wireless cards wireless clients you may have to set your router to WEP to allow the old adapters to connect to the router Note This encryption standard will limit connect...

Page 16: ...onal Options Open System or Shared Key HEX or ASCII Different key sizes TKIP or AES Preshared Key or RADIUS TKIP or AES Preshared Key or RADIUS Recommended Configuration Open System ASCII 13 character...

Page 17: ...ey o When connecting to the router the client must match both the password and the Key number e g if you have activated Key 2 with a password of 12345 then the client must select Key 2 entering Key 1...

Page 18: ...er settings Note RADIUS Server 2 is optional and can be configured as a backup if there are any issues with RADIUS Server 1 o IP Enter the IP address of the RADIUS server e g 192 168 10 250 o Port Ent...

Page 19: ...if one has to connect computers to the router using the traditional connection method To add a wireless device to your network simply push the WPS button on the wireless device you are connecting con...

Page 20: ...tion of WPS Basic wireless settings Wireless Basic This section outlines available management options under the Basic Wireless sub tab 1 Log into your router management page see Access your router man...

Page 21: ...typically not recommended o 2 4GHz 802 11b only mode This mode only allows devices to connect to the router using older and slow 802 11b technology typically not recommended Note Please check the spec...

Page 22: ...actors that can impact the range of wireless devices Follow these tips to help improve your wireless connectivity 1 Keep the number of obstructions to a minimum Each obstruction can reduce the range o...

Page 23: ...ts Advanced wireless settings Wireless Advanced These settings are advanced options that can be configured to change advanced wireless broadcast specifications It is recommended that these settings re...

Page 24: ...n Default Value 1 range 1 255 Access Control Filters Access control basics Access Filter MAC address filters Access Filter MAC Filters Every network device has a unique 12 digit MAC Media Access Contr...

Page 25: ...Table When selected the entry will be highlighted Delete Removes an existing MAC address entry Update Modifies an existing MAC address entry Cancel Discard changes to an existing MAC address entry 4...

Page 26: ...ins listed Deny access to all other unlisted websites Deny users to access all domains listed Allow access to all other unlisted websites Click Apply to save the changes 4 Under Domain Blocking click...

Page 27: ...rns on the Protocol IP Filter and selecting Disabled turns it off Name Enter a name for the Protocol IP Filter Protocol Select the protocol type to filter TCP UDP or you can select to choose all proto...

Page 28: ...selecting Deny will block or deny access Source Configure the source information for the firewall rule o Interface Click the drop down list and select LAN from your network or WAN from the Internet d...

Page 29: ...firewall rule click on the rule in the firewall rules list When selected the entry will be highlighted Advanced Router Setup Access your router management page Note Your router management page http 19...

Page 30: ...ount will restrict access to viewing only and will not allow any settings to be changed Default User Name user Default Password user Set your router date and time Main Time 1 Log into your router mana...

Page 31: ...t your ISP Note If your ISP requires a host name to be specified you can specify it under Main LAN DHCP Server in the Host Name field To save changes click Apply at bottom of the page Clone a MAC addr...

Page 32: ...DHCP Server In most cases you do not need to change your router IP address settings Typically the router IP address settings only needs to be changed if you plan to use another router in your network...

Page 33: ...r management page on page 27 2 Click on Main and click on LAN DHCP Server 3 Review the DHCP Server settings DHCP Server Enable or Disable the DHCP server Start IP Changes the starting address for the...

Page 34: ...ss is required to be within the DHCP IP address range Start IP End IP MAC Address Enter the MAC Media Access Control address of the computer or network device to assign to the reservation e g 00 11 22...

Page 35: ...commended to leave these settings enabled 4 To save changes click Apply Allow deny multicast streaming Management Remote Management In some cases applications require multicast communication also call...

Page 36: ...etc 2 Log into your router management page see Access your router management page on page 27 3 Click on Main and click on Dynamic DNS 4 Next to DDNS click Enabled 5 In the Server Address drop down lis...

Page 37: ...ed DMZ Access DMZ You may want to expose a specific computer or device on your network to the Internet to allow anyone to access it Your router includes the DMZ Demilitarized Zone feature that makes a...

Page 38: ...sed pre defined virtual server entries to modify otherwise you can choose to manually add a new virtual server 3 Review the virtual server settings Enabled Selecting Enabled turns on the virtual serve...

Page 39: ...ntation on configuring a static IP address 4 Log into your router management page see Access your router management page on page 27 5 Click on Access and click on Virtual Server 6 In the list below cl...

Page 40: ...og into your router management page see Access your router management page on page 27 2 Click on Access and click on Special AP To simplify configuration there is a list of commonly used pre defined s...

Page 41: ...on your network to other local networks through other routers Generally different networks can be determined by the IP addressing assigned to those networks Generally speaking and for the case of an e...

Page 42: ...route list When selected the entry will be highlighted Update Saves changes to an existing static route Delete Removes an existing static route Cancel Discards changes to existing static route Enable...

Page 43: ...other routers using the RIP version 2 protocol 4 Click Apply to save the changes or click Cancel to discard the changes Router Maintenance Monitoring Reset your router to factory defaults Tools Setti...

Page 44: ...router configuration file To backup your router configuration 1 Log into your router management page see Access your router management page on page 27 2 Click on Tools and click on Settings 3 Under Sa...

Page 45: ...a firmware upgrade is available download the firmware to your computer 2 Unzip the file to a folder on your computer Please note the following Do not interrupt the firmware upgrade process Do not turn...

Page 46: ...1 Log into your router management page see Access your router management page on page 27 2 Click on Tools and click on Restart If prompted click Yes or OK Check connectivity using the router manageme...

Page 47: ...hen using DHCP Client or Dynamic IP address Internet connection type you will provide the option to Release and Renew your IP address settings Other Internet connection types such as PPPoE will provid...

Page 48: ...g purposes 1 Log into your router management page see Access your router management page on page 27 2 Click on Status and click on Log 3 Review the device log information Time Displays the time of the...

Page 49: ...ce SMTP Password Enter your password for your e mail service SMTP Server Enter the IP address e g 10 10 10 10 or domain name e g mail trendnet com of your e mail server SMTP Server Port Enter the port...

Page 50: ...r packet statistics Status Statistics You may want to check your router packet statistics for informational purposes only 1 Log into your router management page see Access your router management page...

Page 51: ...a packets LAN or WAN 4 Review the options for capturing packets Start Starts the packet capture Stop Stops the packet capture Download Download the packet capture file pcap file Enable SNMP on your ro...

Page 52: ...rmation Log Log Setting o Email Log o Syslog o Log Type Statistic Wireless Routing Static Dynamic Routing Table Access Filter o MAC Filters o Domain URL Blocking o Protocol IP Filters Virtual Server S...

Page 53: ...ic DNS Routing Static LED Indicators Power Status LAN1 LAN4 WAN WLAN Power Input 100 240V AC 50 60Hz Output 5V DC 1A Power Consumption 3 Watts max Dimensions L x W x H 158 x 109 x 34 mm 6 2 x 4 3 x 1...

Page 54: ...urer for assistance Q I am not sure what type of Internet Account Type I have for my Cable DSL connection How do I find out Answer Contact your Internet Service Provider ISP for the correct informatio...

Page 55: ...te If you are experiencing difficulties please contact your computer or operating system manufacturer for assistance How to configure your network settings to obtain an IP address automatically or use...

Page 56: ...etwork settings can be used as general guidelines however it is strongly recommended that you consult your computer or operating system manufacturer directly for assistance on the proper procedure for...

Page 57: ...should be installed and operated with minimum distance 20cm between the radiator your body RoHS This product is RoHS compliant Europe EU Declaration of Conformity This device complies with the essent...

Page 58: ...5 CE Latviski Latvian Ar o TRENDnet deklar ka TEW 712BR atbilst Direkt vas 1999 5 EK b tiskaj m pras b m un citiem ar to saist tajiem noteikumiem Lietuvi Lithuanian iuo TRENDnet deklaruoja kad is TEW...

Page 59: ...tax and other fees WARRANTIES EXCLUSIVE IF THE TRENDNET PRODUCT DOES NOT OPERATE AS WARRANTED ABOVE THE CUSTOMER S SOLE REMEDY SHALL BE AT TRENDNET S OPTION REPAIR OR REPLACE THE FOREGOING WARRANTIES...

Page 60: ......

Reviews: