background image

 • TR A X X AS

Once you become familiar with driving your model, you might need 
to make adjustments for better driving performance
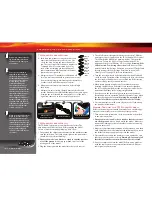
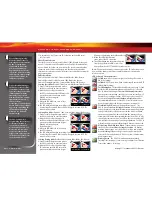
Adjusting Gear Mesh

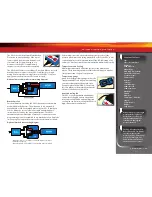
Incorrect gear mesh is the most common cause 
of stripped spur gears. Gear mesh should be 
checked and adjusted anytime a gear 
is replaced. To set the gear mesh, cut a 
narrow strip of notebook paper and run 
it into the gear mesh. Loosen the motor 
screws and slide the motor and pinion 
gear into the spur gear. Retighten the 
motor screws and then remove the strip 
of paper. You should be able to run a 
fresh strip of paper through the gears 
without binding them. 


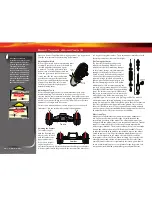
Adjusting the Toe-in

Geometry and alignment specs play an important roll in your 
model’s handling. Take the time to set them correctly. Set the 
steering trim on your transmitter to neutral. Now, adjust your servo 
and tie rods so that both wheels are pointing straight ahead and are 
parallel to each other (0-degrees toe-in). This will ensure the same 
amount of steering in both directions.

For increased stability add one- to two-degrees of toe in to each 
front wheel. Use the turnbuckles to adjust the alignment. 

Adjusting the Camber

The camber angle of 
both the front and rear 
wheels can be adjusted 
with the camber rods 
(upper turnbuckles). 
Use a square or right-
angle triangle to set 
the camber accurately.  Adjust the front wheels to 0 degrees of camber 
(wheel perpendicular to the ground). In the rear, adjust the wheels to 1 

to 2 degrees of negative camber.  These adjustments should be set with 
the truck positioned at its normal ride height.

Fine Tuning the Shocks

The four shocks on the model greatly 
influence its handling. Whenever you 
rebuild your shocks, or make any changes 
to the pistons, springs or oil, always make 
changes to them in pairs (front or rear). 
Piston selection depends on the range of 
oil viscosities that you have available. For 
example, using a two-hole piston with a 
lightweight oil will, at one point, give you 
the same damping as a three-hole piston 
with heavier oil. We recommend using the 
two-hole pistons with a range of oil viscosities 
from 10W to 50W (available from your hobby 
shop). The thinner viscosity oils (30W or less) 
flow more smoothly and are more consistent, 
while thicker oils provide more damping. Use 
only 100% pure silicone shock oil to prolong seal life. The model’s 
ride height can be adjusted by adding or removing the clip-on, 
spring pre-load spacers. Adjust the ride height so that the suspension 
arms are slightly above being parallel to the ground. Observe how 
the model handles in turns. Proper set-up will add stability and help 
prevent spin outs. Experiment with different springs and shock oils to 
find what works best for your current track conditions.
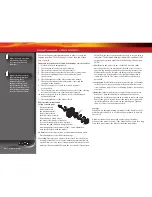
Wheels and Tires

Many types of aftermarket tires and wheels can be adapted for 
use on your model. Most will affect the overall width and the 
suspension geometry of the model. The offsets and dimensions 
designed into the model’s wheels are intentional; therefore, Traxxas 
cannot recommend the use of other non-Traxxas wheels with 
different specifications. The diameter of the wheels is an innovative 
design, and there are a variety of different tires available for you 
to experiment with in addition to the included tires on the model 
(listed in your parts list). Experimentation with different types of 
tires is recommended to see which ones work the best on the 
terrain where the model is run. When selecting tires, consider the 
overall diameter and the rubber compound (hard or soft). If the 
overall diameter of the tire is significantly increased, you will need 
to use a smaller pinion gear to compensate for the larger tire. Soft 
compound tires with many short spikes generally work better 

Motor 

Screws

Strip of 

Paper

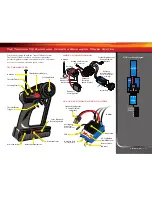
Basic Tuning Adjustments

1

°

-2

°

1

°

-2

°

0

°

0

°

Pre-load

Spacer

0

o

0

o

1

o

-2

o

1

o

-2

o

-1

o

-1

o

Camber

Toe-in

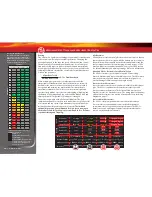
All of the toe links are 
installed on the truck so the 
left hand thread indicators 
point to the same direction. 
This makes it easier to 
remember which way to 
turn the wrench to increase 
or decrease toe link length 
(the direction is same at all 
four corners). Note that the 
groove in the hex indicates 
the side of the toe link with 
the left-hand threads. 

AZ[i=VcYI]gZVY

>cY^XVidg

AZ[i=VcYI]gZVY

>cY^XVidg

;gdcid[IgjX`

;gdcid[IgjX`

AZ[i;gdci

G^\]i;gdci

Summary of Contents for 2408

Page 1: ...owners manual MODEL 2408 MODEL 3708 MODEL 3608 extreme brushless power system ...

Page 2: ...s designed into your model Also be sure to read and follow the precautions and warnings in this manual and on any labels or tags attached to your model They are there to educate you on how to operate your model safely and also get maximum life and performance from your model Even if you are an experienced R C enthusiast it s important to read and follow the procedures in this manual Thank you agai...

Page 3: ...upport You may also e mail customer support with your question at support Traxxas com Join thousands of registered members in our online community at Traxxas com Traxxas offers a full service on site repair facility to handle any of your Traxxas service needs Maintenance and replacement parts may be purchased directly from Traxxas by phone or online at www BuyTraxxas com You can save time along wi...

Page 4: ...fe and safe operation Warning LiPo batteries are intended only for advanced users that are educated on the risks associated with LiPo battery use Traxxas does not recommend that anyone under the age of 16 use or handle LiPo battery packs without the supervision of a knowledgeable and responsible adult Your model is able to use LiPo batteries with nominal voltage not to exceed 11 1 volts 3S packs v...

Page 5: ...y glasses Thin hobby quality cyanoacrylate instant tire glue CA glue Hobby knife Side cutters and or needle nose pliers Philips screwdriver Soldering iron For more information on batteries see Use the Right Batteries on page 15 A peak detecting charger is recommended for best performance and longest battery life For more information see Use the Right Charger on page 12 Important If you plan to use...

Page 6: ...sis Plate Antenna Mount Suspension Arm Front Front Body Mount Front Bumper Front Shock Tower Steering Servo under Upper Chassis Plate Shock Oil Damper Turnbuckle Toe Link Rear Shock Tower Rear Body Mount Chassis Turnbuckle Front Camber Link Suspension Arm Rear Servo Saver not visible Traxxas High Current Connector Gear Cover ghosted Turnbuckle Rear Camber Link EZ Set Button On Off Button Caster Bl...

Page 7: ...pension Arm Front Bulkhead Front Bumper Front Shock Tower Steering Servo Shock Oil Damper Turnbuckle Toe Link Anatomy of the Stampede Suspension Arm Rear Wheelie Bar Turnbuckle Rear Camber Link Turnbuckle Front Camber Link Brushless Motor Velineon 3500 Gear Cover ghosted Traxxas High Current Connector Rear Shock Tower Rear Body Mount EZ Set Button On Off Button Caster Block Steering Block ...

Page 8: ...ntenna Mount Suspension Arm Front Front Body Mount Front Bumper Front Shock Tower Steering Servo under Upper Chassis Plate Shock Oil Damper Turnbuckle Toe Link Rear Shock Tower Rear Body Mount Chassis Turnbuckle Front Camber Link Suspension Arm Rear Servo Saver not visible Traxxas High Current Connector Gear Cover ghosted Turnbuckle Rear Camber Link Wing Mount Hole EZ Set Button On Off Button Cast...

Page 9: ...ritical steps to maintain the performance of your model and keep it in excellent running condition 4 Install batteries in the transmitter See page 15 The transmitter requires 8 AA alkaline or rechargeable batteries 5 Install the battery pack in the model See page 15 Your model requires a fully charged battery pack not included 6 Turn on the radio system See page 18 Make a habit of turning the tran...

Page 10: ...raw the glue around the bead of the tire 3 Repeat step two at four or five points around the rim until the tire is completely secured to the rim Turn the rim over and repeat the process for the inside of the rim tire Repeat for the other three wheels 4 Reinstall the wheels Make sure none of the axle pins have fallen out from behind the hex hubs Installing The Bandit VXL Wing The Bandit VXL wing co...

Page 11: ...djust Steering Wheel Power Switch Battery Compartment Servo Channel Reversing Switch Power Indicator Antenna Channel 1 Channel 2 Not Used Receiver Velineon Brushless Motor see side bar for proper motor wiring Channel 2 Electronic Speed Control Channel 1 Steering Servo to Motor LED EZ Set Button On Off Button Heat Sink VXL 3s ELECTRONIC SPEED CONTROL Traxxas High Current Connector Male to Battery C...

Page 12: ...accelerating from a stop It happens for a very short period as the signals from the electronic speed control and the motor synch with each other The VXL 3s electronic speed control is optimized to virtually eliminate cogging Crystal X tal The plug in device that determines which channel the radio system will operate on For each channel there are two crystals one for the receiver and one for the tr...

Page 13: ...to use sensored motors when applications benefit from them such as some sanctioned racing classes Sensorless Sensorless refers to a brushless motor that uses advanced instructions from an electronic speed control to provide smooth operation Additional motor sensors and wiring are not required The VXL 3s electronic speed control is optimized for smooth sensorless control Servo Small motor unit in y...

Page 14: ... and the bars attaching the cells together High pack resistance will create additional heat and rob you of the full power the cells are capable of producing When choosing NiMH battery packs look for the following Wire The VXL 3s electronic speed control is equipped with 12 gauge wire For optimum performance the battery pack should also be equipped with 12 gauge wire The minimum allowable wire size...

Page 15: ...Note A piece of foam is installed in the back of the battery compartment to keep smaller battery packs secure The foam may be removed to accommodate larger battery packs Stampede note The battery wire should route under the hump in the battery hold down Make sure the receiver is secured by the battery hold down CH 2 CH 1 Use the Right Batteries Your transmitter uses AA batteries Use new alkaline b...

Page 16: ... or bends and then insert the end of the wire into one end of the antenna tube Push the wire all the way through the antenna tube 3 Pull the remaining wire through the antenna tube and then insert the base of the antenna tube into the molded post on the chassis 4 Fold the remaining antenna wire over the top of the tube and secure it with the antenna tip 5 On the transmitter always fully extend the...

Page 17: ...the factory Electronic Steering Trim The electronic steering trim located on the face of the transmitter adjusts the neutral center point of the steering servo when the servo is at rest Adjust this control to make the model drive straight with no steering input at the wheel Servo Reversing Switches The servo reversing switches are located on the front of the transmitter next to the on off switch M...

Page 18: ...he front wheels should be pointing straight ahead If the wheels are turned slightly to the left or right slowly adjust the steering trim control on the transmitter until they are pointing straight ahead 7 Gently operate the throttle trigger to ensure that you have forward and reverse operation and that the motor stops when the throttle trigger is at neutral Warning Do not apply full throttle in fo...

Page 19: ...ersing switches after programming the VXL 3s ESC VXL 3s Setup Programming Calibrating your ESC and transmitter Read through all of the programming steps before you begin If you get lost during programming or receive unexpected results simply unplug the battery wait a few seconds plug the battery back in and start over 1 Connect a fully charged battery pack to the VXL 3s 2 Turn on the transmitter w...

Page 20: ...ted keep the EZ Set button pressed down and the blink cycle will repeat until the button is released and a Mode is selected LED Codes and Protection Modes Solid Green VXL 3s power on light Low Voltage Detection is ON LiPo setting Solid Red VXL 3s power on light Low Voltage Detection is OFF NiCad NiMH setting Fast Blinking Red Thermal Shutdown Protection Stage 1 If the motor has lower than normal p...

Page 21: ...peed running limit your driving to paved surfaces only Running in grass and off road could cause excessive loads on the electrical system in the model High performance vehicles produce small vibrations which may loosen hardware over time Frequently check wheel nuts and other screws on your vehicle to ensure that all hardware remains properly tightened About Run Time A large factor affecting run ti...

Page 22: ...istons with a range of oil viscosities from 10W to 50W available from your hobby shop The thinner viscosity oils 30W or less flow more smoothly and are more consistent while thicker oils provide more damping Use only 100 pure silicone shock oil to prolong seal life The model s ride height can be adjusted by adding or removing the clip on spring pre load spacers Adjust the ride height so that the s...

Page 23: ...omatically jump to its center position The servo horn may now be installed onto the servo output shaft 6 Check servo operation by turning the steering wheel back and forth to ensure that the mechanism has been centered properly and you have equal throw in both directions Repeat 1 6 if necessary Stampede VXL Wheelie Bar Set up The Traxxas wheelie bar comes standard with the Stampede VXL It is avail...

Page 24: ...k bushings Traxxas part 2545 and the tie rod ends Traxxas part 2742 Replace these components as needed to restore factory tolerances The bellcrank bushings Rustler VXL and Bandit VXL only may be replaced with 5x8mm ball bearings Traxxas part 2728 Shocks Keep the oil level in the shocks full Use only 100 pure silicon shock oil to prolong the life of the seals If you are experiencing leakage around ...

Page 25: ...ering servo does not work Check the wires radio system crystals battery and motor connectors and the battery pack Possible internal damage Test the servo on channel 2 of the receiver or in another model Return the servo to Traxxas for service Motor runs backwards Motor wired backwards Check the wiring and correct Motor runs as soon as the battery is plugged in Internal damage return VXL 3s to Trax...

Page 26: ...possible sensorless motor performance The Velineon 3500 is a sensorless brushless motor see sidebar for specs The wiring phase alignment of the motor determines its direction of rotation Refer to the wiring diagram on page 11 Sensored brushless motors The VXL 3s is fully compatible with sensored brushless motors Sensor motors use an additional sensor installed in the motor to communicate rotor pos...

Page 27: ... using phases A B or B C the VXL 3s will send short pulses to the motor and turn off the LED indicating a fail safe mode It will not return to normal operation until wired properly Temperatures and Cooling Monitoring temperatures will extend the lives of the batteries and motors There are many options available that will help you monitor temperatures and cool your components Temperature gauge An o...

Page 28: ...1100 Klein Road Plano Texas 75074 1 888 TRAXXAS 070926 KC1081 Part 3798X ...

Reviews: