background image


10


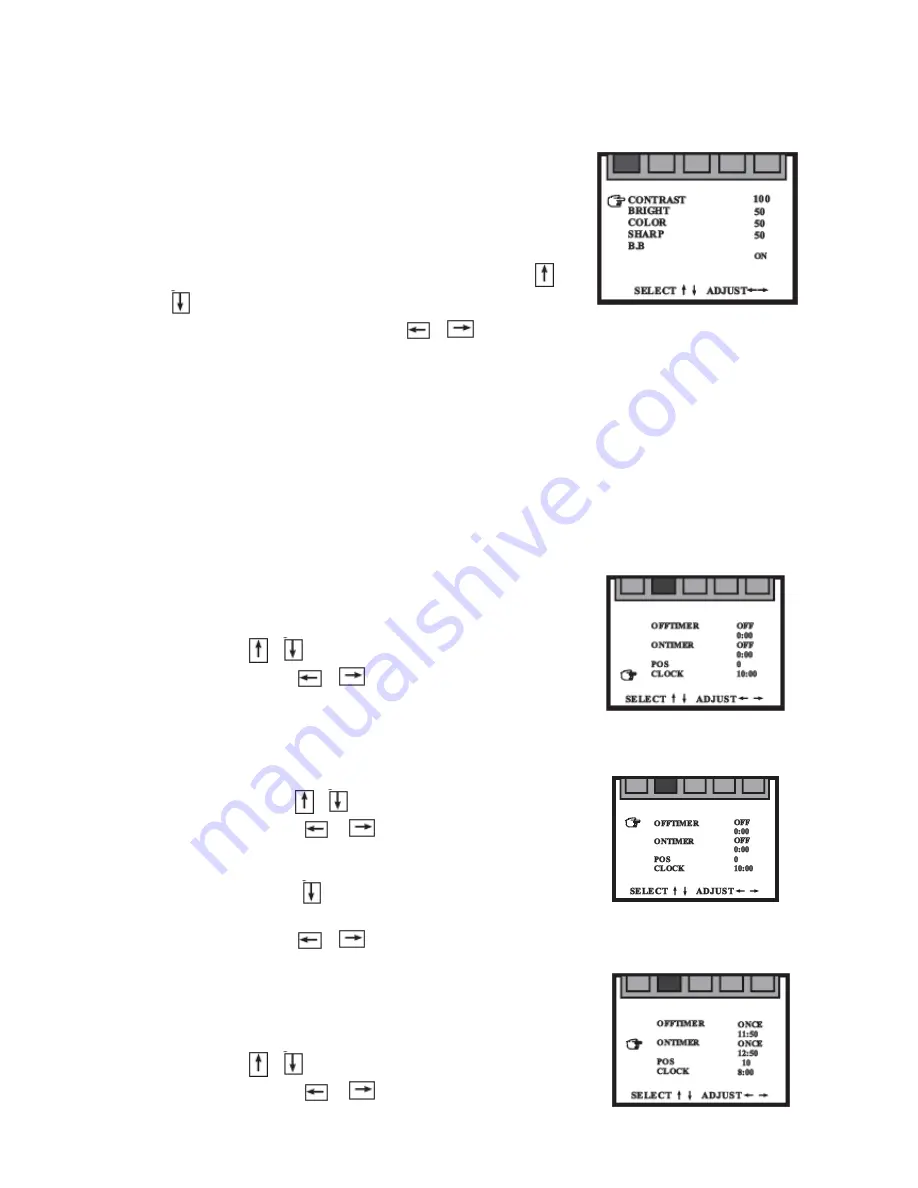
1.  PICTURE menu  

On the PICTURE menu, you can adjust the contrast, 
bright, colour, sharp and blue background (B.B.). 
 

• 

Press PIC button or MENU button to enter the 
PICTURE menu. 

• 

Select the item that you want to adjust using the 

 / 

 buttons.  

• 

Adjust the item value using the 

 / 

 buttons. 

• 

Press PIC button or press MENU repeatedly to exit this menu.  


Note: The adjusted level is stored as the PERSONAL picture mode. 
The blue back is disabled during search mode. 
If the blue back is set as OFF, the screen will show smooth dark grey pattern under 
AV status and show black and white dots under TV status when there is no signal. 


2. 

TIMER menu 


Using  the  TIMER  menu  operation,  you  can  start  automatically  the  TV  to  watch  a 
certain program at a particular time. Also you can place the TV set in standby mode 
at a preset time. 
 

(1) CLOCK setting 

• 

Select CLOCK on the TIMER menu screen using 

the 

 / 

 buttons. 

• 

Using the 

 / 

 buttons to set clock. 


(2) OFF TIMER  

With  the  OFF  TIMER,  the  TV  will  automatically  switch  to  standby  mode  at  a 
preset time. 

• 

Select  OFFTIMER  on  the  TIMER  menu  screen 

using the 

 / 

 buttons. 

• 

Using  the 

 / 

 buttons  to  select  ONCE  (a 

day) or EVERY (every day). Select OFF to cancel 
the OFF TIMER. 

• 

Press  the 

 button  to  select  the  time  setting  of 

the off-timer. 

• 

Press the 

 / 

 buttons to set TV off-time. 


(3) ON TIMER 

With  the  ON  TIMER,  the  TV  will  automatically  turn 
on to a preset channel at a preset time. 

• 

Select ONTIME on the TIMER menu screen using 

the 

 / 

 buttons. 

• 

Using  the 

 / 

 buttons  to  select  ONCE  (a 

Summary of Contents for TC-BS2972

Page 1: ...29 inch Colour Television Instruction Manual Model TC BS2972 Please read these instructions carefully and retain for future reference...

Page 2: ...c symbols used in this manual or on the back cover of the set mean the following Read this manual in full before use Class II Double insulated Appliance The lightning flash symbol is intended to alert...

Page 3: ...uch as lighted candles on any electrical apparatus WARNING Connect to a suitable 230 240V 50 Hz power supply only WARNING Keep out of reach of young children This apparatus is not suitable for use by...

Page 4: ...Safety Precautions 2 Description of Control Keys and Connectors 4 Remote Controller 5 Installation Basic Connection 7 Presetting TV channels 8 Operating the TV 9 Cleaning 15 Troubleshooting 16 Specifi...

Page 5: ...ous to young children Packing list Description Quantity 29 Colour Television set 1 Instruction Manual 1 Remote Controller 1 AA Battery 2 2 FRONT PANEL CONTROL KEYS 1 Main power ON OFF Button 2 Remote...

Page 6: ...ust be replaced If the remote controller is not to be used for a long period of time we recommend removing the batteries to avoid electrolyte leaking Do not mix new batteries with old ones different b...

Page 7: ...or three figures 5 TV AV BUTTON Press the button to select TV AV1 AV2 and DVD signal input 6 PIC BUTTON Set the desired picture quality to the PERSONAL position GAME MIX Yellow 7 CALL BUTTON Press the...

Page 8: ...gaussing circuit which operates for a short period while each time the receiver is switched on using the main switch This circuit removes any residual magnetism in the metal parts of the picture tube...

Page 9: ...New Zealand and Australia Sound System Press the navigation buttons to move the cursor to SOUND Each time the button is pressed the settings change in sequence as shown below DK I BG Note select BG s...

Page 10: ...ION Press the MENU button on front panel of the television or on the remote control to enter the OSD menu then select the item by pressing the Navigation buttons to enter the PICTURE menu TIMER menu T...

Page 11: ...g the TIMER menu operation you can start automatically the TV to watch a certain program at a particular time Also you can place the TV set in standby mode at a preset time 1 CLOCK setting Select CLOC...

Page 12: ...that you want to watch are selected 1 POSITION For select the program number for manual search or Skip Select POSITION on the TUNING menu screen using the buttons Using the buttons to select the prog...

Page 13: ...not necessary under normal conditions However in an area of inferior broadcast conditions the adjustment MFT is necessary for getting a better picture quality Select MTF on the TUNING menu screen usi...

Page 14: ...enter the selection Using the buttons to select the screen format Standard Wide or Zoom Press the MENU button to confirm and return to main menu 4 LOCK Child lock function This television is equiped w...

Page 15: ...en The player submarine colour is Yellow The computer is Green or Purple OTHER OPERATION 1 Select the picture mode Press IPI button to select the picture mode from five preset modes and one user set m...

Page 16: ...ram number and time appear on the screen Press CALL button again turn off the program number and time display 5 CALE Calendar Press CALE button the calendar appears on the screen Press the buttons to...

Page 17: ...d or sound is no normal Check the sound volume is at minimum Check mute function Check the sound system change to BG sound system No colour Check with the colour system as PAL colour system for New Ze...

Page 18: ...tem PAL NTSC playback Sound system BG DG I Channel memory 250 Colour Picture Tube 29 74cm Super Flat Viewable size 68cm diagonally Sound output 8W x 2 Net weight 48kg Dimensions 890 x 560 x 645mm Note...

Page 19: ...cond hand Warning Refer specific instructions All production orders have quality inspections IN the unlikely event of a deficiency please contact the retailer from whom this product was purchased WARR...

Reviews: