background image

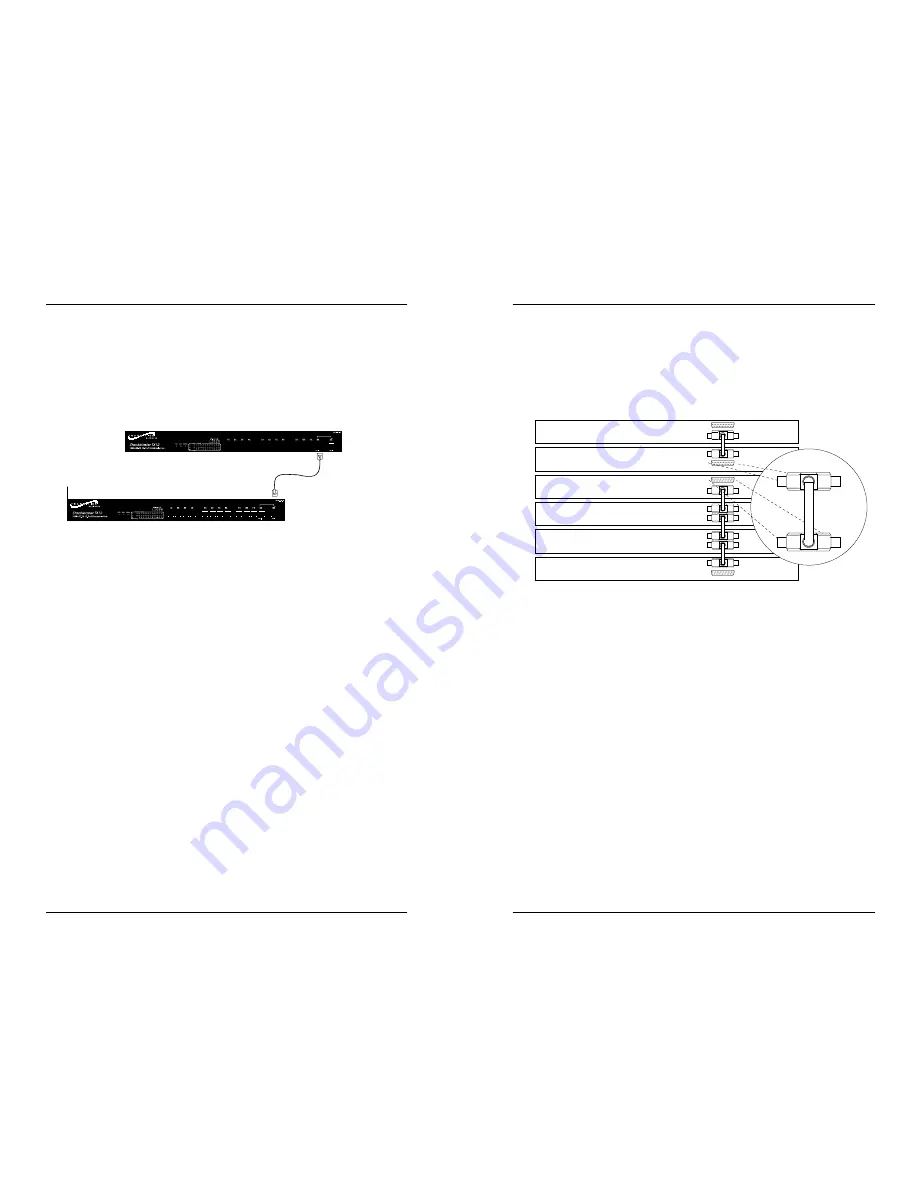
Using SCSI Connectors to Cascade Stacked Hubs

Up to six StackMaster™ TX12  hubs can be cascaded by installing SCSI
connectors at the back of the StackMaster™ TX12 stack.

To cascade a StackMaster™ TX12 stack:

NOTE: Install the SCSI cable by carefully pressing the cable
connector against the StackMaster™ TX12 connector until the
connectors snap into place.

1. At back of stacked StackMaster™ TX12 units to be cascaded,

connect a SCSI cable to the BOTTOM SCSI connector on the
top StackMaster™ TX12 hub.

2. Connect the SCSI cable to the TOP SCSI connector on the next

StackMaster™ TX12 hub.   

3. Connect another SCSI cable to the BOTTOM SCSI connector

on that StackMaster™ TX12 hub, as shown above.

4. Connect the SCSI cable to the TOP SCSI connector on the next

StackMaster™ TX12 hub, as shown above.   

5. Continue connecting SCSI cables by repeating steps 3 and 4

until the entire StackMaster™ TX12 stack is cascaded.   

NOTE: The open SCSI connectors at the top and bottom of the
StackMaster™ TX12 stack do NOT require termination.

StackMaster™ TX12

100BASE-TX 12-Port Stackable Hub

Optionally Cascading 12-Port Stackable Hub

Using Port 12 to Cascade Two Hubs

Two StackMaster™ TX12 hubs can be cascaded using the two
connections at the front of each hub that are labelled ‘Port 12’. 

To cascade two StackMaster TX12 hubs:

1. Locate or build 100BASE-TX cable with the following

characteristics:

803.2 compliant (See page 15)

cable length less than 5 meters

male RJ-45 plug connectors installed at both ends of cable.

2. Connect male RJ-45 plug connector at one end of 100BASE-TX

cable to Port 12 connector marked MDI-X.

3. Connect male RJ-45 plug connector at other end of 100BASE-

TX cable to Port 12 connector marked MDI.

Up to 5 meters

Summary of Contents for SMHB-E-TX-12

Page 1: ...Class 1 stacked Class 2 unstacked Physical Dimensions 17 x 10 x 1 8 438 mm x 255 mm x 45 mm Shipping Weight 9 lbs 4 1 kg Input Power Internal universal input 100 240VAC 50 60 Hz 53W AC Input Cord TN...

Page 2: ...permission from TRANSITION Networks Trademark Notice All registered trademarks and trademarks are the property of their respective owners Der Anschluss dieses Ger tes an ein ffentlickes Telekommunika...

Page 3: ...e limited collision domain in 100BASE X use the shortest cables possible to make a connection between any two devices Where collisions are not a consideration full duplex longer cable may be possible...

Page 4: ...ct tort or strict liability shall not exceed the amount paid to TN for the product directly related to the alleged damage However in no event shall TN have any liability to a customer or any third par...

Page 5: ...ERMITTED BY LAW TN DOES NOT MAKE AND DISCLAIMS ALL OTHER WARRANTIES EXCEPT TITLE EXPRESSED OR IMPLIED INCLUDING BUT NOT LIMITED TO ANY WARRANTY OF DESCRIPTION MERCHANTIBILITY FITNESS FOR A PARTICULAR...

Page 6: ...Contact For assistance in fault isolation and in maintaining the StackMaster TX12 100BASE TX 12 Port Stackable Hub contact Technical Support 800 260 1312 or your local distributor StackMaster TX12 Con...

Page 7: ...ed ERROR Flashing yellow Error detected on port OR port partitioned and isolated 2 SITE CONSIDERATIONS The site for the StackMaster TX12 hub must provide AC power outlet for each hub Adequate ventilat...

Page 8: ...ter TX12 Link Integrity cannot be disabled All devices connected to the StackMaster TX12 MUST have link functions enabled To install the StackMaster TX12 Unpack the StackMaster TX12 Hub Install StackM...

Page 9: ...TX12 between the 19 inch rack mounting rails at the installation position 3 Install two screws through right front bracket and two screws through left front bracket using clip nuts if necessary Connec...

Page 10: ...aster TX12 hub as shown above 5 Continue connecting SCSI cables by repeating steps 3 and 4 until the entire StackMaster TX12 stack is cascaded NOTE The open SCSI connectors at the top and bottom of th...

Reviews: