background image

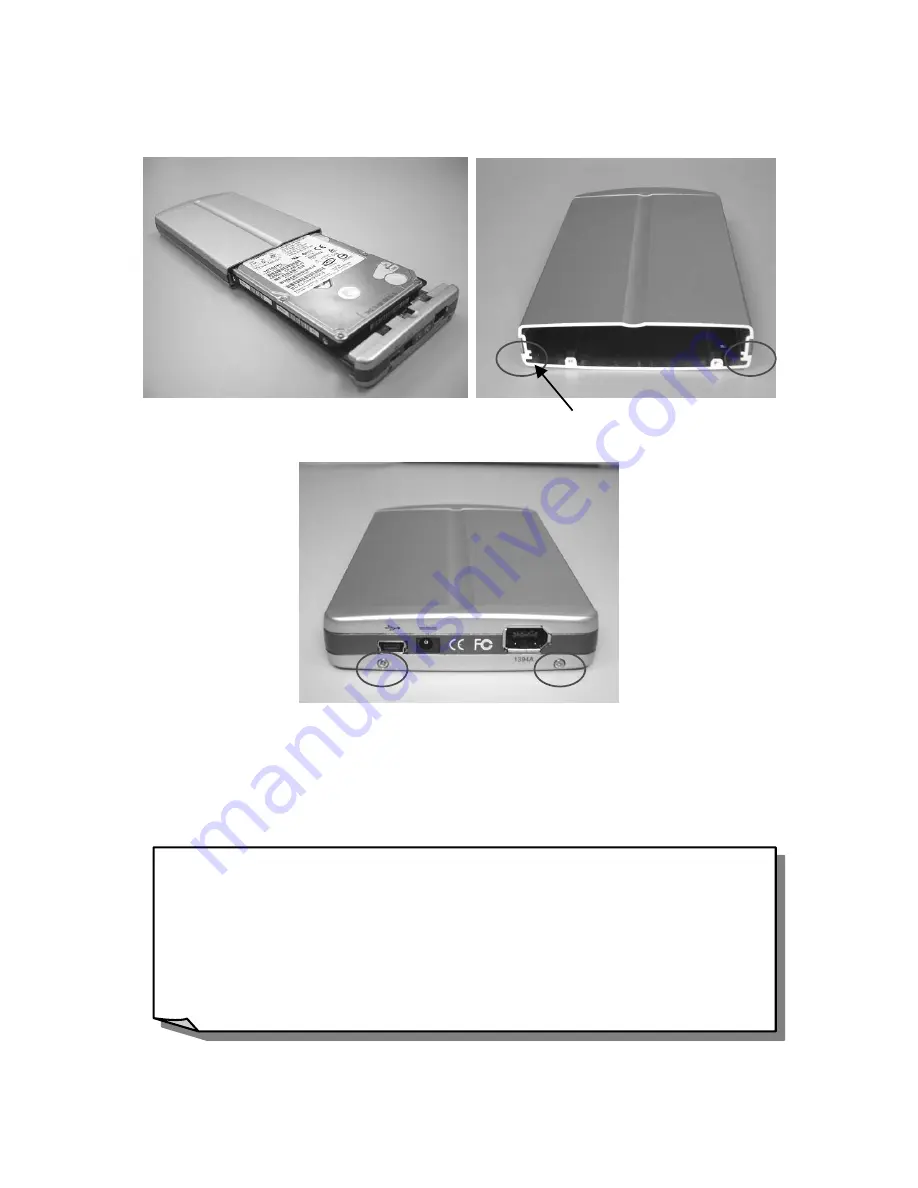
4. Push and slide the circuit board into the case. The sides of the circuit board should 

be put into the tracks.   


5. Insert the screws into the back panel of the 

2.5” Portable Hard Disk


track

6. The 

2.5” Portable Hard Disk

 is now ready for use. 


*

Note: 

For some desktop or notebook computers, the 

2.5” Portable Hard 

Disk

 may not work properly due to insufficient power availability 

from the USB port. In this event, you will need to provide additional 
power by connecting the USB power jack of the 

2.5” Portable 

Hard Disk

 via the USB power cable to another USB port of your 

desktop or notebook computer.


4

Summary of Contents for Portable Hard Disk Enclosure TS0MHDENC

Page 1: ...IEEE 1394A 2 5 Portable Hard Disk User s Manual...

Page 2: ...Me 2000 XP 5 Remove 2 5 Portable Hard Disk in Windows Me 2000 XP 5 Using and Removing 2 5 Portable Hard Disk in Mac OS 7 Using the 2 5 Portable Hard Disk with USB 2 0 7 Driver Installation for Windows...

Page 3: ...hard disk drive HDD installed in the 2 5 Portable Hard Disk and any desktop or notebook computer With the astonishing storage capacity and strong data retention ability available on a 2 5 HDD the ultr...

Page 4: ...A interface Up to 400Mbps 50Mbytes at high speed Note If your desktop or notebook computer only supports the USB 1 1 specification rather than the USB 2 0 specification the data transfer rate of the 2...

Page 5: ...the 2 5 Portable Hard Disk by pulling and sliding it slightly until it releases from the case 2 Plug the HDD into the IDE connector and put the HDD horizontally onto the circuit board 3 Insert the sc...

Page 6: ...5 Portable Hard Disk is now ready for use Note For some desktop or notebook computers the 2 5 Portable Hard Disk may not work properly due to insufficient power availability from the USB port In this...

Page 7: ...t the IEEE 1394A cable of the 2 5 Portable Hard Disk from IEEE 1394A port of your computer Using in Windows Me 2000 XP 1 Power on the computer where you will connect 2 5 Portable Hard Disk and make su...

Page 8: ...move the hardware 3 The Safe To Remove Hardware window will appear Click OK 4 Your 2 5 Portable Hard Disk is now ready to be removed Note If you don t follow the above steps to remove the 2 5 Portable...

Page 9: ...ortable Hard Disk Using the 2 5 Portable Hard Disk with USB 2 0 Driver Installation for Windows 98SE 1 Power on the computer where you will connect the 2 5 Portable Hard Disk and make sure the USB por...

Page 10: ...ct the 2 5 Portable Hard Disk to another USB port on your computer Your computer will automatically detect the 2 5 Portable Hard Disk and appear in Windows explorer 6 The 2 5 Portable Hard Disk is now...

Page 11: ...complete the process Using in Windows Me 2000 XP 1 Power on the computer where you will connect 2 5 Portable Hard Disk and make sure the USB port is enabled and working properly 2 2 5 Portable Hard Di...

Page 12: ...n on the system tray Click left button of the mouse on the icon 2 The Stop USB Mass Storage Device pop up menu will appear Click to remove the hardware 3 The Safe To Remove Hardware window will appear...

Page 13: ...Hard Disk to your Mac A disk icon will appear on the desktop You may use this device as if it were a Mac Hard Disk 1 2 3 If you want to remove the 2 5 Portable Hard Disk you must first drag and drop t...

Page 14: ...supply From USB or IEEE 1394A port Storage media 2 5 HDD LED Indicators Always On Power on Blinking Data Access Operating Temperature 5 C 55 C Storage Temperature 40 C 65 C Humidity 8 90 RH Emission S...

Page 15: ...y to product failure due to accident abuse mishandling improper installation alteration acts of nature improper usage or problems with electrical power Transcend products must be used with devices tha...

Reviews: