background image


18


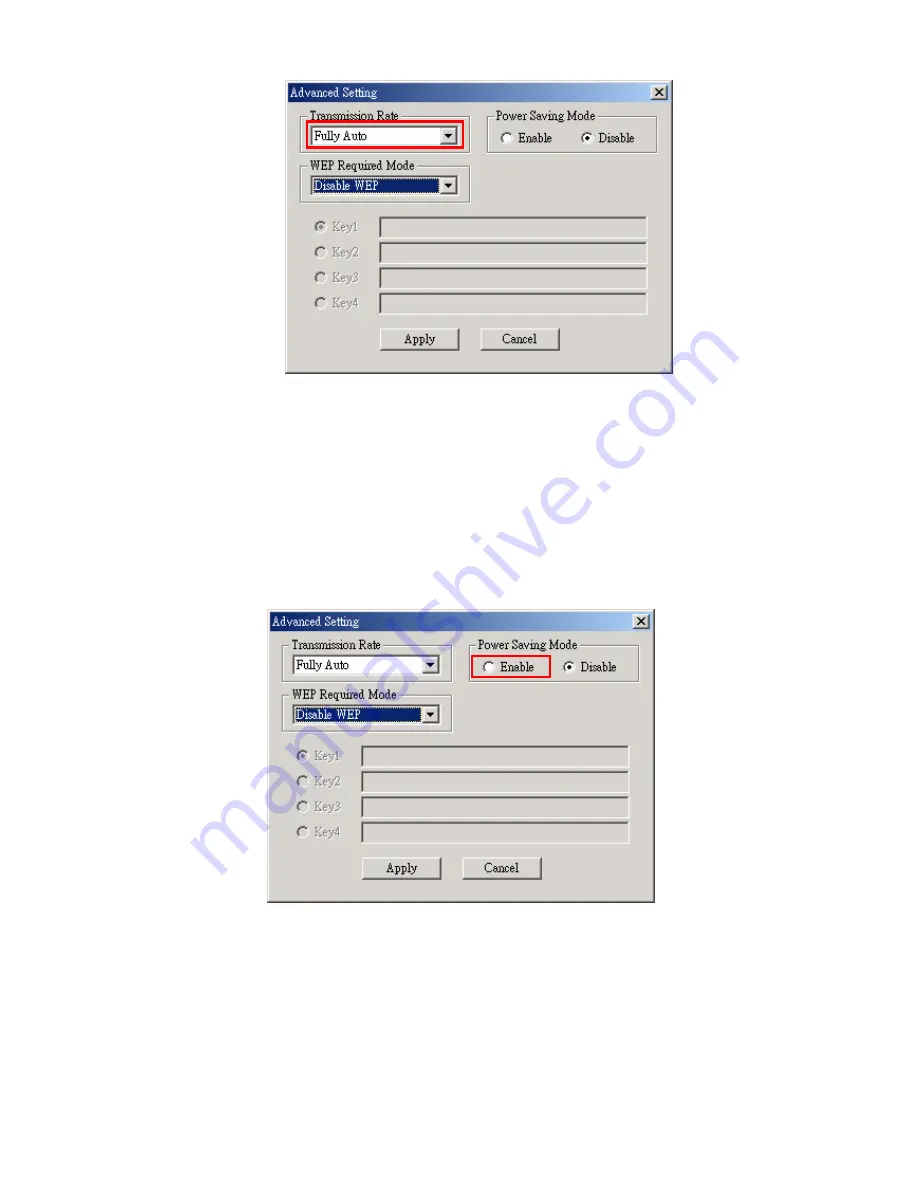
Power Saving Mode


JetFlash

 supports Power Saving Mode. You can follow the procedures below to enable the Power 

Saving Mode.   

1. Execute 

the 

WLAN Utility

2. Select 

the 

Setting

 tab and then select 

Advance

3. Select 

the 

Enable

 option in the 

Power Saving Mode

 column.   


™

  When the Power Saving Mode


is enabled, 

JetFlash

 can work with low power 

consumption but the throughput may slow down. 

™

  Power Saving Mode is useless in Ad Hoc Mode. 

LAN Status 

Select the 

LAN Status

 tab in the 

IEEE802.11b WLAN Utility (USB)

 window to see information 

Summary of Contents for JetFlash 128MB

Page 1: ...USB 128MB 256MB JetFlash User s Manual P N TS128 256MJF WL...

Page 2: ...9 Connect to an Access Point Infrastructure Mode 10 Connect without an Access Point Ad Hoc Mode 13 Enable Encryption 15 Setting the Transmission Rate 17 Power Saving Mode 18 LAN Status 18 Link Informa...

Page 3: ...age experience Package Contents Your JetFlash package includes the following items JetFlash Neck Strap Driver CD USB Adapter USB Extension Cable Quick Installation Guide Features Compliant with USB sp...

Page 4: ...before using the Wireless LAN function of your JetFlash LED Lights WLAN LED Blue DATA LED Green Status Off Off Standby Off Blinking Data transfer Blinking Off JetFlash is searching for an Access Point...

Page 5: ...into the CD ROM Auto Run supported Select the Win98 Driver button 2 Select 98 Driver Install to continue 3 After the drivers are installed the DRVSETUP2 dialogue window will appear Select OK to contin...

Page 6: ...N function see Wireless LAN Function section Simply plug your JetFlash into an available USB port and Windows will install the files needed to use it as an external hard drive Two new Removable Disk d...

Page 7: ...nd on the Driver CD to enable the WLAN Function Before installing the WLAN Utility verify that the switch is set to the ON position and carefully read the following steps Install the WLAN Utility 1 In...

Page 8: ...6 4 Select Next You can select Browse to choose the folder destination 5 Select Next...

Page 9: ...ktop recommended 7 Select Finish to complete the installation In Windows XP you must complete steps 8 10 and disable the Windows XP Zero Configuration The Operating system may request you to insert th...

Page 10: ...o to Settings and select Network Connections 9 Right click Wireless Network Connection this will be your JetFlash and select Properties 10 Select the Wireless Networks tab and verify the check box Use...

Page 11: ...n the Setup exe file inside and follow the above mentioned steps to complete the installation Execute the WLAN Utility 1 Verify that you have installed the WLAN Utility application and the switch is s...

Page 12: ...sconnected You can right click the signal icon and select Exit to close the IEEE 802 11b WLAN Utility USB window or select radio off to disable the Wireless LAN function Connect to an Access Point Inf...

Page 13: ...example The SSID must match the one used by the Access Point SSID Service Set Identifier is the group name that will be shared by all the members of the wireless network You can only connect to an Acc...

Page 14: ...t you can type in a name in the Profiles column and select Apply to save the settings Profiles will allow you to store a maximum of five sets You can select the Site Survey tab in the IEEE 802 11b WLA...

Page 15: ...y peer to peer without using an Access Point you must select Ad Hoc mode Follow the procedures below to activate Ad Hoc Mode 1 Execute the WLAN Utility 2 Select the Setting tab in the IEEE 802 11b WLA...

Page 16: ...14 Every member of the peer to peer network must select the same SSID and channel 5 Select Apply 6 Select OK to activate 802 11 Ad Hoc Mode...

Page 17: ...the WLAN Utility 2 Select the Setting tab and then select Advance 3 From the WEP Required Mode drop down menu box choose either 64 bits ASCII 128 bits ASCII 64 bits or 128 bits then type in the WEP ke...

Page 18: ...16 b If Manual 128 bits ASCII is selected enter the 13 digit WEP Key s c If Manual 64 bits is selected enter the 10 digit WEP Key s d If Manual 128 bits is selected enter a 26 digit WEP Key...

Page 19: ...ates You can follow the procedures below to set the transmission rate 1 Execute the WLAN Utility 2 Select the Setting tab and then select Advance 3 Select one of following transmission rates and then...

Page 20: ...t the Setting tab and then select Advance 3 Select the Enable option in the Power Saving Mode column When the Power Saving Mode is enabled JetFlash can work with low power consumption but the throughp...

Page 21: ...other available networks You may be able to connect to any of the other available networks displayed Encryption may prevent you from connecting to one of the other networks Link Information Select the...

Page 22: ...ic tab in the IEEE 802 11b WLAN Utility USB window and select Start Diagnostic If any error occurs you can select View Error Details to view the detailed information About Version You can select the A...

Page 23: ...in Windows Me 1 Select the icon in the system tray 2 The Unplug or Eject Hardware pop up menu will appear Select to continue 3 The Unplug or Eject Hardware window will appear Select USB Disk and then...

Page 24: ...unplug your JetFlash from your computer Remove JetFlash in Windows 2000 1 Select the icon in the system tray 2 The Unplug or eject hardware pop up menu will appear Select to continue 3 The Unplug or...

Page 25: ...e window will appear Select OK to continue 5 Select WLAN miniUSB Adapter and select Stop to continue 6 The Safe To Remove Hardware window will appear Select OK to complete You may now safely unplug yo...

Page 26: ...move Hardware pop up menu will appear Select to continue 3 The Safely Remove Hardware window will appear Select USB Mass Storage Device and then select Stop to continue 4 The Safe To Remove Hardware m...

Page 27: ...JetFlash see previous section 2 Select the button on the Task Bar go to Settings and then select Control Panel 3 Double click the Add or Remove Programs icon 4 Select the IEEE802 11b WLAN Utility and...

Page 28: ...26 5 Follow the InstallShield Wizard and select Remove to complete the un installation 6 Select Finish when the un installation has completed...

Page 29: ...my operating system detecting JetFlash after I ve plugged it into the USB port of my computer A2 Please check following 1 Is JetFlash properly connected to the USB port If not unplug it and plug it in...

Page 30: ...Remove d Select OK to confirm the device removal e Select Yes to restart your computer and refer to the Driver Installation for Windows 98SE section to re install the Win98 Driver In Windows Me a Rig...

Page 31: ...29 b Select the Device Manager tab and double click Network adapters Select the WLAN miniUSB Adapter and right click Properties c If an error message appears in the Device Status window select Remove...

Page 32: ...30 d Select OK to confirm the device removal e Select Yes to restart your computer and re insert your JetFlash In Windows 2000 a Right click the My Computer icon on the desktop and select Properties...

Page 33: ...31 b Select Hardware tab and then select Device Manager c Double click the Network adapters Right click the WLAN miniUSB Adapter and then select Properties...

Page 34: ...32 d If an error message appears in the Device Status window right click WLAN miniUSB Adapter and then select Uninstall e Select OK to confirm the device removal...

Page 35: ...33 f Restart your computer and re insert your JetFlash In Windows XP a Select the button on the Task Bar go to Settings and then select Control Panel b Double click the System icon...

Page 36: ...34 c Select Hardware tab and then select Device Manager d Double click the Network adapters Right click WLAN miniUSB Adapter and then select Properties...

Page 37: ...35 e If an error message appears in the Device Status window right click WLAN miniUSB Adapter and select Uninstall f Restart your computer and re insert your JetFlash...

Page 38: ...Mbps 1Mbps Auto Rate Modulation Technique DSSS Direct Sequence Spread Spectrum with BPSK 1Mbps QPSK 2Mbps and CCK 5 5Mbps and 11Mbps Antenna Embedded PIFA antenna Wireless Security 64 bit 128 bit WEP...

Page 39: ...o accident abuse mishandling improper installation alteration and acts of nature improper usage or problems with electrical power Transcend JetFlash must be used with devices that conform to the recom...

Reviews: