Startup
76
RT-SVX34F-EN
8. Loosen the adjustment screws on each side of the
damper and slide it downward to the required opening.
9. Tighten the adjustment screws and re-install the mist
eliminators and the mist eliminator retainer bracket.
10. Open the main power disconnect or the unit mounted
disconnect switch to shut the unit off and to reset the
RTRM.
11. Before closing the disconnect switch, ensure that the
compressor discharge service valve(s), suction service
valve(s), and liquid line service valve(s) are
backseated.
Starting the Compressor
Optional service valves must be fully opened before
startup (suction, discharge, liquid line and oil line).
Starting 27.5 to 35 Ton Units
Install a set of service gauges onto the suction and
discharge service ports. To start the compressor test, close
the main power disconnect switch or the unit mounted
disconnect switch.
Jump across the “Test terminals” on LTB1 or toggle the
test switch three consecutive times if it is a constant
volume application, or five times if it is a variable air
volume application for two to three seconds per jump.
Refer to
Table 31, p. 56
-
Table 36, p. 58
for the Cooling Test
sequence.
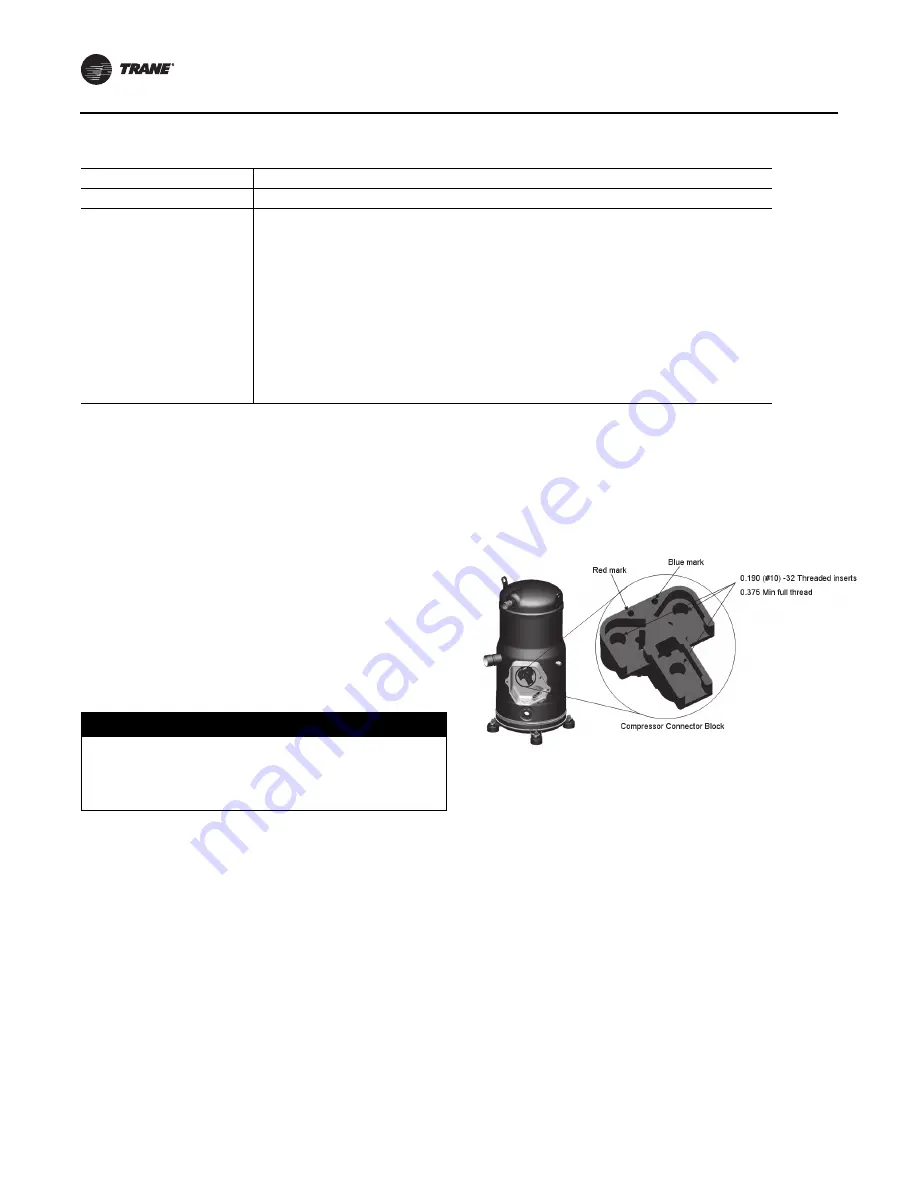
Important:
The compressors are protected from
reverse rotation caused by improper
sequencing of the customer supplied unit
power wires by the unit phase monitor. It is
imperative to verify correct sequencing of
compressor power wires to prevent
compressor failure from reverse rotation.
Refer to the unit wiring schematic and/or
wire color markers vs. the compressor
terminal block color markers.
If a scroll compressor is rotating backwards, it will not
pump and a loud rattling sound can be observed. If
allowed to run backward for even a very short period of
time, internal compressor damage may occur and
compressor life may be reduced. If allowed to run
backwards for an extended period of time, the compressor
will likely fail or the motor windings will overheat and
cause the motor winding thermostats to open. The
opening of the motor winding thermostat will cause a
“compressor trip” diagnostic and stop the compressor.
Starting 40 to 50 Ton Units
Install a set of service gauges onto the suction and
discharge service ports of each circuit. Follow the same
procedures as above to start the first stage of compressor
operation.
After the compressor and the condenser fans have been
operating for approximately 30 minutes, use
Table 58,
p. 78
through
Table 71, p. 84
to determine the proper
operating pressures for that circuit.
Table 57.
Damper adjustment
Damper Opening (In.)
Return Air Static Pressure - Inches w.c.
Damper # 1 Damper # 2
-0.20
-0.40
-0.60
-0.80
-1.00
-1.20
-1.40
-1.60
2
0
430
590
725
840
950
1040
1120
740
4
0
780
1080
1330
1545
1730
1890
2035
2170
6
0
1185
1620
1990
2300
2575
2815
3030
3240
8
0
1530
2110
2600
3025
3390
3705
3985
4240
10
0
1930
2655
3270
3800
4250
4650
5005
5345
10
2
2295
3165
3910
4545
5095
5575
6010
6415
10
4
2660
3650
4510
5255
5905
6480
6995
7470
10
6
3010
4150
5130
5965
6690
7330
7900
8440
10
8
3345
4600
5680
6610
7410
8120
8765
9365
10
10
3690
5125
6350
7395
8295
9075
9775
10420
NOTICE:
Compressors Failure!
Unit must be powered and crankcase heaters energized
at least 8 hours BEFORE compressors are started. This
will protect the compressors from premature failure.
Figure 56.
Compressor terminal block color markers


