


Test Heating Operation
(if your system has heating)
Press the
a.
MODE button.
Scroll to
b.
HEATING.
Press the
c.
Done button to return to the home screen.
Turn the temperature up using the scroll up button until the new setpoint is above the room temperature.
d.
Verify that the heating system turns on and runs.
e.
Note: It may take approximately 5 minutes for the system to start up after switching from COOLING to HEATING mode.
There is a built in time delay which will not allow the equipment to turn on until it is ready. The screen will display the word
“
Wait
” until the time delay has finished.
This concludes the system checkout. If any part of your system fails to come on when performing this checkout
procedure, verify that the correct wires were connected to the wall plate and that each wire is securely attached to the
appropriate terminal. Also go back and verify that you have set up the Mechanical Settings to match your System Type.
14
Test Fan Operation
Press the
a.
FAN button.
Scroll to
b.
ON.
Verify that the system fan starts and moves air.
c.
Press the
d.
FAN button.
Scroll to
e.
AUTO.
Press the
f.
Done button to return to the home screen.
Test Cooling Operation
(if your system has cooling)
Press the
a.
MODE button.
Scroll to
b.
COOLING.
Press the
c.
Done button to return to the home screen.
Turn the temperature down using the scroll down button until the
d.
new setpoint is below the room temperature.
Verify that the outdoor unit and the system fan come on and run.
e.
Perform System Checkout
20
FAN
button
MODE
button
MENU MODE FAN RUN
75
76 H
74 C
11:15 AM
AUTO AUTO
Sys Off
Run
CAUTION:
Do not run the
air conditioner if the outdoor
temperature is below 55 degrees F.
Remote Sensors
RS2 Location IN
DONE
+
-
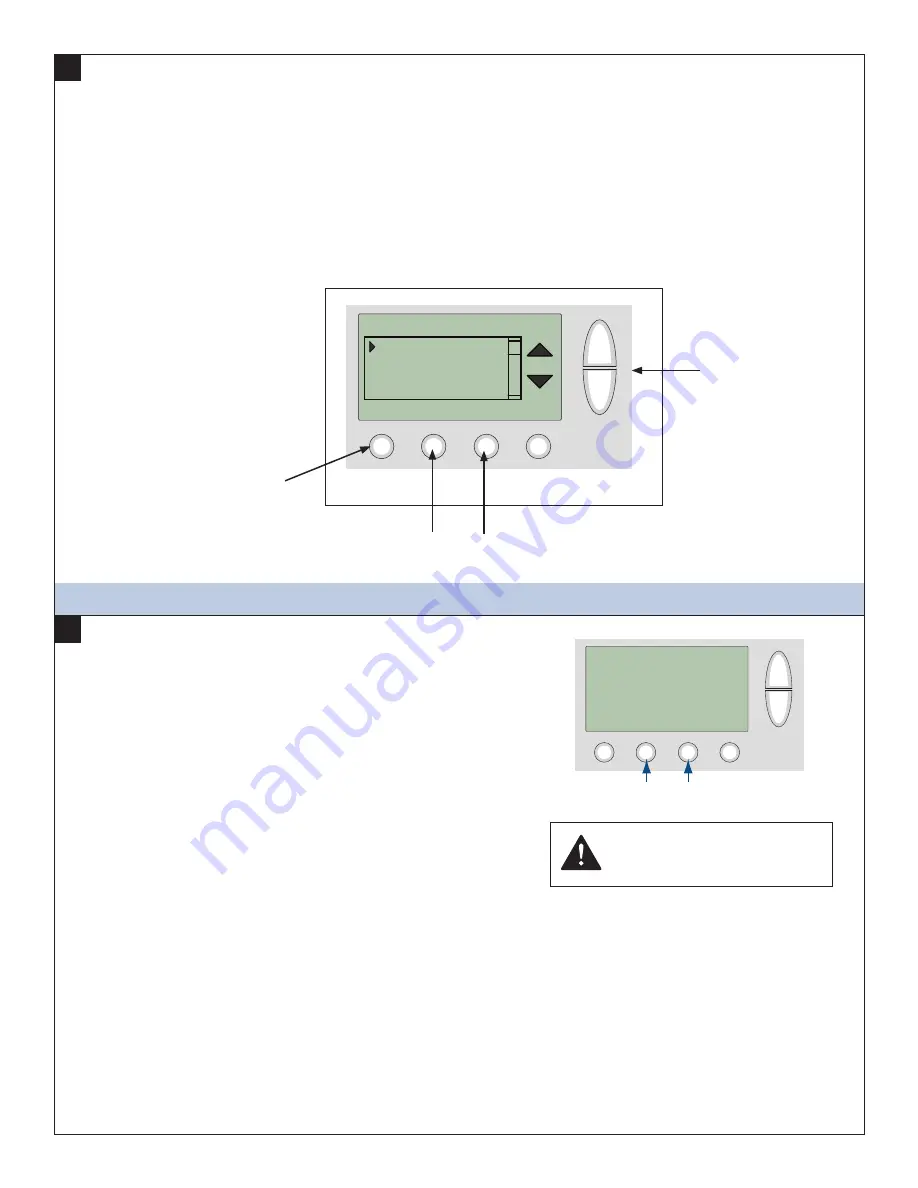
Up
Press DONE button
to exit back to installer
settings screen.
Down
Press the +/- buttons to change the setting.
Scroll menu selection
with the Up and Down
buttons.
Optional Remote Temperature Sensors Installation
Remote sensor input RS2 can be configured for use as indoor or outdoor temperature sensing. The factory default setting for RS2 is
“IN” for use with remote indoor temperature sensing and/or averaging. To configure RS2 to sense outdoor temperature, complete the
following steps:
a. Press the MENU button twice to access the Menu Selection screen.
b. From the Menu Selection screen, press and hold the two inner buttons down for 4 seconds to reach the Installer Settings menu.
c. From the Installer Settings screen, scroll down to Remote Sensors using the Scroll down button and press the Select butt on.
d. From the Remote Sensors screen, select the option for RS2 remote senor location. (IN is the factory default setting)
e. To change RS2 for use as an outdoor temperature sensor, press the + button to change this setting to OUT.
f. Press the Done button three times to return to the home screen.
19


