background image

6

18-GE08D1-7

Installer’s Guide

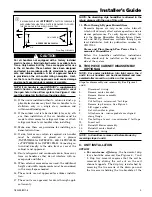
k. If a return duct is connected to the air handler, it

must be the same dimensions as the return
opening shown in the outline drawing.

l. On units with sheet metal returns: Return

plenum should be flanged. Sheetmetal screws
must be 1/2" in length or shorter.

m. No sheetmetal screws may be used to attach

return ductwork on the side of the unit.

n. 

Openings where field wiring enters the cabi-

net must be completely sealed.

  Location of

power entry is shown on the outline drawing.
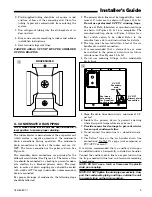
Use 2.5" clear stickers to seal all unused electri-
cal knockouts.  See Figure 11.

o. After ductwork connections are made, seal air-

tight and per local codes.

HORIZONTAL LEFT

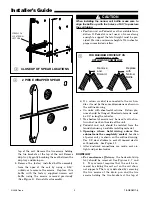
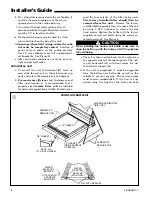
a. To convert the unit to horizontal left, front ac-

cess, slide the coil out on the coil channel sup-
ports and rotate the complete coil 180 degrees.

b.

For maximum efficiency

 and Customer ease of

filter maintenance, it is recommended that a
properly sized 

remote filter 

grille be installed

for horizontal applications. Airflow should not ex-

ceed the face velocity of the filter being used.

The factory installed filter should then be
removed from the unit.

  Remove the factory

installed baffle assembly from the apex of the coil
by using a 5/16" nutdriver to remove the hex
head screws. Replace this baffle with the factory
supplied narrow coil baffle using the screws re-
moved previously. See Figure 5.

CAUTION

!

When installing the narrow coil baffle, make sure to
align the baffle up with the holes so NOT to puncture
the coil tubing.

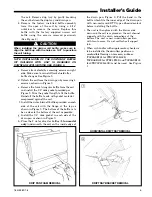
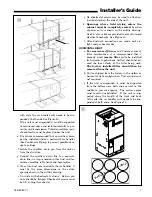
c. The coil is then inserted back into the cabinet on

the opposite side coil channel supports. The unit
is now horizontal left with front access. Do not
reattach coil support tab.

d . If the unit is suspended, it must be supported

from the bottom near both ends as well as the
middle to prevent sagging. The service access
must remain unobstructed. If the unit is sup-
ported along the length of the front and back

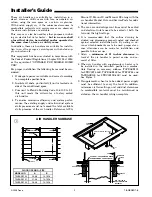
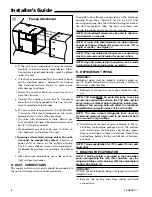
DOWNFLOW BAFFLE KIT

X

X

7/8" GASKET

SCREWS TO 
REMOVE COIL

SCREWS TO 
REMOVE COIL

DISCARD HORIZONTAL
DRIP TRAY

1/2" GASKET
INSIDE SURFACE
OF BAFFLE

7/8" GASKET

SECT. X-X

(TYP. BOTH SIDES)

FILL WITH SEALANT

WATER

BLOW-OFF

BAFFLES

ATTACH WITH

2 SCREWS

EACH SIDE

WATER

DIVERTER

BAFFLES 

(5TON ONLY)

9

Summary of Contents for 2/4TEC3F18B1000A

Page 1: ...These instructions do not cover all variations in systems or provide for every possible contingency Should fur ther information be desired or particular problems arise which are not covered sufficient...

Page 2: ...supply air if the minimum clearances to combustible materials and service access are observed the above installations are suitable This area may also be used for other purposes includ ing an electric...

Page 3: ...door installa tion 17 These units are approved for draw through appli cation only NOTE No atomizing style humidifier is allowed in the return plenum with the use of this unit 18 Flow through Bypass Hu...

Page 4: ...utline drawing e On units with sheetmetal returns Return ple num should be flanged Sheetmetal screws must be 1 2 in length or shorter f No sheetmetal screws may be used to attach re turn duct work on...

Page 5: ...to coil with gasket material compressed against the coil f Install the water blow off baffles provided on each side of the coil with the flange at the top as shown in Figure 9 The bottom of the baffl...

Page 6: ...hould not ex ceed the face velocity of the filter being used The factory installed filter should then be removed from the unit Remove the factory installed baffle assembly from the apex of the coil by...

Page 7: ...event sagging The service access must remain unobstructed If the unit is sup ported along the length of the front and back with rails the air handler only needs to be sus pended at both ends See Figur...

Page 8: ...revent air leakage NOTE No sheetmetal screws may be used to attach re turn ductwork on the side NOTE On units with sheetmetal returns Return plenum should be flanged Sheetmetal screws must be 1 2 in l...

Page 9: ...lean out tee or cross be installed in the primary drain line for future maintenance See Figures 15 16 4 Do not use reducing fittings in the condensate drain lines 2 Field supplied tubing should be cut...

Page 10: ...RING 1 Connect wiring between indoor unit outdoor unit and Comfort Control The use of color coded low voltage wires is recommended 2 Field wiring diagrams are provided which show the low voltage wirin...

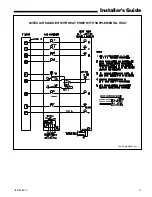
Page 11: ...18 GE08D1 7 11 Installer s Guide 2 4TEC AIR HANDLER WITH HEAT PUMP WITH SUPPLEMENTAL HEAT From Dwg B801082 Rev 2...

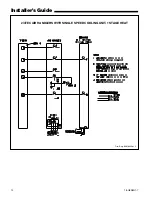
Page 12: ...12 18 GE08D1 7 Installer s Guide 2 4TEC AIR HANDLERS WITH SINGLE SPEED COOLING UNIT 1 STAGE HEAT From Dwg B801083 Rev 2...

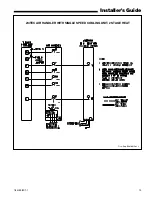
Page 13: ...18 GE08D1 7 13 Installer s Guide 2 4TEC AIR HANDLER WITH SINGLE SPEED COOLING UNIT 2 STAGE HEAT From Dwg B801081 Rev 2...

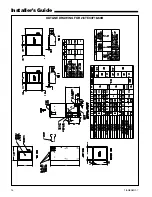
Page 14: ...14 18 GE08D1 7 Installer s Guide OUTLINE DRAWING FOR 2 4TEC3F18 60B...

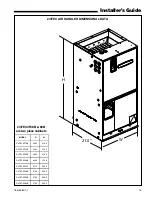
Page 15: ...ONAL DATA H W 21 0 2 4TEC3F48B 60B are two piece cabinets MODEL H W 2 4TEC3F18B 43 00 21 50 2 4TEC3F24B 43 00 21 50 2 4TEC3F30B 45 00 21 50 2 4TEC3F36B 45 00 21 50 2 4TEC3F42C 51 75 23 50 2 4TEC3F48B...

Page 16: ...ode 3 Make sure unit suspension if used is secure and that there are no tools or loose debris in around or on top of the unit 4 Check all duct outlets they must be open and unrestricted 5 Check drain...

Reviews: