background image

7

imprint in the male connector by 180° to re-establish
the correct phase order (see Fig. 14).

5.4 Installing the lifting wire rope in the unit

NOTE : Gloves should be worn when handling the
wire rope.

• The wire rope must be fully unwound and

untwisted over its entire length before you begin
to install it in the hoist.

• Lubricate the lifting wire rope to facilitate insertion

in the hoist.

• Check that the high limit stop is engaged on the

lifting wire rope (spring toward unit) on the wire rope
hook side.

• Connect the power wire rope to the power outlet.

• Insert the free end of the lifting wire rope

(welded, rounded tip) in the unit through the
engagement hole marked by an arrow on the
casing.

Note : Never insert the wire rope in the other hole ;
this hole is only used for exit of the wire rope. Never
secure a load to the loose end of the wire rope.

• Press the « up » button on the control box while

pushing the wire rope so that it engages on the pulley
in the unit. (see three-phase units, see 5.3).

• When the wire rope comes out of the unit, continue

the movement to obtain a length of wire rope of
around 1 meter coming out of the unit.

• On the free end of the wire rope (1), slide on the

low limit stop so that the end of the spring is near
the unit (2) and tighten the screw on the stop ring
(3) using an ALLEN wrench (4). There should be
at least one meter of wire rope between this ring
and the wire rope end

• Ensure that the stop cannot slide on the wire

rope. (Fig. 15).

Note : You may wish to further limit the travel of the
load downward ; in this case, unwind the
corresponding length of wire rope before securing
the limit ring.

On the other end, secure the high limit stop ring

in accordance with the height at which you may want
to limit the travel of the load in the upward direction.
Secure the limit stop and check it by applying the
same procedure as for the low limit stop.

• Check that the hoist limit levers operate correctly,
as well as the other safety devices as described in
section 18.

There should be a limit stop at around 1

meter ahead of the free end of the lifting wire rope
and another limit stop on the wire rope hook slide,

both limit stops securely and appropriately
attached. This a mandatory safety requirement.

5.5 Limit stops and pulleys

If the installation comprises one or several return

pulleys, only pulleys of appropriate diameter should
be used. In this case, the high limit (1) and low limit
(2) stops must be positioned on the wire rope so that
neither the high limit stop or the load be able to come
into contact with a pulley. The high limit stop must
be mounted between the hoist and the pulley which
is nearest on the wire rope path (see Fig. 13).

IMPORTANT : Check that the anchor points and
pulleys are of appropriate strength with respect
to the forces which will be applied.

5.6 Check with load

With the load fastened, lift it slightly and check

that the « Up » and « Down » controls operate
correctly; also check operation of the “Emergency
stop” control.

Once you have ensured that these functions

operate correctly, you can proceed with the
maneuvers. If the unit does not operate correctly,
return it to a TRACTEL

®

-approved repair agent

(Also see section 5.3)

6. OPERATING THE HOIST

The hoist is operated by pressing on either the «
Up » or « Down » button on the control box (Fig.
2). The control box must always be held in the
vertical position, hanging on its control cable. Never
turn over the control box (control cable entry
downward) as this can result in control mistakes.

When the « Up » or « Down » button is released,

the movement stops. When using the minifor

to lift

a load to a very high location, the unit should be
stopped for around 15 minutes every fifty meters of
operation to prevent the unit from overheating.

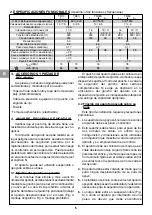
The 230V single phase motor is protected

against overheating by a heat probe in the winding.
This probe inhibits operation by opening the control
circuit so long as the winding temperature has not
returned to an acceptable value.

Note : The casing may heat up to 80°C. This is
normal.

A red emergency stop button is provided to stop

movement of the system in the event of incorrect
operation of the « Up » or « Down » buttons (see
section 8 : Safety devices).

The following precautions must be taken when

performing up or down movements :

• The load should not swing or turn.

GB

Summary of Contents for Minifor TR 10

Page 1: ...te 2 Models Modelo Modello Modelo TR 10 TR 30 TR 30 S TR 50 English Español Italiano Português 2006 42 CE ES PT Istruzioni d uso e manutenzione Traduzione del manuale originale Instruções de uso e manutenção Tradução do manual original Operation and maintenance manual Original manual Manual de empleo y mantenimiento Traducción del manual original GB IT ...

Page 2: ...commendations for use 10 14 Malfunctions 11 Always concerned to improve the quality of its pro ducts the TRACTEL Group reserves the right to modify the specifications of the equipment described in this manual The companies of the TRACTEL Group and their agents or distributors will supply on request descriptive documentation on the full range of TRACTEL products lifting and pulling machines permane...

Page 3: ...he consequences resulting from disassembly of the unit in any way not described in this manual or repairs performed without Tractel authorization especially as concerns replacement of original parts by parts of another manufacturer 14 Tractel declines any responsibility for the consequences resulting from any unauthorized changes or repairs to the wire rope 15 The unit must never be used for any o...

Page 4: ...ments concerning the radio emote control 4 Depending on the control option the lifting wire rope to the length required mounted on a reel equipped with a safety hook and a high limit stop mounted on spring 1 3 Description and markings Figure 1 shows a standard minifor in its most frequently used operating position ready for operation suspended on a clamp secured to a beam The standard hoist is sup...

Page 5: ...ire rope strands The configuration and dimensions of the hole are given in figure 24 showing the bearing face of the hoist and its position on the hole 3 The hoist must be positioned so that the lifting wire rope with load does not rub against the side of the hole and in such a way that the fixed limit stops on the wire rope are able to come into contact with the limit levers on the hoist 4 The ho...

Page 6: ...t the location defined by the operator under safe working conditions 5 2 Electrical recommendations 1 Before using the hoist with a new connection refer to the nameplate on the motor Check the characteristics of the power supply single phase or three phase voltage available amperage Check that the current supplied is compatible with the characteristics on the motor nameplate The available current ...

Page 7: ...the free end of the lifting wire rope and another limit stop on the wire rope hook slide both limit stops securely and appropriately attached This a mandatory safety requirement 5 5 Limit stops and pulleys If the installation comprises one or several return pulleys only pulleys of appropriate diameter should be used In this case the high limit 1 and low limit 2 stops must be positioned on the wire...

Page 8: ...t in use Make sure the hoist cannot be used by unauthorized persons For storage the unit can be stored in its case The wire rope must be removed from the unit except those models having a winder and rolled on its reel The unit must never be set on its base when the wire rope is engaged in the unit as this would result in bending and damaging the wire rope 8 SAFETY DEVICES The hoist is provided wit...

Page 9: ...l possible to add the standard high limit stop this is placed between the pulley and the wire rope entry on the unit marked by an arrow IMPORTANT If tackle is used double the maximum utilization load to be taken into account for safety calculations NOTE Be careful to install the tackle pulley so that its limit spring is located on the cable between the pulley and the wire rope entry on the unit Se...

Page 10: ...individual license for use No changes should be made to the radio remote control system Use of the radio remote controlled minifor outside France is subject to verification for compatibility with local regulations concerning radio waves The radio remote controlled minifor s do not come with a control box connected by a control cable optional on request 13 RECOMMENDATIONS FOR USE When used in compl...

Page 11: ...tarting up movement again Release the load and check the forward cable before starting up movement again 2 No motor rotation Emergency stop has been triggered End of run lever in the appliance has triggered Fuse has blown End of run lever jammed or broken Power down defective plug or connector Defective contacts or control box After intense usage the motor is too hot and the heat probe triggers si...

Page 12: ...the Down button If the cable engages normally press the Up button to release it and reverse the phases on the connector set up for this purpose Should none of the above causes be revealed send the Minifor to a TRACTEL approved repair service 6 The cable slides or slips on the uphill Overly thin cable Cable wear more than 10 of the nominal diameter Heavy wear to the tightening system Check the diam...

Page 13: ...aciones de empleo 11 14 Anomalías de funcionamiento 13 Con el fin de mejorar constantemente sus productos el Grupo TRACTEL se reserva el derecho de hacer cualquier modificación que crea útil en los productos descritos en el presente manual Tractel Ibérica y sus distribuidores autorizados les facilitarán bajo demanda documentación relativa a la gama de los otros productos TRACTEL aparatos de elevac...

Page 14: ...el exoneranaTracteldesuresponsabilidad especialmenteenel caso de reemplazo de piezas originales por piezas de otra procedencia 14 Toda intervención en el cable para modificarlo o repararlo fuera del control de Tractel excluye la responsabilidad de Tractel en lo que respecta a las consecuencias de esta intervención 15 Este aparato nunca debe ser utilizado para operaciones que noseanaquellasdescrita...

Page 15: ...bra 2 Una bolsa de plástico que contiene un tope de fin de carrera bajo sobre muelle una llaveALLEN de 3 para la fijación de los topes de fin de carrera en el cable 3 Una bolsa de plástico que contiene este folleto de instrucciones la declaración CE de conformidad llegado el caso los documentos relativos al control por radio 4 Según la opción de mando el cable de elevación de la longitud correspon...

Page 16: ...e interponer una eslinga de capacidad apropiada 4 2 Fijación del aparato apoyado sobre su base Este tipo de instalación requiere precauciones particulares 1 La superficie de apoyo sobre la cual se coloca el aparato debe ser plana y horizontal 2 Esta superficie debe tener para el paso de los dos ramales de cable un orificio cuya configuración y dimensiones están indicadas en la figura 24 que muestr...

Page 17: ...movimiento de los diferentes ramales del cable evitándoles todo tipo de rozamiento N B Si una polea de desvío es interpuesta para izar la carga sobre un plano inclinado puesto que la carga es motriz se está en un caso de elevación caso 4 4 3 4 4 5 Aparato amarrado al nivel del suelo Elevación mediante polea de desvío Mismas recomendaciones que para el caso 4 4 4 La resistencia de la polea y la de ...

Page 18: ... el minifor monofásico y 8 kVa para el minifor trifásico 5 3 Caso de los aparatos de motor trifásico TR30S TR50 Los aparatos de motor trifásico están equipados con un detector de sentido de fase que impide el funcionamiento en caso de inversión del orden Si después de la conexión invertida el minifor TR30S TR50 trifásico no funciona desconectar la toma de corriente con un destornillador y girar 18...

Page 19: ...onde cuelga de su cable de mando No colocarla en posición invertida es decir con la entrada del cable eléctrico hacia abajo ya que esto podría ocasionar errores de maniobra En cuanto se deja de pulsar el botón Subida o Bajada el movimiento se detiene En el caso de una operación de elevación de gran altura con un minifor se recomienda respetar un tiempo de parada de aproximadamente 15 minutos cada ...

Page 20: ...idad 1 en los ganchos Fig 16 y 17 Protección eléctrica de la botonera clase 2 Fusible de protección del mando en la caja eléctrica La parada de emergencia se obtiene presionando el botón rojo Fig 2 Para permitir un nuevo arranque después de la parada de emergencia hay que desenclavar el botón de parada de emergencia haciéndolo girar en el sentido de las flechas marcadas sobre éste después de haber...

Reviews: