background image

TL-WA601G

108M Wireless Access Point User Guide


1)  Open TCP/IP Properties of the LAN card in your PC, enter the IP address as 192.168.1.* 

(* is any value between 2 to 254, Subnet mask is 255.255.255.0, Gateway is 192.168.1.1, 
DNS address is the value provided by ISP). 

2)  Now, you can run the Ping command in the command prompt to verify the network 

connection between your PC and the AP. The following example is in Windows XP 
Operating System. 

3)  Open a command prompt, From the Start menu on your desktop, select run tab, type 

cmd

 in the field, and type 

ping 192.168.1.1

 on the screen that appears, and then press 

Enter. 

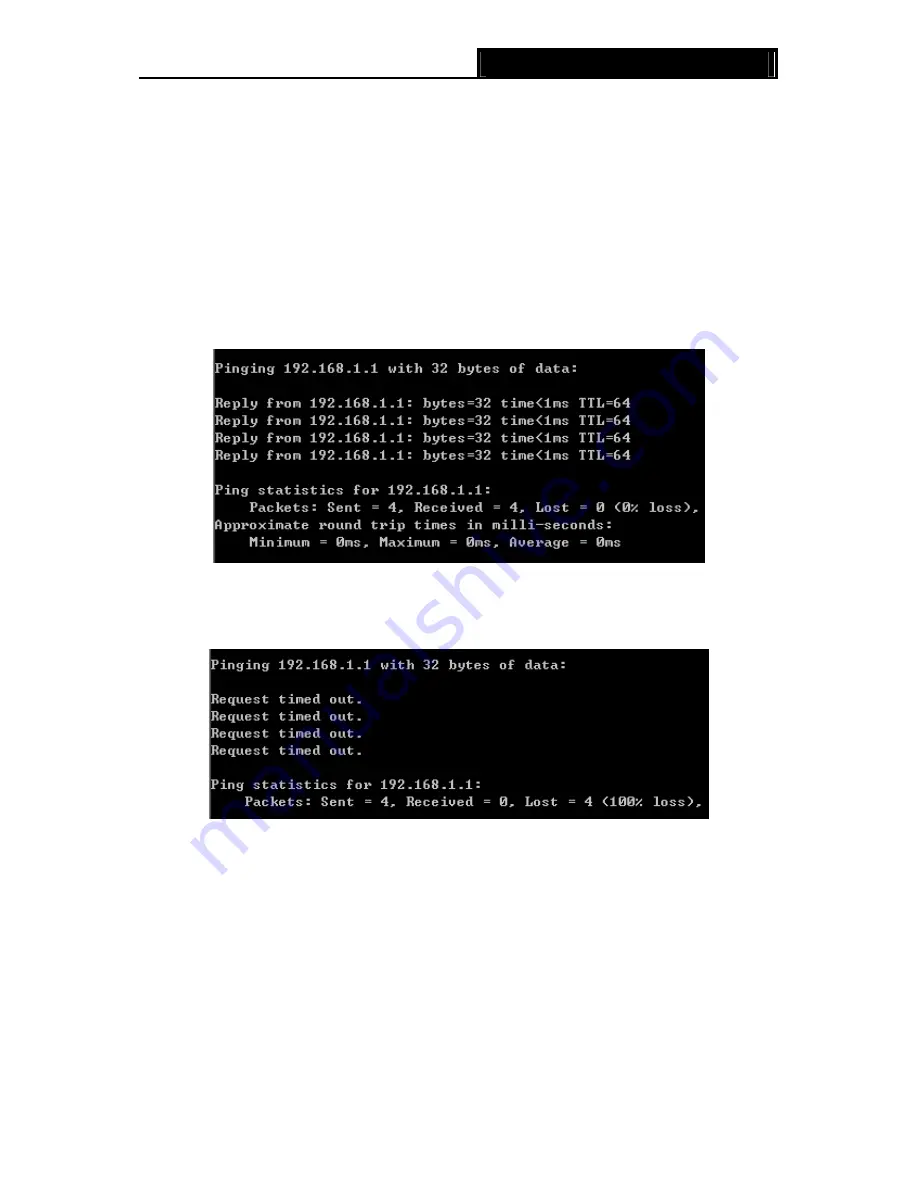
If the result displayed is similar to that shown in Figure below, the connection between your PC 
and the AP has been established. 


Figure 2-8 

If the result displayed is similar to that shown in Figure below, it means that your PC has not 
connected to the AP. 


Figure 2-9 

Please check it following these steps: 

)


Note: 

If the connection between your PC and the AP is correct? 

The LEDs of LAN port which you link to on the device and LEDs on your PC's adapter should be 
lit. 

If the TCP/IP configuration for your PC is correct? 

If the AP's IP address is 192.168.1.1, your PC's IP address must be within the range of 
192.168.1.2 ~ 192.168.1.254. 

Summary of Contents for TL-WA601G

Page 1: ...TL WA601G 108M Wireless Access Point Rev 1 0 3 1910010121...

Page 2: ...are trademarks or registered trademarks of their respective holders No part of the specifications may be reproduced in any form or by any means or used to make any derivative such as translation tran...

Page 3: ...uipment into an outlet on a circuit different from that to which the receiver is connected Consult the dealer or an experienced radio TV technician for help This device complies with part 15 of the FC...

Page 4: ...ongoing in recent years to allow current relaxed regulation Full implementation planned 2012 Italy If used outside of own premises general authorization is required Luxembourg None General authorizati...

Page 5: ...5 Connecting the Device 5 2 6 Configure PC 5 Chapter 3 Software Configuration 9 3 1 Login 9 3 2 Status 10 3 3 Network 11 3 4 Wireless 11 3 4 1 Basic Settings 12 3 4 2 Wireless Mode 13 3 4 3 Site Surve...

Page 6: ...3 7 4 Reboot 30 3 7 5 Password 31 3 7 6 Syslog 31 Appendix A Glossary 33 Appendix B Specifications 35 Appendix C FAQ 36...

Page 7: ...s Access Point One AC power Adapter for TL WA601G 108Mbps Wireless Access Point One Resource CD including z This User Guide z Other Helpful Information Note Make sure that the package contains the abo...

Page 8: ...extended to 4 9 times It is an easy web based setup for installation and management Even though you may not be familiar with the AP this guide will make configuring the AP easy Before installing the...

Page 9: ...LED indicators displayed on the front panel the status of these LED indicators represent the device s working circs For details please refer to 2 1 1 LED Explanation 2 1 1 LED Explanation Name Status...

Page 10: ...s Last release the reset button and wait for the AP to reboot Note Ensure the AP is powered on before it restarts completely One LAN 10 100Mbps RJ45 port for connecting the AP to hub or switch AC powe...

Page 11: ...r for proper installation of the modem 2 Connect the Cable or DSL modem to a Router Quickly install the router 3 Locate an optimum location for the AP The best place is usually near the center of the...

Page 12: ...and configure the IP address manually for your PCs 1 From the Start menu on your desktop go to Settings and then click on Network Connections Figure 2 4 2 In the Network Connections window right clic...

Page 13: ...TL WA601G 108M Wireless Access Point User Guide Figure 2 6 4 Configure the IP address manually Click OK Figure 2 7 7...

Page 14: ...in the field and type ping 192 168 1 1 on the screen that appears and then press Enter If the result displayed is similar to that shown in Figure below the connection between your PC and the AP has be...

Page 15: ...nt a login window will appear similar to that shown in Figure 3 2 Enter admin for the User Name and Password both in lower case letters Then click the OK button or press the Enter key Figure 3 2 Login...

Page 16: ...This field displays the current settings or information for the Network including the MAC address IP address and Subnet Mask Wireless This field displays basic information or status for wireless funct...

Page 17: ...the same subnet as your IP address MAC Address the physical address of the AP as seen from the LAN The value can t be changed Note If you change the IP Address you must use the new IP Address to logi...

Page 18: ...ncy will be used It is not necessary to change the wireless channel unless you notice interference problems with another nearby access point Mode Select the desired wireless mode The options are 108Mb...

Page 19: ...es not have region selection option The wireless basic settings for this version are shown below Note To apply any settings you have altered on the page please click the Save button and wait the AP re...

Page 20: ...TL WA601G 108M Wireless Access Point User Guide Figure 3 7 Wireless Mode Settings 14...

Page 21: ...of four address fields If WDS is disabled three address frames are used If your AP supports WDS well please select the option SSID Enter the SSID of AP that you want to access If you select the radio...

Page 22: ...ange of the wireless network with wireless antenna accessories Bridge Point to Point This mode bridges the AP and another AP also in bridge mode to connect two wired LANs Please input the MAC address...

Page 23: ...lti point bridging Please do the following Figure 3 10 Point to Multi point Bridge 1 Configure the Operating Mode of the TL WA601G Access Points Because it is in the central location configure TL WA60...

Page 24: ...the range of the wireless network with wireless antenna accessories 3 4 3 Site Survey After selecting a mode and pressing button Survey you can view all of APs around you Figure 3 11 Site Survey SSID...

Page 25: ...ngs You can select one of the following security options Figure 3 12 Wireless Securities Disable Security The wireless security function can be enabled or disabled If disabled the wireless stations wi...

Page 26: ...4 bit encryption You can enter 10 hexadecimal digits any combination of 0 9 a f A F zero key is not permitted or 5 ASCII characters 2 For 128 bit encryption You can enter 26 hexadecimal digits any com...

Page 27: ...to control wireless stations accessing the AP which depend on the station s MAC addresses MAC Address The wireless station s MAC address that you want to access Description A simple description of the...

Page 28: ...scription field For example Wireless station A 3 Privilege Selects the privileges for this entry one of Allow Deny 64 bit 128 bit 152 bit 4 WEP Key If you select 64 bit 128 bit or 152 bit in the Privi...

Page 29: ...isable all entries if there are any entries existing already 4 Click the Add New button and enter the MAC address 00 0A EB 00 07 BE in the MAC Address field enter wireless station A in the Description...

Page 30: ...Received Packets and Sent Packets for each connected wireless station Figure 3 15 The AP attached wireless stations MAC Address The connected wireless station s MAC address Current Status The connecte...

Page 31: ...of the addresses in the IP address pool 192 168 1 100 is the default start address End IP Address This field specifies the last of the addresses in the IP address pool 192 168 1 199 is the default end...

Page 32: ...d Before the time is up DHCP client will request to renew the lease automatically You cannot change any of the values on this page To update this page and to show the current attached devices click on...

Page 33: ...try fields blank 2 Click the Save button To delete all Reserved IP addresses Click the Clear All button Click the Save button Click the Next button to go to the next page and Click the Previous button...

Page 34: ...not have power selection option The wireless advanced settings for this version are shown below Note The AP will reboot automatically after you click the Save button 3 7 System Tools Figure 3 21 The...

Page 35: ...are upgrade file from the TP LINK website www tp link com 2 Click Browse to view the folders and select the downloaded file 3 Click the Upgrade button Firmware Version displays the current firmware ve...

Page 36: ...AP s configuration follow these instructions Click the Browse button to find the configuration file which you want to restore Click the Restore button to update the configuration with the file whose...

Page 37: ...ault user name and password of the AP Figure 3 26 Password It is strongly recommended that you change the factory default user name and password of the AP All users who try to access the AP s web base...

Page 38: ...s Point User Guide Figure 3 27 System Log The AP can keep logs of all traffic You can query the logs to find what happened to the AP Click the Refresh button to refresh the logs Click the Clear ALL bu...

Page 39: ...1b The 802 11b standard specifies a wireless networking at 11 Mbps using direct sequence spread spectrum DSSS technology and operating in the unlicensed radio spectrum at 2 4GHz and WEP encryption for...

Page 40: ...n response to the shortcomings of WEP One of the key technologies behind WPA is the Temporal Key Integrity Protocol TKIP TKIP addresses the encryption weaknesses of WEP Another key component of WPA is...

Page 41: ...ategory 3 4 5 cable maximum 100m EIA TIA 568 100 STP maximum 100m 100BASE TX UTP category 5 5e cable maximum 100m EIA TIA 568 100 STP maximum 100m LEDs POWER SYSTEM LAN WLAN Wireless Wireless Data Rat...

Page 42: ...int and the network device hub switch or router 2 Make sure the connected device is turned on 3 Be sure the correct cable is used Use a standard Category 5 Ethernet patch cable If the network device h...

Reviews: