background image

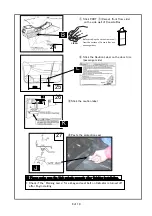
 ① Stick PART ① (Carpet, front floor side)
      on the side wall of Console Box.

 ② Stick the Caution Label on the door trim.
     (passenger side)

  ③ Stick the caution label

  ④ Paste the protection seal

※ Please make sure the Unit swivels properly after finishing installation.

*  Check if the "Warning Lamp" for airbag and seat belt on Indicator is turned-off
    after Engin starting

Before sticking the carpet, remove oil 
from the surface of Console Box and 
passenger door.

5

370

24

25

26

27

B

L

K

J

15

10

8 of 10

clean

Summary of Contents for 08926-21802

Page 1: ...ons PICTURE HERE Model Year 2004 Body type Hatch back 3 door and 5 door Part Number LHD 3 door 08926 21810 LHD 5 door 08926 21802 RHD 3 door 08926 21812 RHD 5 door 08926 21804 Weight 44 kg Installation Time 60 minutes Manual reference number AIM 000721 01 ...

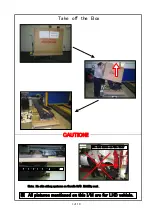
Page 2: ...Note No side airbag systems on Corolla H B Mobility seat Do not move on the floor CAUTION Do not put on the floor directly Take off the Box All pictures mentioned on this I M are for LHD vehicle 1 of 10 ...

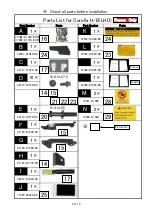
Page 3: ... C 1 N 2 74596 D1020 58551 D1050 B0 82711 1E360 00 74551 D1020 01999 D1085 00 M 2 10 C7126 D1770 00 90119 10578 00 90119 10579 00 1 H 1 F 1 E G C7120 D1540 00 Parts A 1 B 1 Part Number C7002 D1320 5DR C7002 D1370 3DR D Parts List for Corolla H B LHD S14 L27 5 S14 L55 France Only 16 24 17 20 Picture No 15 15 14 17 25 24 23 28 29 14 15 21 23 22 French English 2 of 10 ...

Page 4: ...90119 10578 00 74551 D1010 P 3 74596 D1010 G 82711 1E360 00 01999 D1086 00 D 10 O 2 58561 D1380 B0 74553 D1020 00 C 1 1 C7002 D1310 5DR C7002 D1360 3DR 74552 D1050 00 B 1 L 1 A 1 K 1 Part Number Parts Part Number Parts Parts List for Corolla H B RHD S14 L27 5 S14 L55 UK Only 16 24 17 20 15 15 14 17 25 24 23 30 32 Picture No 15 14 21 22 23 31 3 of 10 ...

Page 5: ... Torque Wrench is also required Tool PROTECT COVER 3 CAUTION 1 2 4 of 10 ...

Page 6: ...Seat Bolt Removal Remove the Headrest 4 5 6 7 8 9 10 12 13 11 Remove the OE Seat Seat Bolt Bolt Bolt Bolt or Keep 4 Bolts 5 of 10 ...

Page 7: ...dling Wire harness Under panel of swivel unit Joint this socket to base vehicle s Air Bag Harness Joint this socket to base vehicle s buckle switch harness Unit Installation 14 15 16 17 18 19 A C D H 2 Bolts F G D I Install the Mobility Seat 4 Bolts 6 of 10 ...

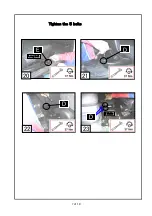
Page 8: ...Tighten the 5 bolts 20 21 22 23 2 Bolts D D D E Long bolt 7 of 10 ...

Page 9: ...on label Paste the protection seal Please make sure the Unit swivels properly after finishing installation Check if the Warning Lamp for airbag and seat belt on Indicator is turned off after Engin starting Before sticking the carpet remove oil from the surface of Console Box and passenger door 5 370 24 25 26 27 B L K J 15 10 8 of 10 clean ...

Page 10: ... France Only M N Two places OM Put the label on O M of base Vehicle Put on B Pillar Put on Side of Instrument Panel Two places OM Dispositif de retenue des occupants Siege enfants Put the label on O M of base Vehicle Dispositif de retenue des occupants SRS Airbag lateraux 9 of 10 ...

Page 11: ...Passenger s seat side O P 30mm 20mm Put on B Pillar Put on Side of Instrument Panel Three places Two places Put the label on O M of base Vehicle OM Put the label on O M of base 10 of 10 Chapter Occupant restraint systems Paragraph Child restraint OM Chapter Occupant restraint systems Paragraph SRS side airbags ...

Page 12: ...ring under seats strapped to original wiring Warning lights Inspect no damage on the covers fabric L R Seat heaters working Plastic covers are well fitted Tune seek radio Stickers well fitted Volume up and down from steering wheel Correct position comes on the screen automatically after satellite reception with full map navi Arm and foot rest working ok Console is well aligned with dashboard no ga...

Reviews: