background image

8

Before First Use: 

Read all instructions and safety information carefully before first use. Please retain this 

information for future reference. 

1. 

Remove your appliance from the packaging.

2. 

Ensure that all contents are present and check for any visible signs of damage to the 

appliance, cord or plug.

3. 

Before using the appliance for the first time, carefully clean the lid, oil reservoir and 

frying basket.

4.  DO NOT use any aggressive detergents, brushes with metal or nylon bristles or sharp 

objects such as knives or spatulas for cleaning the unit.

5. 

Your appliance is now ready for normal use.

6. 

Dispose of packaging in a responsible manner.

Attaching the Frying Basket Handle: 

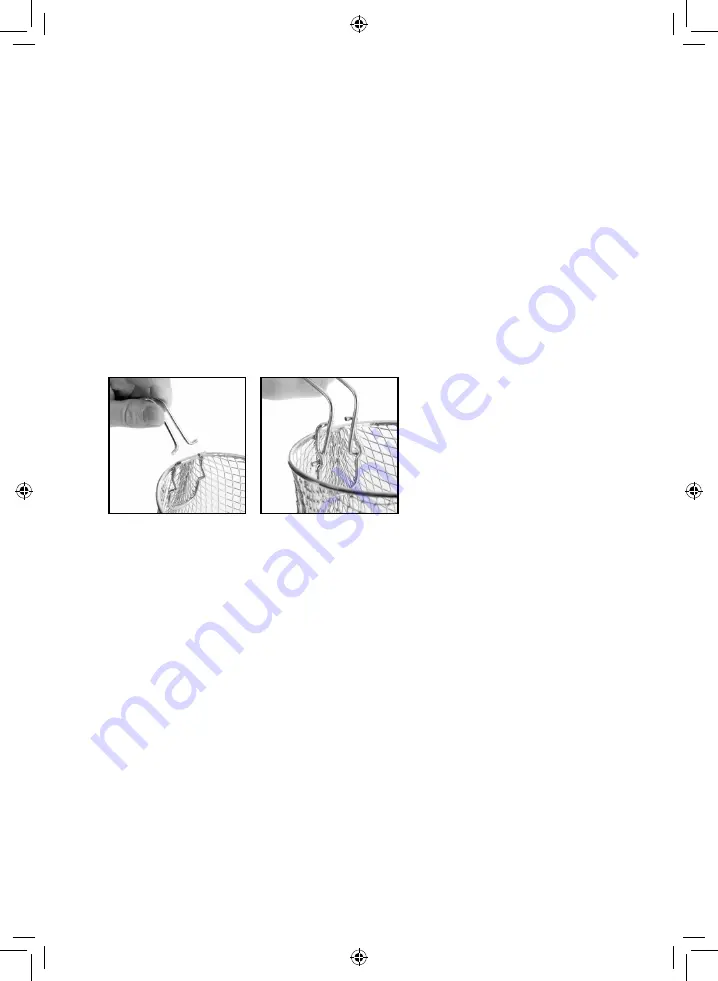
The fryer is equipped with a removable handle for the frying basket.

1. 

To assemble the frying basket handle, squeeze the metal rods of the handles 

together and position each end within the slots of the holder in the basket, as shown 

below. 

2. 

Once the rods are correctly positioned, slot each of them into one of the vertical grips 

to secure the handle in place, as shown below.

3. 

Simply reverse this procedure to remove this handle for cleaning and storage.

Using Your Appliance.

Filling the fryer with oil or fat:  

It is recommended that you always use high quality oils and fats that are recommended 

for this type of frying, as this will allow the full flavour of the food to be tasted and the oil 

itself will remain usable for longer. 

Suitable oils to use in your fryer include vegetable, sunflower, sesame, groundnut, corn, 

soy, hazelnut and rapeseed.

Peanut oil, safflower oil, sunflower oil and canola oil are the best choices as they have ‘high 

smoke points’. This means they don’t break down at deep frying temperatures.

If you use the same oil for frying repeatedly, the temperature at which the smoke point 

occurs is lowered. This happens less in rapeseed and sunflower oils.

Avoid using margarine, olive oil or butter. These types of fats are unsuitable for frying and 

can give off smoke, even at low temperatures.

1. 

Make sure that the thermostat control dial is in the “off” position, and the unit is 

unplugged and cold.

2. 

Open the top lid.

3. 

Remove the frying basket using the handle.

4.  Fill the reservoir with oil or fat (1 Litre MAX). ALWAYS take care to ensure the level of oil 

is between the ‘MIN’ and ‘MAX’ fill lines on the reservoir wall. If you use blocks of fat, 

cut them into pieces before placing them in the reservoir.

5. 

Close the lid.

6. 

Plug in your appliance and switch on at the socket.

7. 

To melt the fat, turn the Thermostat Control Dial clockwise to the required 

temperature and the indicator light will illuminate.

8. 

To melt, the fat needs approximately 6 minutes in the oil reservoir. Never attempt to 

melt fat in the basket.

Summary of Contents for T17069

Page 1: ...T17069 All Colour Variants 900ML DEEP FAT FRYER SAFETY AND INSTRUCTION MANUAL PLEASE READ CAREFULLY Subject to registering your Extended Guarantee online at www towerhousewares co uk...

Page 2: ...r 2 Oil reservoir inside the unit 3 Carry handles 4 Non slip feet 5 Frying basket handle 6 Cooking guides 7 Adjustable thermostat control dial 110 190 C 8 Indicator light 9 Frying basket Specification...

Page 3: ...ug fitted to the mains lead and should the fuse need replacing you must use an ASTA approved one conforming to BS 1362 of the same rating If in doubt consult a qualified electrician who will be please...

Page 4: ...sion or instruction concerning use of the appliance in a safe way and understand the hazards involved Children should not play with the appliance Cleaning and user maintenance should not be made by ch...

Page 5: ...ug out by the cord as this may damage the plug and or the cable DO NOT wrap the cord around the appliance DO NOT use this product for anything other than its intended use This appliance is for househo...

Page 6: ...inside Always use the frying basket Never use the fryer without the filter Fill the basket out of the fryer to avoid any splashing Always dry damp food before frying e g Chips which are too wet can ca...

Page 7: ...DO NOT leave the appliance unattended whilst operating This appliance is fitted with a safety thermostat If the appliance catches fire never try to extinguish the flames with water Close the lid of t...

Page 8: ...ats that are recommended for this type of frying as this will allow the full flavour of the food to be tasted and the oil itself will remain usable for longer Suitable oils to use in your fryer includ...

Page 9: ...g the fryer Note If cooking multiple batches turn Temperature Control Dial to the lowest temperature setting while waiting between batches Tips In order to reduce the acrylamide content of starchy foo...

Page 10: ...ervoir When you change the oil in your fryer never pour it down the drain Dispose of it safely according to the guidelines of your local council How often should the oil be changed Change the oil in y...

Page 11: ...oughly Never immerse the unit cord or plug in water or wash it directly with water Take advantage of the oil change to clean the inside of the oil reservoir After removing the oil or grease Wipe the i...

Page 12: ...c 1 2 oz 15g 1 oz 30g 2 oz 60g 3 oz 90g 4 oz 110g 5 oz 140g 6 oz 170g 7 oz 200g 8 oz 225g 9 oz 255g 10 oz 280g 11 oz 310g 12 oz 340g 13 oz 370g 14 oz 400g 15 oz 425g 1 lb 450g Food Allergies Important...

Page 13: ...tirely thawed Dry food completely before dipping into the batter 5 Dip your prepared food into batter and coat Suggested foods Slices of zucchini chicken pieces partially cooked shrimp fish Method 1 M...

Page 14: ...14 Add your own recipes Here Ingredients Method...

Page 15: ...15 Add your own recipes Here Ingredients Method...

Page 16: ...tee is valid in the UK and Eire only The standard one year guarantee is only extended to the maximum available for each particular product upon registration of the product within 28 days of purchase I...

Reviews: