background image

22

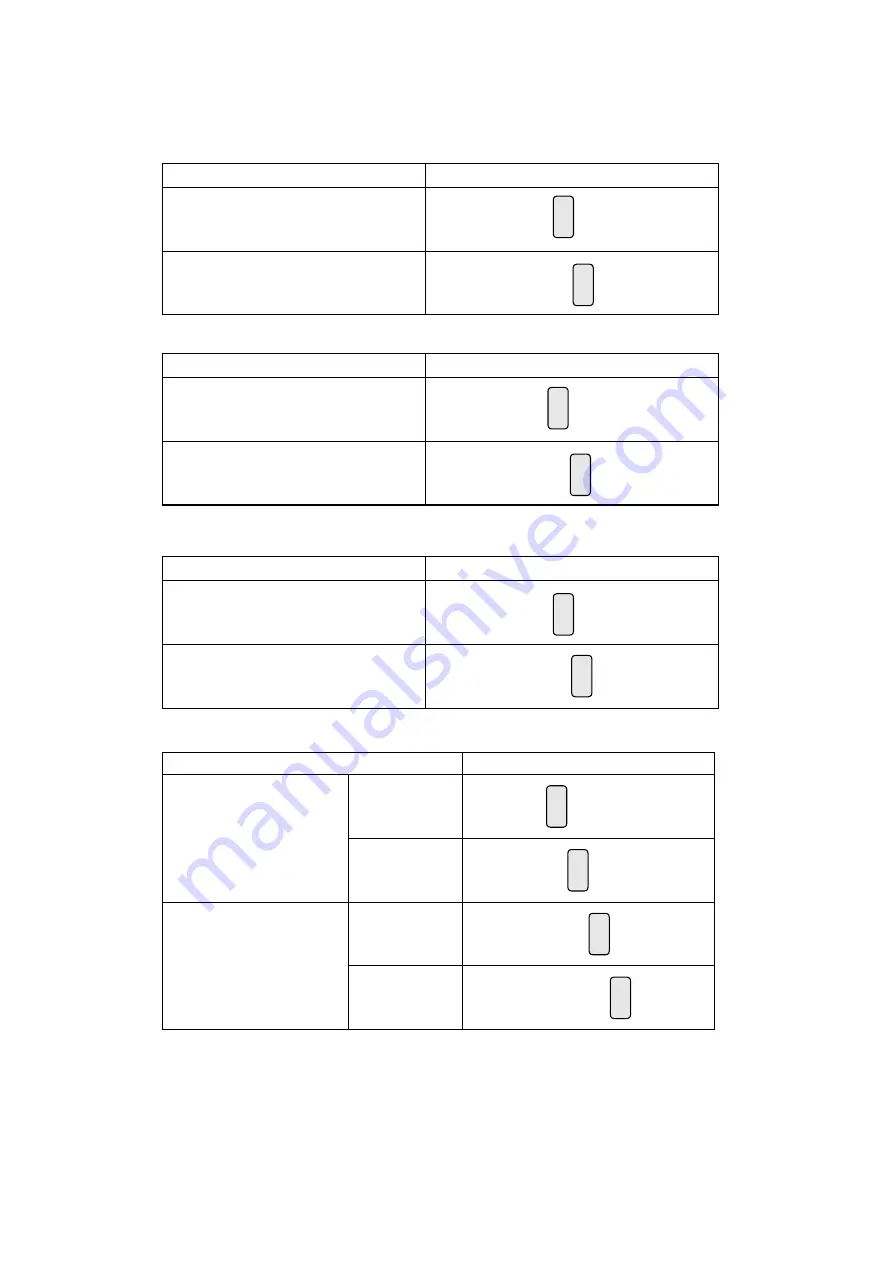
Cash Drawer Power Setting 


Function

JP10

  ▲ +19V

+12V

2

1 3

4

6-2-3. 

Jumper Setting

Inverter Selection       

Function

JP1

  ▲LED

   CCFL 

2

1 3

4

2

1 3

4

COM1 Power Setting 


Function

JP8

▲COM1 +5V

COM1 +12V

2

1 3

4

2

1 3

4


COM2/COM3 Jumper setup

Function

JP6

COM2

+5V

8

5 7

2

1 3

6

4

   +12V

8

5 7

2

1 3

6

4

COM3

  +5V

8

5 7

2

1 3

6

4

+12V

8

5 7

2

1 3

6

4


  ▲ = Manufacturer Default Setting

2

1 3

4

Summary of Contents for QK10 AIO

Page 1: ...USER MANUAL VERSION 1 3 December 2015 QK10 All in One...

Page 2: ...must be easily accessible and in close proximity to the machine 2 Read these instructions carefully Save these instructions for future reference 3 Follow all warnings and instructions marked on the pr...

Page 3: ...Ce produit ne doit jamais tre plac proximit ou sur un radiateur sur un registre de chaleur ou dans une installation int gr e moins qu une ventilation ad quate soit pr vue 7 Ce produit doit tre utilis...

Page 4: ...RE ENCLOSURE in the thinnest significant wall thickness used shall be of 5VB CLASS MATERIAL or shall pass the test of Clause A 1 AVERTISSEMENT SUR LES BATTERIES AU LITHIUM Il y a un danger d explosion...

Page 5: ...other household wastes at the end of its working life Instead the device should be taken to the waste collection centers for activation of the treatment collection recycling and disposal procedure To...

Page 6: ...original user manual are listed below Revision Description Date 1 0 Initial release March 2013 1 1 Ivy bridge board added November 2013 1 2 J1900 board added May 2015 1 3 Remove RJ11 port and relevan...

Page 7: ...ems 2 2 System View 3 2 1 Front Side View 3 2 2 Rear View 3 2 3 I O view 4 2 4 Dimensions 5 3 System Assembly 6 3 1 Open the Chassis Cover 6 3 2 RAM Module Replacement 7 3 3 HDD Replacement 8 4 Periph...

Page 8: ...d Layout 15 6 1 2 Connectors Functions 16 6 1 3 Jumper Setting 17 6 2 Ivy Bridge Motherboard 20 6 2 1 Motherboard Layout 20 6 2 2 Connectors Functions 21 6 2 3 Jumper Setting 22 6 3 J1900 Motherboard...

Page 9: ...ix The page is intentionally left blank...

Page 10: ...st 1 1 Standard Items a System b Power adapter c Power cord d RJ45 DB9 cable x2 e USB cable x2 f Power extended cable a b c d e f Note Power cord will be supplied differently according to various regi...

Page 11: ...2 1 2 Optional Items MSR...

Page 12: ...View 2 1 Front Side View 2 2 Rear View 1 3 2 4 5 6 Item No Description 1 Touch screen 2 Built in web cam 3 Ventilation 4 MSR cable hole Item No Description 5 VESA mounting holes 6 Cable cover 7 Power...

Page 13: ...right f LAN g USBx4 two optional USB h Cash drawer i USB x2 D2550 Motherboard Ivy Bridge Motherboard b c d e f g h a i Item No Description a 2nd power button b Power button c DC IN d VGA e COM port 1...

Page 14: ...ensions 263mm 170mm 38mm Item No Description a Power button b DC Jack 19V c VGA d COM3 e USB2 f COM1 COM2 from right to left g USB 2 0 x4 two optional USB h LAN i USB3 USB4 J1900 Motherboard b c d f g...

Page 15: ...d by opening the chassis cover which is located on the back side of the system Please follow the steps below to open the chassis cover 1 Turn to the back side of the sys tem and loosen the screws x2 t...

Page 16: ...dscribed in chapter 3 1 Removing a RAM module 1 Find the memory slot at the right side of the motherboard 2 Flip the ejector clips outwards to remove the memory module from the memory slot Installing...

Page 17: ...the HDD please open the cable cover firstly as stpes dscribed in chapter 3 1 1 1 Loosen the screws x2 to remove the HDD bracket from the system 2 The HDD is secured by the bracket remove the screws x2...

Page 18: ...s x2 on the back to secure the module To install MSR please open the cable cover firstly as steps described in chapter 3 1 1 2 Connect MSR cable to the connector on system side 3 Close the cable cover...

Page 19: ...wer Controller Register The Cash Drawer Controller use one I O addresses to control the Cash Drawer Register Location 48Ch Attribute Read Write Size 8bit BIT BIT7 BIT6 BIT5 BIT4 BIT3 BIT2 BIT1 BIT0 At...

Page 20: ...Bit 1 Reserved Bit 0 Reserved Note Please follow the Cash Drawer control signal design to control the Cash Drawer Cash Drawer Control Command Example Use Debug EXE program under DOS or Windows98 Comma...

Page 21: ...card 8G 16G 32G 64G option Peripherals Web Cam Build in 2M Web Cam WiFi Optional 802 11 b g n WLAN card MSR right side Optional 3 Track USB Device Box Optional Smart IC card Reader Scanner Function Ke...

Page 22: ...imensions W x D x H 263 x 170 x 38 mm Weight N W G W 1 5kg 2 5kg Mounting 75mm x 75mm Standard VESA Panel Mount OS Support Windows XP Professional POSReady 2009 Windows XP Embedded Windows XP Professi...

Page 23: ...n Key Pad Line Out Mic In Expansion Mini PCI E Slot 1 External I O Ports USB 3 0 1 USB 2 0 4 x USB Type A Serial COM 3 x RJ48 0V 5V 12Vl default by BIOS setting 0V LAN 10 100 1000 1 x RJ 45 2nd VGA 1...

Page 24: ...B2 RJ45_1 RJ45_2 VGA1 PWR1 PWR2 SW1 CN17 CN16 JP7 JP4 JP8 DDR3_A1 JP3 CN5 CN4 SKT1 JP1 CN1 JP9 CN11 CN12 SATA1 SATA4 CN8 SATA2 CN6 CN13 JP5 CN14 CN15 JP6 CN10 CN9 CN18 CN19 6 Jumper Setting 6 1 D2550...

Page 25: ...6 19V DC IN Connector CN17 Power button Internal CN18 Front I O Connector USB power LED Power button PWR2 3 19V DC JACK RJ11_1 Cash Drawer Connector RJ45_1 LAN Connector RJ45_2 COM1 COM2 COM3 COM4 DDR...

Page 26: ...on pin 10 of the RJ45 serial connector If you use the serial RJ45 to DB9 adapter cable the power is on pin 9 of the DB9 connector By default the power option is disabled in the BIOS Enable COM2 COM3 C...

Page 27: ...ower and press Enter Save the change by pressing F10 COM2 Power Setting Function JP5 No Power COM2 5V 2 1 3 4 COM2 12V 2 1 3 4 COM3 COM4 Jumper setup Function JP6 COM3 5V 8 5 7 2 1 3 6 4 12V 8 5 7 2 1...

Page 28: ...el 5 1024 x 768 18 Single LVDS Panel 7 1024 x 768 24 Single LVDS Panel 9 1280 x 1024 24 Dual LVDS Panel 10 1366 x 768 18 Single LVDS Panel 11 1366 x 768 24 Single LVDS Panel 13 1440 x 900 24 Dual LVDS...

Page 29: ...rd Layout RJ11_1 RJ45_1 USB2 USB3 RJ45_3 USB1 RJ48_1 VGA1 PWR1 PWR2 SW1 CN20 CN19 JP7 CN10 JP5 JP6 JP9 JP4 JP3 CN11 CN15 CN14 CN16 CN17 CN18 JP8 JP10 CN12 CN13 SATA2 SATA3 SATA1 CN8 CN1 MINI_PCIE1 DDR...

Page 30: ...onnector CN19 DC Jack Connector CN20 Power Button CN21 LCM Connector CN22 BOT 51P Connector CN23 iButton Connector CN24 SDR Connector RJ45_1 LAN Connector RJ45_3 COM1 COM2 RJ48_1 COM3 RJ11_1 Cash Draw...

Page 31: ...nverter Selection Function JP1 LED CCFL 2 1 3 4 2 1 3 4 COM1 Power Setting Function JP8 COM1 5V COM1 12V 2 1 3 4 2 1 3 4 COM2 COM3 Jumper setup Function JP6 COM2 5V 8 5 7 2 1 3 6 4 12V 8 5 7 2 1 3 6 4...

Page 32: ...and LCD Brightness Configuration Ports and press Enter to go to display the available options COM1 COM2 COM3 Power Setting COM1 COM2 and COM3 can be set to provide power to your serial device The volt...

Page 33: ...1024 x 768 24 Single LVDS Panel 5 1366 x 768 18 Single LVDS Panel 6 1366 x 768 24 Single LVDS Panel 7 1024 x 600 18 Single LVDS Panel 8 1280 x 1024 24 Dual LVDS Panel 9 1440 x 900 24 Dual LVDS Panel...

Page 34: ...48_1 VGA1 PWR1 PWR2 SW1 CN20 CN19 JP7 CN25 CN18 CN17 CN15 SATA1 SATA2 CN14 CN13 JP6 CN24 CN12 SATA1 CN8 MINI_PCIE1 CN23 CN11 CN9 JP4 CN7 CN10 JP1 CN1 CN2 CN5 CN6 JP2 JP3 CN3 DDR3_A1 BAT1 6 3 J1900 Mot...

Page 35: ...rt internal CN15 PS2 keyboard connector CN17 MSR connector CN18 COM5 touch connector CN19 Wide Range CN20 Power button internal CN21 LCM connector CN22 POS325 51pin connector CN25 S5 S0 Status LED PWR...

Page 36: ...r on the system and press the DEL key when the system is booting up to enter the BIOS Setup utility 2 Select the Advanced tab 3 Select VGA COM Power Configuration Ports and press Enter to go to displa...

Page 37: ...1024 x 768 24 Single LVDS Panel 5 1366 x 768 18 Single LVDS Panel 6 1366 x 768 24 Single LVDS Panel 7 1024 x 600 18 Single LVDS Panel 8 1280 x 1024 24 Dual LVDS Panel 9 1440 x 900 24 Dual LVDS Panel...

Page 38: ...29...

Reviews: