background image

36

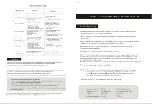
Preventing  Damage Due to Frozen Water
Pipes

When freezing temperatures are anticipated.

Caution!

Before beginning the freezing prevention procedure, please turn the Auto
On/Off Flush and Auto On/Off Open/Close settings to "off" and close the toilet
seat and lid. 

Please either heat the toilet interior or, where impossible, remove the water if the ambient
temperatures are going to fall below freezing. If there is a risk of freezing, please implement the
following procedure. If the unit freezes, the parts may break, resulting in leaks.

Press the Rear Cleansing On/Off button on the

Main Unit Control  for at least 10 seconds.

1

This will start anti-Freeze mode.

The "Power" light in the Main Unit Display will switch from solid to
blinking. 

Warm water will flow from the unextended nozzle every 5 minutes. 

The toilet water will flush at 10 minute intervals.

To prevent Freezing,

Please set the water and toilet seat temperature settings
on the remote to their maximum settings. 

Please be sure to close the toilet lid.

When turning off freeze prevention,

Press the Rear Cleansing On/Off button in the
Main Unit Control for at least 10 seconds.

This will turn off the anti-freeze mode. 

The "Power" light in the Main Unit Display will go from blinking
to solid. 

1

When freezing temperatures are anticipated, 

Please do not use energy saving. Freezing can damage the product. 
See Page 23 to stop the Timed Energy Saving.  See Page 25 to stop the Automatic Energy Saving.

Rear Cleansing On/Off Switch

“Power” will blink

Power will be solid

How to Prevent  Damage (Running water method)

Summary of Contents for NEOREST 500

Page 1: ...the Toilet To Conserve Energy Using the Energy Saver Feature TIMER ON OFF Using the Energy Saver Auto ON OFF 13 15 15 16 17 19 22 22 24 Operation Caring for your NEOREST 500 Before Cleaning the NEORE...

Page 2: ...l outlet 10 This product should be used with 120V electrical current only Use of multi prong outlet adapters with this product may result in overheating or fire 11 Avoid damaging the electrical cord o...

Page 3: ...heavy objects on top of the toilet 13 Do not bend or crush the connecting hose Bending or crushing the connecting hose may result in water leakage 14 Use only a mild dish detergent diluted with water...

Page 4: ...e wire insulation having an outer surface that is green with or without yellow stripes is the grounding wire Check with a qualified electrician or serviceman if the grounding wire instructions are not...

Page 5: ...temperature control of the toilet seat or malfunction of the remote controller Avoid getting urine on the main unit or toilet handle as this may result in malfunction of the product Do not cover the s...

Page 6: ...eset is set to 79 F Use the Auto Energy Saver to automatically reduce the toilet seat temperature when the toilet is not being used See page 24 Use the timer and save energy Use the Auto Energy Saver...

Page 7: ...g water pressure is used to wash 13 Amenities Page Heated toilet seat Warms the toilet seat 15 Warm air drying Dries wet portions with warm air 14 Temperature adjustment Adjusts the temperature of the...

Page 8: ...atures Page Removable toilet seat and lid The toilet seat and lid can be removed for easy cleaning 28 29 Self Cleaning The wand tip is washed before and after each use Wand Cleaning The entire wand is...

Page 9: ...31 Water supply hose Toilet seat bumpers Bottom of Main unit Main unit Display Main unit Controls Seal Grey Deodorizer filter See page 30 Power on off See page 12 Flush Button See page 19 Rear cleansi...

Page 10: ...scillating Wash ON OFF button Pulsating Wash ON OFF button See page 13 Remote Control button for flushing the toilet bowl See page 19 Remote Control button for OPEN CLOSE toilet seat and lid See page...

Page 11: ...ay will appear as in the figure shown at the right Please be sure to observe the following to avoid having batteries burst or leak When replacing batteries be sure to use new ones When the unit will n...

Page 12: ...Unit Display Power Light Seat Light Main Unit Controls If the Power lamp is not on none of the functions can be used Please press the on the Main Unit Controls The light will turn on 1 2 1 If the toi...

Page 13: ...vate the Move Wash Push the Oscillating button again to turn off the Oscillating function Alternates hard and soft water pressure Push the desired button Push the Pulsating button to activate the Mass...

Page 14: ...ically shut off after 1 minute Seat and lid will automatically close after 90 seconds See page 18 for Auto Lid Open and Close The Seat Sensor detects when a person is seated Infrared light is emitted...

Page 15: ...isplay push down on the button until the display goes out The dryer temperature can be adjusted to 5 different settings by pushing the and buttons When the toilet seat temperature button is pushed the...

Page 16: ...nction automatically starts The DEODORIZER light on the main unit display lights up 2 Move away from the toilet seat The deodorizer function automatically stops after 1 minute The DEODORIZER light on...

Page 17: ...e Remote Controller Display The toilet seat and or lid will open or close 1 During power outages or when the batteries are dead please raise and lower the toilet seat and lid manually 1 Stand in front...

Page 18: ...ion detecting sensor as shown in the diagram A person is detected when he or she steps into the infrared light Motion detection Sensor The Auto Seat and Lid OPEN CLOSE disappears After use move at lea...

Page 19: ...button Please flush the toilet by pressing the Flush button on the Main Unit Controls Press the Flush button on the Main Unit Control The toilet will be flushed How to use automatic flush Automatic f...

Page 20: ...lly unless the person is seated for at least 6 seconds 1 Even when seated on the toilet the sitting position or posture could cause the sensor to mis detect and start an automatic flush 2 1 Initially...

Page 21: ...t 2 seconds 2 When the water stops running turn the knob toward the front The toilet will be flushed The toilet will re fill with water When not using automatic flushing Press the Auto Flush On Off bu...

Page 22: ...aving is Once it s set energy saving works at that time automatically everyday The toilet seat heater turns off during timed energy saving The period of energy saving can be set to 3 6 or 9 hours For...

Page 23: ...hours please reset the energy saving start time once again Turning off Timed Energy saving Press Disappears Press the Timer On Off button until the words Timer and Saving Time disappear Energy saving...

Page 24: ...ontroller The Neorest will begin determining low use times During low use times the Energy Saver light orange on the Main Unit Display Module will go on Press Display Lights up Orange light The displa...

Page 25: ...and Automatic Energy Saving Either of the buttons may be pressed first See Page 24 about Programmed Energy Saving Press the Auto On Off button Let s look at the following Energy Saving example 6 00 0...

Page 26: ...oilet seat and toilet lid Deodorizer Filter removable See Page 31 Toilet See Page 34 and 35 Wand Can be extended without spraying water See Page 33 Water Supply Filter Can be removed See Page 31 and 3...

Page 27: ...off If the seat or lid comes off please look at Page 29 before reattaching Floor care If there are drops of urine or condensation from the toilet on the floor please wipe them up with a well wrung ra...

Page 28: ...ds Important Point After removal place the toilet seat and lid on top of the toilet as shown in the diagram Clean the Main Unit the toilet seat and lid Please clean along the same lines as shown in Da...

Page 29: ...ly Toilet Lid Hinge Assembly Approximately 1 4 5mm Removal Place finger on the seat lock lever on the right side and move the hinge assembly toward the inside approximately 5mm Remove the toilet lid f...

Page 30: ...lug Grasp the plug never the cord and pull straight out Please check the power plug around once a month to make sure that it is in proper working condition Dry cloth Clean Clean dust or debris from th...

Page 31: ...Doing so can cause malfunctions Filter Click Click Guide marking faces up Main Unit of Washlet 1 1 Cleaning the filter The filter can be cleaned using water but please remove all moisture before rein...

Page 32: ...g it under water Use a small brush such as a toothbrush to remove any dirt that is lodged in the mesh Remove any dirt that may have deposited inside the water shutoff valve unit with a cotton swab 1 B...

Page 33: ...rce when pushing or pulling the wand as this may damage the mechanism Store the wand Wand is stored Push the Wand Cleaning button again The wand comes out The wand will automatically retract after 5 m...

Page 34: ...ress the Rinse Cycle button on the remote Press the Rinse Cycle On Off button for toilet cleaning Toilet bowl cleaning will begin Water will flow into the toilet from the rim jet approximately 30 seco...

Page 35: ...ton When using a toilet cleanser to clean inside the toilet bowl please wash and rinse quickly 3 minutes or less and leave the toilet seat and lid open Additionally please be sure to wipe up all of th...

Page 36: ...e Main Unit Display will switch from solid to blinking Warm water will flow from the unextended nozzle every 5 minutes The toilet water will flush at 10 minute intervals To prevent Freezing Please set...

Page 37: ...se When there is no danger of freezing temperatures 1 2 Insert the power plug into the outlet Spray water out of the wand Cover the Seated Sensor with white paper and press the Rear Wash button on the...

Page 38: ...utoff Valves two places closed Is the Seat Sensor working properly Is the water pressure setting set too low Is the water supply filter blocked Is the water temperature set to Off or too low Push the...

Page 39: ...meone is seated on the toilet and will warm in approximately 15 minutes See Page 22 The heater turns on temporarily when someone is seated on the toilet and will warm in approximately 15 minutes See P...

Page 40: ...Please press the Timer ON OFF or the Auto ON OFF buttons and reset the settings The unit will gradually begin saving energy at the proper times See Pages 22 24 Please press the Timer ON OFF or the Au...

Page 41: ...ote controller display Is the Sensor light in the Main Unit Display on Are you standing directly in front of the toilet Are the Seat Sensor or Motion Detection Sensor functioning properly Do you have...

Page 42: ...toilet flush from the remote while seated on the toilet Auto Flush will not work Note however that if the Seat Sensor continues to detect a person for 60 seconds or more the Auto Flush will work When...

Page 43: ...es approximately 10 seconds between flushes Please remove the debris water droplets or dust Toilet flush does not function with remote Are the batteries in the remote controller worn out Have you been...

Page 44: ...Solution Please open the water shutoff valve fully Please clean the water supply filter See Page 31 Please wait until the water outage has been resolved Because there is no tank there won t be any wat...

Page 45: ...evices Temperature Fuse Bimetal sensor auto reset and Float Switch prevent boil Dryer Temperature 104 138 F 40 60 C Air Volume 10 5 ft3 min 0 30m3 min Heater power 350 W Safety Devices Temperature Fus...

Page 46: ...C 2 999 2D 9 9 E 8 3 F 06 0 0 C 70 G 0 0 0C0 0 0 7H C0 A 707 70 G0 0 0I A0 0C07 A G 0 0 0 G0 0 G 0 B B 0 7 B 0 70 0 0J 0 7 C 0 0I 0 0 07 G 0 0 B G 0 7 0 0C A B 0 G 0 B 0 0I 0 0 0 B 07 G A0 0A0 3 0 G 0...

Page 47: ...st 500 occasionally Is the power plug abnormally hot Is the power plug covered with dust Is the outlet loose Is your Neorest 500 operating differently than usual In case anything is abnormal contact T...

Reviews: