background image

15/32

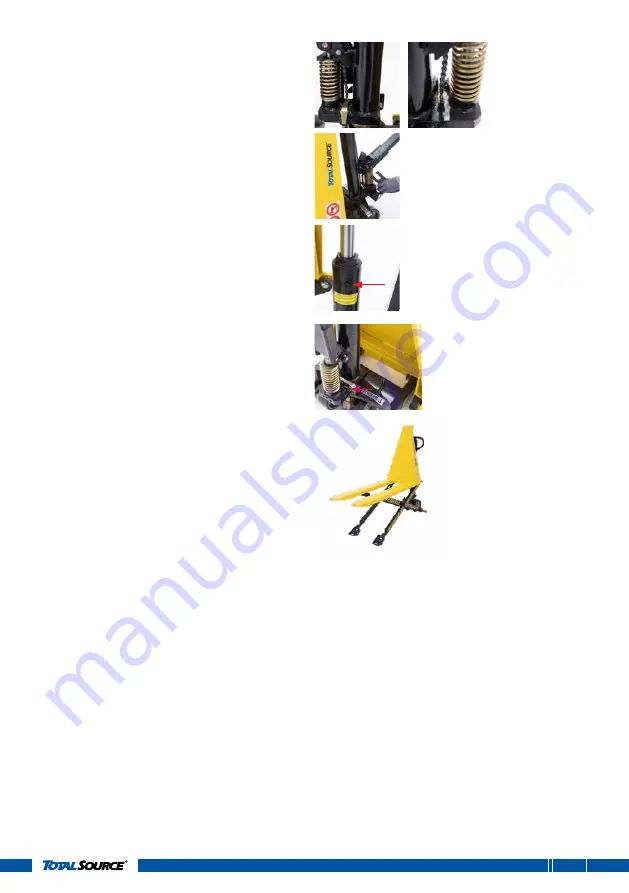
5.  Take the chain in the lever and run it 

through the hole in the axle. Attach the 

chain to the lever of the lowering valve.

6.  Remove the safety plate.

7.  To prevent oil from leaking from the 

oil tank during transport, the bleeder 

screw has been replaced by a sealing 

screw in the factory. Remove the sealing 

screw and replace it with the bleeder 

screw

8.  If the pump functions unsatisfactorily: 

loosen the nut and adjust by tightening 

or loosening the screw. After 

performing the adjustment, retighten 

the nut.

9.  The pallet truck is now ready to use!

Summary of Contents for TRSM0004

Page 1: ...OPERATING MANUAL MANUAL SCISSOR PALLET TRUCK TRSM0004 Original operating manual 01 2022 V01 from serial n G21041386...

Page 2: ...cal including copying recording or use in an information storage or retrieval system without prior and explicit permission of TVH Parts Holding NV Printing errors reserved Photographs and illustration...

Page 3: ...landic H gt er a finna essa handb k nu tungum li tenglinum h r a ne an IT Italian Cliccando sul link sottostante troverai il manuale nella tua lingua LT Lithuanian vadovl l savo kalba rasite spustel j...

Page 4: ...e at the moment of printing the manufacturer reserves the right to carry out modifications to its own products at any moment without notice and without incurring in any sanction It is therefore sugges...

Page 5: ...cking list 14 5 2 Safety instructions for assembly and installation of the product 14 5 3 Required material for assembly 14 5 4 Assembly of the tiller handle and commissioning the pallet truck 14 6 OP...

Page 6: ...planned maintenance lubrication and inspection system should be followed see maintenance instructions in chapter 7 2 Only qualified and authorized personnel shall be permitted to maintain repair adju...

Page 7: ...ed steel welded Total length L2 mm 1570 Length of the forks L1 mm 1170 Width across the forks W1 W3 mm 560 Minimum height H1 mm 85 Lifting height H2 mm 800 Material of the steering wheels Polyuthane M...

Page 8: ...Scissor mechanism 7 Fork wheels 2 3 Placement of the decals The safety and warning labels should be placed as described in the pictures below See chapter 3 for the explanation of the safety warnings I...

Page 9: ...n xxxxxx Width over forks xxx mm Capacity xxxx kg Wheels xxx Net weight xx kg Year of manufacturing xxxx 1 6 7 8 9 10 2 3 4 5 1 Type of pallet truck 2 Serial number 3 Capacity of the pallet truck 4 We...

Page 10: ...to stand underneath the forks 166TA5226 6 Maximum load capacity 1500 kg 166TA7633 7 1 2 3 4 1 2 The load should be positioned against the back of the scissor pallet truck forks The weight of the good...

Page 11: ...entre of the two forks 11 Read the manual before using the pallet truck 166TA2313 9 To prevent oil leaking from oil tank during transportations air screw is replaced with oil sealing screw from the fa...

Page 12: ...carried out slowly and for as short a distance as possible Do not operate the product unless you are of age The person responsible for the use of the product must make sure that all of the safety rul...

Page 13: ...ut any load and in a dry area 3 The pallet truck is parked 4 2 Transporting the scissor pallet truck Make sure that the scissor pallet truck is in a secured and stable position ensuring that it will n...

Page 14: ...he scissor pallet truck on a level surface Be careful when removing the packaging 5 3 Required material for assembly Utility knife Hammer Screwdriver 5 4 Assembly of the tiller handle and commissionin...

Page 15: ...rom leaking from the oil tank during transport the bleeder screw has been replaced by a sealing screw in the factory Remove the sealing screw and replace it with the bleeder screw 8 If the pump functi...

Page 16: ...s situations like ledges or potholes bumps and floor obstructions debris and overhead obstructions Make sure that no elements can hinder the lowering of the forks When transporting goods raise the for...

Page 17: ...wly insert the forks into the inlets until the pallet hits the back of the forks 3 Pump up the forks to lift the pallet off the ground 4 Move backwards and pay attention to the load to make sure it s...

Page 18: ...desired space 10 If the job is finished safely store the pallet truck see chapter 4 The scissor pallet truck is equipped with 2 supports At a height of 400 mm the supports automatically hit the floor...

Page 19: ...lifting position 2 Pump the tiller handle the linkage is not operated the forks raise and tilt while the release valve remains completely closed 3 If the forks do not lift or tilt regulate the adjust...

Page 20: ...ear safety shoes and gloves when using or maintaining the pallet truck 7 2 Maintenance schedule Task D W M 6M 1 Cleaning 2 Daily maintenance check 3 Lubrication 4 Check oil level D daily W weekly M mo...

Page 21: ...complete legible and available for reference Ensure that all decals are legible and in place Check the entire machine for damage corrosion or cracks in structural components A damaged or malfunctioni...

Page 22: ...anging the oil can only be done by a qualified service technician and according to the manufacturer s instructions Draining the oil 1 Lower the forks to the bottom position 2 Remove the screw and turn...

Page 23: ...adjusting the control lever in chapter 7 3 The forks descend without the release valve being operated The impurities in the oil prevent the release valve from closing properly Change the oil see chapt...

Page 24: ...jam Lubricate the rod Keep the forks in the lowest position when not in use and pay more attention to the lubrication of the rod The adjuster nut or screw is not in the correct position Adjust the nu...

Page 25: ...ging should be sorted and put into solid dustbins according to the materials and needs to be collected by the local special environmental protection bureau To avoid pollution it s forbidden to throw a...

Page 26: ...pallet truck Manueller scherenhubwagen Palet de tijera manual Tanspallet a pantografo manuale Porta paletes de tesoura manual Functie Fonction Function Funktion Funci n Funzione Fun o Heffen en verpla...

Page 27: ...ijn 2006 42 EC en met de aanpassingen en integraties die daarop volgen EN ISO 3691 5 2014 AC 2014 EN 16307 5 2013 o la Directive 2006 42 EC et les modifications et int grations successives EN ISO 3691...

Page 28: ...28 32 NEUTRAL LOWERING LIFTING 10 2 Hydraulic diagram...

Page 29: ...material Hammer Mandrel New fork wheels Place some kind of support under the wheels like a wooden block This will allow you to work more comfortably when using the hammer 1 Turn the pallet truck arou...

Page 30: ...again Do check this before replacing the wheels 1 Remove the protective cap 2 Remove the snap ring using a snap ring rod 3 Pull the wheel from the axle 4 Push the new wheel on the axle and position t...

Page 31: ...31 32 NOTES...

Page 32: ...TVH PARTS HOLDING NV Brabantstraat 15 8790 Waregem Belgium T 32 56 43 42 11 F 32 56 43 44 88 info tvh com www tvh com REF 48515700 01 2022 MGSL Your distributor Manufactured outside the EU for...

Reviews: