background image

37

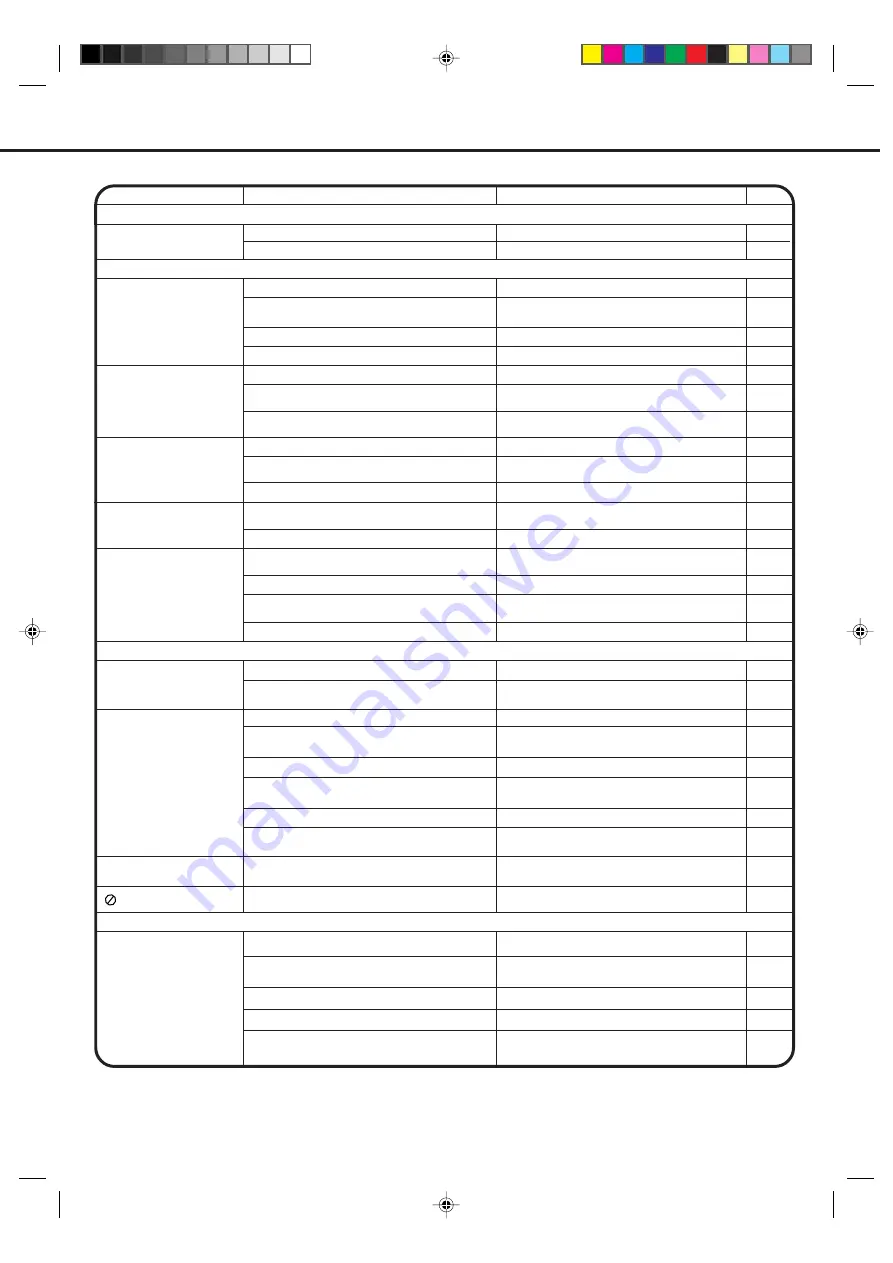
BEFORE REQUESTING SERVICE

If your unit does not work properly check the following before calling a service engineer.

NOTE: In the case that the scart input of the unit is connected to AV1 scart of a recordable equipment such as
a VTR, DVD+VTR, DVD-R etc and when the input of the recordable equipment is also selected to AV1, there maybe
some white flashing lines on the screen and a high pitch  sound may also be heard. This is due to the feedback
loop of the connections to the unit and it is not a defect of the unit.

6

9

CAUSE

SYMPTOMS

SOLUTION

PAGE

POWER

No power.

The Mains lead is not connected.

ON/STANDBY button is OFF.

9

6

6

No picture, no sound.

TV BROADCAST RECEPTION

Sound OK, poor picture.

Picture OK, poor sound.

Poor reception.

Poor colour or no colour.

DVD

The Mains lead is disconnected.

Aerial connector is not connected or wires
are broken.

ON/STANDBY button is off.

Possibly station trouble.

Possibly station trouble.

Possibly local interference.

Possibly station trouble.

Possibly local interference.

Volume control set at minimum position.

Aerial connector is not connected or wires
are broken.
Possibly station trouble.

Possibly station trouble.

Possibly local interference.

Aerial connector is not connected or wires
are broken.

Colour control is not adjusted.

Aerial  connector is not connected or wires
are broken.

Connect Mains lead to AC outlet.

Set it to ON.

Connect the Mains lead to the AC outlet.

Check aerial connections or broken wires.

Press the ON/STANDBY button.

Try another channel.

Try another channel.

Check aerial connections or broken wires.

Move the aerial away from the source of
interference.
Try another channel.
Move the aerial away from the source of
interference.

Increase VOLUME control.

Check aerial connections or broken wires.

Try another channel.

Check aerial connections or broken wires.

Try another channel.

Move the aerial away from the source of
interference.
Adjust the colour settings.

15

17

13

6

13

6

13

17

13

17

6

13

13

20

Eject the disc and clean it.

The disc is dirty.

Some times a small amount of picture
distortion may appear. This is not a malfunction.

It is in fast forward or fast reverse playback.

The playback picture has
occasional distortion.

REMOTE CONTROL

5

Aim it at the remote control sensor.

It is not aimed at the remote sensor.

5

5

5

Operate within 5 metres and reduce the
light of the room.

Clear the path of the beam.

Replace batteries.

Batteries are weak.

Obstacle in the path of beam.

Distance too far or there is too much light in
the room.

Remote control does not
work.

23

20

23

Insert a disc.

Insert a playable disc (Check the disc type
and colour system).

Place the disc with the playback side down.

The disc is placed upside down.

An unplayable disc is inserted.

No disc is inserted.

Place the disc correctly inside the guide on
the disc tray.

The disc is not placed within the guide.

The unit does not start
playback.

Clean the disc.

The disc is dirty.

Cancel the parental lock function or change
the parental lock level.

The parental lock function is set.

Playback does not follow the
course of the disc’s program.

These operations may prevent a proper
progress of the contents.

It is in the mode of repeat playback,
memory playback, etc.

The function is prohibited with the unit or the disc.

 appears on the screen.

23

33,34

20

5

Install batteries correctly.

Polarities of the batteries, + or –, are not
inserted correctly.

 5J20301A P34-LAST

23/4/03, 1:06 PM

37

Summary of Contents for VTD1420

Page 1: ...Combination TV and DVD Video Player TELETEXT Region discs only MODEL VTD1420 VTD2020 USER GUIDE DIGITAL VIDEO 5J20301A Cov In 23 4 03 1 04 PM 1 ...

Page 2: ...the distribution board WIRING INSTRUCTIONS The wires in the mains lead are coloured in accordance with the following code As the colours of the wires in the mains lead of the appliance may not correspond to the coloured markings identifying the terminals in your plug proceed as follows The wire which is coloured BLUE must be connected to the terminal which is marked with the letter N or coloured b...

Page 3: ... 20 PREPARATION 21 STATUS DISPLAY OF DISC 21 SETTING LANGUAGE 22 PLAYBACK PROCEDURE 23 SPECIAL PLAYBACK 24 MP3 PLAYBACK 25 ZOOMING 26 LOCATING DESIRED SCENE 26 REPEAT RANDOM PROGRAM PLAYBACK AND REPEAT A B 27 MARKING DESIRED SCENES 28 CHANGING SOUNDTRACK LANGUAGE SUBTITLES 29 CHANGING ANGLES 30 TITLE SELECTION 30 DVD MENU 30 This product incorporates copyright protection technology that is protect...

Page 4: ...ls for good air circulation To protect the unit during a thunder storm unplug the AC mains lead from the wall outlet and disconnect the aerial PRECAUTIONS Keep the unit away from flower vases sink etc Liquids spilled into the unit can cause serious damages Switch OFF the Power Supply to the unit and consult a qualified service engineer before attempting to use the unit again Do not block the venti...

Page 5: ...es socket Disc tray STAND BY Indicator Power button VOLUME buttons STOP button OPEN CLOSE button PLAY button Forward SKIP button Reverse SKIP button Remote sensor 21 pin SCART PERITEL AV1 COAXIAL DIGITAL AUDIO OUT jack Indoor Aerial Holder Mains Lead 5J20301A P01 07 23 4 03 1 04 PM 3 ...

Page 6: ...f a DVD disc 30 CANCEL Cancel input data in the setting mode 14 15 26 28 33 34 ZOOM Zoom for DVD playback 26 CH RTN Switch between present last channel 14 CH PAGE Select channel of the TV 13 14 Utilize the teletext 19 B A Cursor buttons RETURN Remove DVD set up menu 22 31 SELECT ENTER Enter information in the menu Select option in the menu SEARCH8 9 Reverse search or Forward search playback 24 REV...

Page 7: ...nce it is recommended batteries be replaced on a yearly basis or when remote operation becomes erratic Do not mix old and new batteries Weak batteries can leak and severely damage the remote control transmitter Always remove batteries as soon as they become weak BATTERY CAUTIONS NOTES When direct sunlight an incandescent lamp fluorescent lamp or any other strong light shines on the remote sensor t...

Page 8: ...n the back cabinet until it locks into place Insert the aerial adaptor supplied with VTD1420 only to the aerial socket Adjust the angle of the loop aerial to receive the best possible picture INDOOR AERIAL A The type of aerial required depends on the position of your home it s distance from the transmitter and local interference If you do not have an aerial and you are uncertain of what to buy you...

Page 9: ...entonthemodel and features of each component Check the Owner s Manual provided with each component for the location of video and audio inputs and outputs Coaxial digital cable not supplied AV Amplifier with built in digital surround decoder as listed above Center Speaker Front Speaker Left Front Speaker Right Subwoofer Surround Speaker Left Surround Speaker Right Coaxial Digital Audio Output To Co...

Page 10: ...need to consult each component s Owner s Manual for additional information 1 To connect the unit to a VCR Press the 0 AV button to select AV2 to use the TV as a monitor Camcorder Front of unit Front of unit Audio Video cord not supplied Audio Video cord not supplied To Audio Video OUT VIDEO IN AUDIO IN L AUDIO IN R Press the TV DVD button to select TV mode and then press the 0 AV button repeatedly...

Page 11: ... TV mode Then press SETUP MENU NOTES If you are using this unit for the first time step 1 and 2 of the MENU screen will not be shown The Language selection menu will be shown To turn your unit off completely switch off the Power button on the front panel AV COLOUR PAL PICTURE LANGUAGE MENU PRESS ENTER MENU CHANNEL SETUP PRESS ENTER MENU ENGLISH ESPANOL FRANCAIS DEUTSCH ITALIANO LANGUAGE SPRACHE LA...

Page 12: ...this Press or to select the AUTO mode then press SELECT ENTER 2 Allavailablechannelsinyourarea are automatically scanned and stored in the memory of the unit When the unit finds a broadcasting channel the mark disappears Afterscanning thepreviousstep 2 screen appears 3 Press SETUP MENU twice The unit will return to normal TV screen 4 CHANNEL SETUP PRESS ENTER MENU MANUAL CH ALLOCATION AUTO AV COLO...

Page 13: ...LECT ENTER 1 Press SETUP MENU Press or to select the CHANNEL SETUP mode then press SELECT ENTER AV COLOUR PAL PICTURE LANGUAGE MENU PRESS ENTER MENU CHANNEL SETUP MANUAL TUNING How to tune a station to channel 10 position CHANNEL SETUP PRESS ENTER MENU AUTO CH ALLOCATION MANUAL Repeat step 3 through 4 until all the required channels have been stored When all desired channels have been set in your ...

Page 14: ...N AUTO Press or to select the channel position No broadcast ing which you want to change Then press SELECT ENTER 3 Press or to select the channel allocation No that you want to change to 4 Press SELECT ENTER The numbers of the stations are changed Repeat steps 3 4 to change the order of other channels Then press SETUP MENU three times to return to normal TV screen 5 PRESS ENTER MENU CH ALLOCATION ...

Page 15: ...ction button on the remote control 1 9 CH Press your required number only 10 80 CH Pressthetwodigitsinaccordancetothechannel numbers required VOLUME 30 CH 29 CH PAGE Press CH PAGE or on the remote control 3 The VOLUME can be adjusted by pressing the VOLUME or on the remote control NOTE On screen display will disappear after 4 seconds Automatic Power Shut Off Ifastationbeingviewedstopsbroadcasting ...

Page 16: ...ETURN CALL When you press this button once the channel number will appear Press this button again then the display will disappear MUTE When MUTE is pressed the TV sound will be turned off completely To disable this function press the button again or VOLUME or After all channels available in your area have been set in memory you can skip unwanted channels as follows SKIP FUNCTION 1 Press CH PAGE or...

Page 17: ...2 BRIGHTNESS CONTRAST COLOUR NOTE Each time is pressed the on screen display will change as shown below To adjust the BRIGHTNESS press or then press TINT Press SETUP MENU twice to return to normal TV screen SHARPNESS 3 BRIGHTNESS 0 PRESS B A C D MENU NOTES Thepicturesettingscanonlybeadjusted when they are displayed on screen Pressing CANCEL will return all adjustments to their factory preadjusted ...

Page 18: ...o the unit the picture may become black and white This can be corrected by selecting AV Extension Colour as follows PICTURE LANGUAGE MENU PRESS ENTER MENU CHANNEL SETUP AV COLOUR PAL 2 Press SELECT ENTER to select one of the colour options PAL or NTSC4 43 Usually select the PAL option 3 Press SETUP MENU to remove the menu from the screen 5J20301A P08 17 23 4 03 1 04 PM 16 ...

Page 19: ...the other isreflectedfromtallbuildings hillsorsimilarobstruction Changingthedirectionand orposition of the aerial may improve reception SNOW If your TV is located on the fringe area of a TV station where the signal is weak your picture may be affected by the appearance of small dots SNOW It may be necessary to install a stronger aerial to improve the picture RADIO FREQUENCY INTERFERENCE This kind ...

Page 20: ... button The first push on the TEXT MIX TV button switches the Teletext on The second push on TEXT MIX TV displays the TV program and the Teletext together MIX The third push on the TEXT MIX TV button switches the Teletext off and returns the screen back to the TV program TV GUIDE P100 TELETEXT 100 JAN 1 12 00 00 SPORT NEWS WEATHER Selected page number Time Teletext service name Date Displayed page...

Page 21: ...screen s left upper corner will display To call sub page 2 enter 0 0 0 2 Your input will be displayed in the left upper corner 0002 It may take some time until sub page 2 is broadcast The sub page can only be displayed when the broadcaster transmits it To leave sub page mode push the SUB PAGE button again Within the sub page mode no other pages other than the sub pages of the selected page can be ...

Page 22: ...ions Each section is called a CHAPTER Track An Audio CD can contain several items These are assigned to tracks Removing Disc from Case Be sure to hold the edge of disc Do not touch the surface of the disc Pick up the disc gently from the case Do not scratch the disc Do not get dirt on the surface of the disc Do not stick a label or adhesive tape on the disc Do not drop or bend the disc Storing Dis...

Page 23: ...rd plug is plugged in for the first time wait for about 5 seconds before pressing ON STANDBY NOTE When connecting to other equipment unplug the unit from the AC outlet Press ON STANDBY on the remote control to turn on the unit Every time you press ON STANDBY the unit starts from TV mode When using an amplifier switch on the amplifier Press TV DVD to select DVD mode The DVD startup screen will ap p...

Page 24: ... then press SELECT ENTER The menu returns to Lan guage menu automatically If you want to return to the previous menu press or RETURN 4 Repeat steps 2 3 for other Language setting Other Selection Menu Audio Subtitle If you want to select another language enter the language code see the Language code list on page 36 Off subtitle Subtitles do not appear 5 Press SETUP MENU to remove the Menu screen NO...

Page 25: ...the stopped point 7 To stop the playback press STOP Then press OPEN CLOSE The disc tray opens Remove the disc and press ON STANDBY The disc tray closes automatically and unit turns off NOTES If a non compatible disc is loaded Incor rect Disc Region Code Error or Paren tal Error will appear on the TV screen ac cording to the type of loaded disc If these appear check your disc again see pages 20 and...

Page 26: ...SE Audio CD does not work in above operation Press SLOW during normal playback or still playback Each press of SLOW will change the speed of the slow x1 2 x1 4 x1 6 x1 8 Slow motion Playback To resume normal playback press PLAY Locating a chapter or track NOTE The unit is capable of holding a still video image or On screen display image on your television screen indefinitely If you leave the still...

Page 27: ...e as much time as the number of file NOTES During MP3 Playback you cannot use search A B Repeat functions You can use Repeat Track or All Random functions and Program playback for MP3 CD Playback See page 27 Turn on the unit Press TV DVD to select the DVD mode Preparation MP3 CD Information Limitations on MP3 CD playback MP3 CD is the disc that is standardized by ISO9660 its file name must include...

Page 28: ... 1 x 2 2 x 3 and 3 x 4 2 3 Zooming Use the title chapter and time recorded on the disc to locate the desired point to play back Press Number buttons 0 9 to input the number If you input a wrong number press CANCEL Refer to the package supplied with the disc to check the numbers 1 Press JUMP during play back 3 Locating Desired Scene Press SELECT ENTER 4 Playback starts When you change the title pla...

Page 29: ...gain Repeat A B DVD On screen Operation display Title Repeats the current title Chapter Repeats the current chapter Off Resumes normal playback During stop mode PLAY MODE key is not effective Audio CD MP3 CD Video CD On screen Operation display All Repeats entire disc Track Repeats the current track Random Play Plays the tracks in random order Program Plays the tracks in program order Status displ...

Page 30: ... Press SELECT ENTER Playback starts from the marked scene 1 Press MARKER 2 Press or to select the Marker 1 3 3 Press CANCEL To Cancel the Mark NOTES The marking is cancelled when you open the disc tray or turn the power off Some subtitles recorded around the marker may fail to appear 3 Press MARKER to remove this display Marker Enter Cancel Marker T C 1 T C 2 T C 3 0 8 5 0 0 1 2 2 7 0 1 7 0 4 0 1 ...

Page 31: ...ck language is can celled when you open the disc tray The ini tial default language or available language will be heard if the disc is played back again Changing subtitle language is cancelled when you open the disc tray or turn the power off Some functions may not work on some DVDs You may not be able to turn subti tles on or off or change subtitles While play ing the DVD the subtitle may change ...

Page 32: ...s allow you to select the disc contents using the menu When you play back these DVDs you can select the sub title language and soundtrack language etc using the DVD menu 1 Press DVD MENU during playback The DVD menu appears on the screen Press DVD MENU again to resume playback at the scene when you pressed DVD MENU 2 Press or to select the desired item 3 Press SELECT ENTER The menu continues to an...

Page 33: ...xter nal widescreen 16 9 TV set via the SCART socket see P 9 4 3 Letterbox When playing back a wide screen DVD disc it displays the wide picture with black bands at the top and bottom of screen 4 3 Panscan It displays the wide picture on the whole screen with left and right edges automatically cut off If you want to return to the previous menu press or RETURN 4 Press SETUP MENU to remove the Menu ...

Page 34: ...ess or SELECT EN TER to select On or Off If you want to return to the previous menu press or RETURN 4 Press SETUP MENU to remove the Menu screen DRC Dynamic Range Control ena bles you to control the dynamic range so as to achieve a suitable sound for your equipment NOTES This function works only during play back of Dolby Digital recorded discs The level of Dynamic Range Reduction may differ depend...

Page 35: ...arental Level then press or SELECT ENTER 3 Press or to select a level from Off or 1 8 Press or SELECT ENTER to set the selected level Level Off The parental control setting does not func tion Level 8 Almost all DVD software can be played back Level 1 DVD software for adults cannot be played back Select from the level 1 to level 8 The limitation will be more severe as the level number is lower 4 Pr...

Page 36: ...u select a password number that you will remember easily 9 Press SELECT ENTER The parental level is now changed and locked If you want to return to the previous menu press or RETURN Press SETUP MENU to remove the parental control screen NOTE Do not forget the password If you forget your password or would like to change it you can reset the code by pressing both the DVD STOP button on the unit and ...

Page 37: ...s not been set playback will commence If you don t know or have forgotten the password select STOP The setting screen will disappear Press OPEN CLOSE to remove the disc To quit entering press RETURN 4 Playback will commence if the entered password was cor rect NOTE This temporary cancellation of rating level will be kept until the disc is ejected When the disc is ejected the original rating level ...

Page 38: ...gian 2425 Thai 3018 Bihari 1218 Hungarian 1831 Oriya 2528 Tibetan 1225 Breton 1228 Icelandic 1929 Panjabi 2611 Tigrinya 3019 Bulgarian 1217 Indonesian 1924 Pashto Pushto 2629 Tonga 3025 Burmese 2335 Interlingua 1911 Persian 1611 Turkish 3028 Byelorussian 1215 Irish 1711 Polish 2622 Turkmen 3021 Cambodian 2123 Italian 1930 Portuguese 2630 Twi 3033 Catalan 1311 Japanese 2011 Quechua 2731 Ukrainian 3...

Page 39: ...nterference Try another channel Move the aerial away from the source of interference Increase VOLUME control Check aerial connections or broken wires Try another channel Check aerial connections or broken wires Try another channel Move the aerial away from the source of interference Adjust the colour settings 15 17 13 6 13 6 13 17 13 17 6 13 13 20 Eject the disc and clean it The disc is dirty Some...

Page 40: ... 2 PAL DVD 12cm 8cm CD 12cm 8cm DVD 4Hz 22KHz CD 4Hz 20KHz 90dB 0 06 Below Measurable Level 90dB Audio RCA 12 0 dBm 1Kohm Digital Audio 0 5Vp p 75 ohm CD Wavelength 775 805 nm Maximum output power 0 5 mW DVD Wavelength 640 660 nm Maximum output power 1 0 mW AC 230V 240V 50Hz 55 W 11 0 kg 362 W x382 H x365 D mm 5 C to 40 C DC 3V Two batteries AAA R03 UM 4 1 Remote Control 2 Batteries UM 4 1 Loop Ae...

Page 41: ...ad 1 Open the cover in direction of the arrow and take it off 2 Install the batteries as shown below pay attention to polarities 3 Replace the compartment cover Use battery type UM 4 AAA Size QUICK SET UP GUIDE MODEL VTD1420 VTD2020 1 Loop Aerial supplied VTD 1420 only 5J20307A Q Sheet 23 4 03 1 06 PM 1 ...

Page 42: ... 3 Press SETUP MENU to return to the normal TV screen 4 Press TV DVD to select TV mode 1 Unit turning on Gerät einschalten Unit turning on Press ON STANDBY The STAND BY indicator will go off 1 PRESS ENTER MENU ENGLISH ESPANOL FRANCAIS DEUTSCH ITALIANO LANGUAGE SPRACHE LANGUE LINGUA LENGUA Press Power button The STAND BY indicator will light up 2 Power button 5J20307A Q Sheet 23 4 03 1 06 PM 2 ...

Page 43: ...e order that they are found As this may not necessarily be the correct order you can change the sequence of the channels see page 12 4 Press SETUP MENU repeatedly until normal TV screen appears 5 3 Press TV DVD to select TV mode 1 CHANNEL SETUP PRESS ENTER MENU MANUAL CH ALLOCATION AUTO AV COLOUR PAL PICTURE LANGUAGE MENU PRESS ENTER MENU CHANNEL SETUP CH 10 Automatic tuning 5J20307A Q Sheet 23 4 ...

Page 44: ... The disc tray closes automatically On the screen changes to and then playback will commence A menu screen may appear on the TV screen if the disc has a menu feature In this case press the or SELECT ENTER to oper ate a menu feature Place a disc onto the tray Hold the disc position it with the printed label side up alignitwiththeguides andplaceitinitsproper position Press STOP to end playback Press...

Reviews: