background image

– 20 –

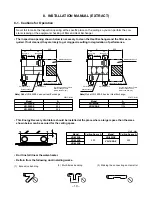
• Do not use in bathrooms or food preparation areas etc.

If you use the unit at the place of much soot and high humidity, the filter or the Heat Exchanger gets clogged
and disables you to use it.

• Use the Heat Exchange Ventilators in the ambient temperature of 40°C or less.

Never install the unit at the place where the flame likely reaches directly the unit. If you use it at the atmosphere of
more than 40°C for hours, it is likely to cause deterioration or deformation or damage of the resin part.

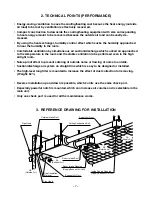
• Be careful of dewing and frosting.

As shown in the figure to the right, suppose a high temp. absorbing air condi-
tion A and a low temp absorbing air condition B are plotted on the air line
figure, then a high temp air A is heat-exchanged by the unit and goes out of
the saturation curve as shown by Point C. In this case, the unit will be dewed
or frosted. To avoid this, you are required to heat a low temp air B up to B' so
as to get C' below the saturation curve, before using the unit.

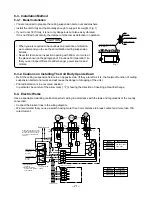
8-2. Local Procurements

• Switches are to be locally procured.

We recommend that you use a switch having more than 3mm distance to break contact and more than 15A
rated current.

8-3. Reference Sketch

A

B

C

C'

B'

Dry-bulb temperature (˚C)

Saturation 
curve

Absolute humidity (kg/kg

’)

Pipe Hood

Outside Intake Duct

Supply Air Duct

Ceiling Suspension Bolt

Room Intake Duct

Room Intake Opening

(Supply/Exhaust Air Grill)

Heat Insulation 
Material

Exhaust Air Duct

Inside Supply Opening

(Supply/Exhaust Air Grill)

Pipe Hood

OA 

(Outside Air)

RA

(Outside Air)

SA

(Supply Air)

EA 

(Exhaust Air)

Use conditions

Outdoor air conditions : Temperature range –10°C~40°C, relative humidity 85% or less

Indoor air conditions

Temperature range –10°C~40°C, relative humidity 85% or less

Installation requirements: Same as the indoor air conditions

• Indoor air here means air in air-conditioned living rooms. Its use in refrigerators or other places where

temperature can fluctuate greatly is prohibited even if a temperature range is acceptable.

Example: Indoor air conditions

During cooling period : Temperature 27°C, relative humidity 50%

During heating period : Temperature 20°C, relative humidity 40%

Summary of Contents for VN-1KSAE

Page 1: ...SERVICE MANUAL FILE NO A02 012 HEAT EXCHANGE VENTILATORS PRINTED IN JAPAN Jan 2003 ToMo VN 250SE VN 350SE VN 500SE VN 800SE VN 1KSAE VN 500SE Revised on 2005 Feb 15 ...

Page 2: ...ICATIONS 8 5 NAME AND DIMENSION OF EACH PARTS 11 6 WIRING DIAGRAM 12 7 OWNER S MANUAL EXTRACT 13 8 INSTALLATION MANUAL EXTRACT 19 9 HOW TO DIAGNOSE THE TROUBLE 24 10 HOW TO REPLACE THE MAIN PARTS 25 11 CHECK WHEN REPAIR WORK COMPLETED 28 12 Q A FOR HEAT EXCHANGE VENTILATORS 29 13 EXPLODED VIEWS AND PARTS LIST 30 ...

Page 3: ...ced work are indicated with illustrations or descriptions near the illustration symbol Indicates cautions including danger warning The concrete contents of cautions are indicated with illustrations or descriptions near the illustration symbol 1 1 Warning and caution exclusive in service work WARNING Be sure to ask the customers not to let children close to the work place The tools or disassembled ...

Page 4: ...indows If operation were to be attempted in such a situation sparking at electrical contact points could cause an explosion Netting or something similar should be provided at the external air intake opening to prevent birds etc interfering with the unit Nests or other foreign objects should be removed That could lead to a lack of oxygen in the room If the supply cord is damaged it must be replaced...

Page 5: ... container of combustible gas or liquid near Heat Exchange Ventila tors or to spray it directly with the gas or liquid It could cause a fire Do not use outside the rated voltage It could cause a fire or an electric shock Combustion apparatus should not be placed allowing a direct exposure to wind of Heat Exchange Ventilators Incomplete combustion could occur on the apparatus Don t put a container ...

Page 6: ...gh the metal lath or the wire lath or the metal plate of the wooden facility do not forget to insulate electrically between the duct and the wall Otherwise it would cause an electric shock or an electric leakage Don t use other parts than specified including the auxiliary parts for installing works If you do not use the specified parts it is likely to cause a drop of the unit a fire an electric sh...

Page 7: ...gh airtight room Noise proof effect to prevent entering of outside noise or flowing of noise to outside Suction discharge air system on straight line which is easy to be designed or installed The high level long filter is mounted to increase the effect of dust collection for removing Weight 82 Reverse installation up and down is possible which 2 units use the same check port Especially powerful no...

Page 8: ... 0 6 0 56 0 57 0 61 0 63 0 57 0 6 0 54 0 56 0 59 0 55 0 39 0 59 0 55 0 39 0 85 0 75 0 67 0 83 0 74 0 67 104 119 99 114 79 90 103 119 98 114 79 90 137 154 124 137 117 128 133 151 119 132 113 125 128 118 78 128 118 77 178 149 132 176 145 131 250 250 170 250 250 170 350 350 280 350 350 280 250 250 135 250 250 135 350 350 240 350 350 240 90 80 37 90 80 37 95 65 42 95 65 42 125 100 30 125 100 30 155 90...

Page 9: ...5 1 45 1 48 1 41 1 43 1 14 1 0 0 81 1 12 0 96 0 8 2 05 1 92 1 68 2 04 1 87 1 68 188 214 169 188 151 166 184 210 161 182 145 164 316 347 309 329 302 327 309 337 300 325 297 316 244 202 162 243 196 161 424 391 347 417 387 346 500 500 370 500 500 370 800 800 650 800 800 650 500 500 310 500 500 310 800 800 575 800 800 575 105 70 38 105 70 38 140 110 70 140 110 70 165 85 33 165 85 33 190 100 50 190 100...

Page 10: ... Heat exchange Normal ventilation 50Hz 220 240V Extra high High Low Extra high High Low 1 97 2 04 1 85 1 93 1 68 1 76 1 95 2 03 1 84 1 92 1 67 1 74 399 445 360 399 332 367 392 438 358 392 329 362 1000 1000 810 1000 1000 810 90 55 35 90 55 35 37 5 38 5 36 37 31 33 38 39 36 5 37 5 31 5 33 5 75 75 76 71 71 73 65 65 68 Zinc iron plate 4 pole capacitor dielectric motor E type ABS resin Combustion proof...

Page 11: ...Ø245 388 218 194 612 428 228 19 940 1250 85 1322 884 Ø258 Ø242 388 218 194 612 678 228 19 1190 1250 85 1322 1134 Model VN 800SE VN 1KSAE Unit mm Nominal Diameter Ø150 Ø200 Model VN 250SE VN 350SE VN 500SE Nominal Diameter Ø250 Model VN 800SE VN 1KSAE Applicable Duct Applicable Duct Number 1 2 3 4 5 6 7 8 9 10 11 12 Name Frame Adapter Terminal Inspection Cover Fan Sirocco Motor Fan Heat Exchanger F...

Page 12: ...COMMON L N LOW HIGH DAMPER 1 2 3 4 5 6 LINE NEUTRAL Operation Switch 1 0 OFF 2 1 ON Air Flow Switch 3 High 4 Low Operation Switch 1 0 OFF 2 1 ON Air Flow Switch 3 High 4 Low Function Select Switch 5 Heat Exchange Ventilation 6 Normal Ventilation To find out the function of each switch Divide the power lines running to the switch and the main unit On the product do not attach more then one cable to...

Page 13: ...ter or Heat Exchanger become clogged with oil Make sure that access is provided so that filter and Heat Exchanger maintenance and periodic spot checks of the unit can be easily carried out Refer to the Model Installation for its space Do not install the unit in locations such as machinery or chemical plants where it will be exposed to noxious gases containing acids alkali organic solvents paint fu...

Page 14: ...Use the Air Flow switch to set to the desired air flow High Turns to high air volume Low Turns to low air volume Use the Function Select switch to set the ventilation mode Heat Exchange Ventilation Mode Open air is thermal exchange with room air to bring it closer to a room temperature and humidity before taking it in the room NormalVentilation Mode To intake open air as it is 7 3 Maintenance Meth...

Page 15: ...tion of lukewarm water and dish washing neutral detergent 5 Install the filter after thoroughly allowing it to dry naturally CAUTION Avoid using heat to dry the filter as this may cause changes in the shape or quality of the filter Whenever the filter was damaged order the sales shop or the engineering office Separately sold Cleaning the Heat Exchanger If you find it too much stained clean it 1 Re...

Page 16: ... was damaged order the sales shop or the engineering office Separately sold 4 When cleaning is completed return the Heat Exchanger and filter to their former positions and close the Inspection cover and tighten the screw CAUTION Make absolutely sure to install the filter with an indication of turned to wart the Heat Exchanger side Failure to do so will lead to clogging of the Heat Exchanger foils ...

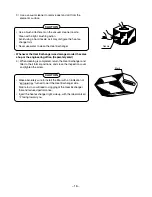
Page 17: ...vacuum cleaner to remove the dirt If it is very dirty swish it back and forth in a solution of lukewarm water and dish washing neutral detergent 5 Install the filter after thoroughly allowing it to dry natu rally Install them to fit well with the grooved rail CAUTION Avoid using heat to dry the filter as this may cause changes in the shape or quality of the filter Whenever the filter was damaged o...

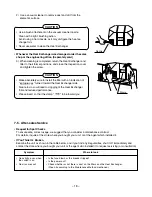
Page 18: ...ill lead to clogging of the Heat Exchanger foils and reduced performance Please insert so that the stamp to be toward you Nozzle Stamp 7 5 After sales Service Request for Spot Checks To ensure safe correct usage we suggest that you consider a maintenance contract For details inquire at the store where you bought your unit or at the agent which installed it IfYou Think It s Broken Examine the unit ...

Page 19: ...r Unit Body RA Room Air SA Supply Air Unit Body Maintenance Space Maintenance Space Inspection Opening 450 Inspection Opening 450 EA Exhaust Air OA Outside Air Heat Exchanger EA Exhaust Air OA Outside Air Heat Exchanger For the inspection of Filters Heat Exchanger Fans Motors and Damper For the inspection of Filters Heat Exchanger Fans Motors and Damper Unit mm Unit mm Note Model VN 250SE has one ...

Page 20: ...ore using the unit 8 2 Local Procurements Switches are to be locally procured We recommend that you use a switch having more than 3mm distance to break contact and more than 15A rated current 8 3 Reference Sketch A B C C B Dry bulb temperature C Saturation curve Absolute humidity kg kg Pipe Hood Outside Intake Duct Supply Air Duct Ceiling Suspension Bolt Room Intake Duct Room Intake Opening Supply...

Page 21: ...e 8 4 Electric Works Have a specialized working contractor perform wiring in accordance with the laws and regulations of the country concerned Connect the broken lines in the wiring diagram We recommend that you use a switch having more than 3 mm distance to break contact and more than 15A rated current 1 2 3 4 5 6 7 1 2 3 4 5 6 7 8 1 2 3 4 5 6 7 1 2 3 4 5 1 2 3 4 5 1 2 3 4 5 6 7 8 MS CN SAFM CN E...

Page 22: ...are no wrong wirings before power ON Ring terminal Secure wire properly Stranded wire Electric Parts Lid Cover fixing screws of the Electric Parts Lid CN8 CN8 CN8 CN8 Switching Connector 1 2 3 4 5 6 7 1 2 3 4 5 6 7 8 1 2 3 4 5 6 7 1 2 3 4 5 1 2 3 4 5 1 2 3 4 5 6 7 8 Srcond main body Third main body Power Source 3 1 4 1 NC NO CM CN8 CN6 CN5 CN7 NO NC CM NO NC CM NO CM NO NC CM TM1 4 3 2 1 6 7 5 COM...

Page 23: ...t Exchange High Extra High Low Normal Ventilation High Extra High Low Checking items Airflow condition Check if the air from inside supply opening and the one from room intake opening are set to High Extra High and to Low respectively Damper Open A Damper is beyond Close A Damper is near In case that any abnormality occurs in a pilot running its conceivable cause would be a wrong wiring Don t lose...

Page 24: ... locked Capacitor trouble Relay trouble Abnormal power is applied Miswiring Electromagnetic sound Buzzing of motor Bearing failure Incomplete attachment of fan sirocco Suction of foreign matter Deformed fan sirocco Loosening of screw Resonance due to incom plete tightening Clogging of filter Clogging of heat exchanger Capacitor failure Contact failure Contact failure Winding of motor damper is dis...

Page 25: ...tch is turned off because it is a single cut switch Do not modify the product Also do not use the disassembled modified or repaired parts Otherwise it causes a fire electric shock or injury Use the substitute parts corresponded to the model for repair It causes an abnormal operation or a trouble resulting in leakage or fire that is a cause of customers disaster Use gloves Use the protective materi...

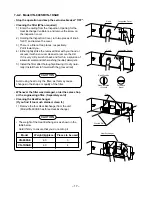
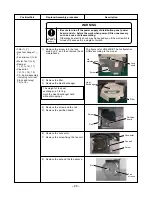
Page 26: ... terminal block and relay 12 to 16 2 Remove the filter 3 Remove the Heat Exchanger The weight of the heat exchanger is 3 to 7kg Hold the Heat Exchanger hard without dropping it 4 Remove the screw and the rail 5 Remove the partition board Nut Fan sirocco 6 Remove the connector 7 Remove the screw fixing the fan unit 8 Remove the nut and the fan sirocco WARNING Be sure to turn off the power supply of...

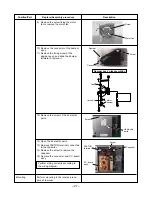
Page 27: ...eftward to remove it Perform mounting in the reverse proce dure of removal Mounting Screw Capacitor P C board ass y FASTON terminal Lid electric parts Screw 13 Open the lid electric parts 14 Remove FASTON terminal connected to the capacitor 15 Remove the screw to remove the capacitor 16 Remove the connector and P C board ass y Perform wiring correctly according to the wiring diagram Damper Screw C...

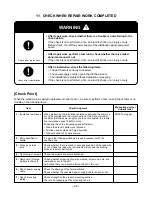
Page 28: ... lead wire 4 Tightening of screws 5 Removal of foreign matters in the unit 6 Check power supply cable 7 Check mounting status Check Judgment When measuring the insulation resistance between the common pin of the terminal and the metal section of the main unit under condition that the power supply cord is not connected the insula tion resistance keeps 10MΩ or more Especially check the following cas...

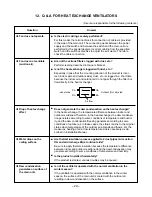
Page 29: ... Does not generate the dew condensation on the heat exchanger In the heat exchange the temperature difference between indoor and outdoor is widened Therefore in the heat exchanger the dew condensa tion generates according to some conditions of temperature and humid ity and the dew condensation freezing generates according to some conditions of outdoor air In these cases the status returns to the o...

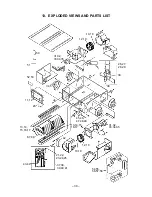
Page 30: ... AND PARTS LIST 19 18 1 2 10 31 32 33 34 35 50 51 52 53 11 12 20 13 14 15 16 17 6 7 8 9 43 44 42 37 38 39 40 41 21 22 23 24 25 54 55 56 57 58 31 32 33 34 35 45 46 47 48 49 13 14 15 16 17 18 19 1 2 10 3 4 5 36 30 26 27 28 29 ...

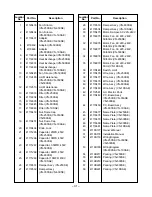
Page 31: ...118532 Damper Ass y VN 350SE VN 500SE Location Part No Description No 28 41118533 Damper Ass y VN 800SE 29 41118534 Damper Ass y VN 1KSAE 30 41179475 Motor Damper AC 220 240V 31 41150975 Motor Fan AC 220 240V 50 60Hz VN 250SE 32 41150976 Motor Fan AC 220 240V 50 60Hz VN 350SE 33 41150977 Motor Fan AC 220 240V 50 60Hz VN 500SE 34 41150978 Motor Fan AC 220 240V 50 60Hz VN 800SE 35 41150979 Motor Fan...

Page 32: ......
Reviews: