background image

37

Copyright © 2005 TOSHIBA CORPORATION. All rights reserved.

(E) 27HL95 *Web 213 : 276

Chapter 6: Setting up your TV

Manually adding and deleting channels in
the channel memory

After automatically programming channels into the channel
memory, you can manually add or delete individual channels.

To add or delete channels in the channel memory:

1. Press MENU and open the Setup menu.
2. Highlight Installation and press ENTER. (A new set of

Installation menu icons will appear on-screen, as shown in
step 3).

Navigate

Select

Exit

EXIT

Installation

Sleep Timer

On/Off Timer

PC Settings

No

Auto

2

PC Audio

HDMI Audio

Gray Level

Setup

Back

RTN

3. Open the Terrestrial menu, highlight Channel Add/Delete,

and then press ENTER.

Terrestrial

Input Configuration

Channel Program

Channel Add/Delete

Signal Meter

Navigate

Select

Exit

EXIT

Back

RTN

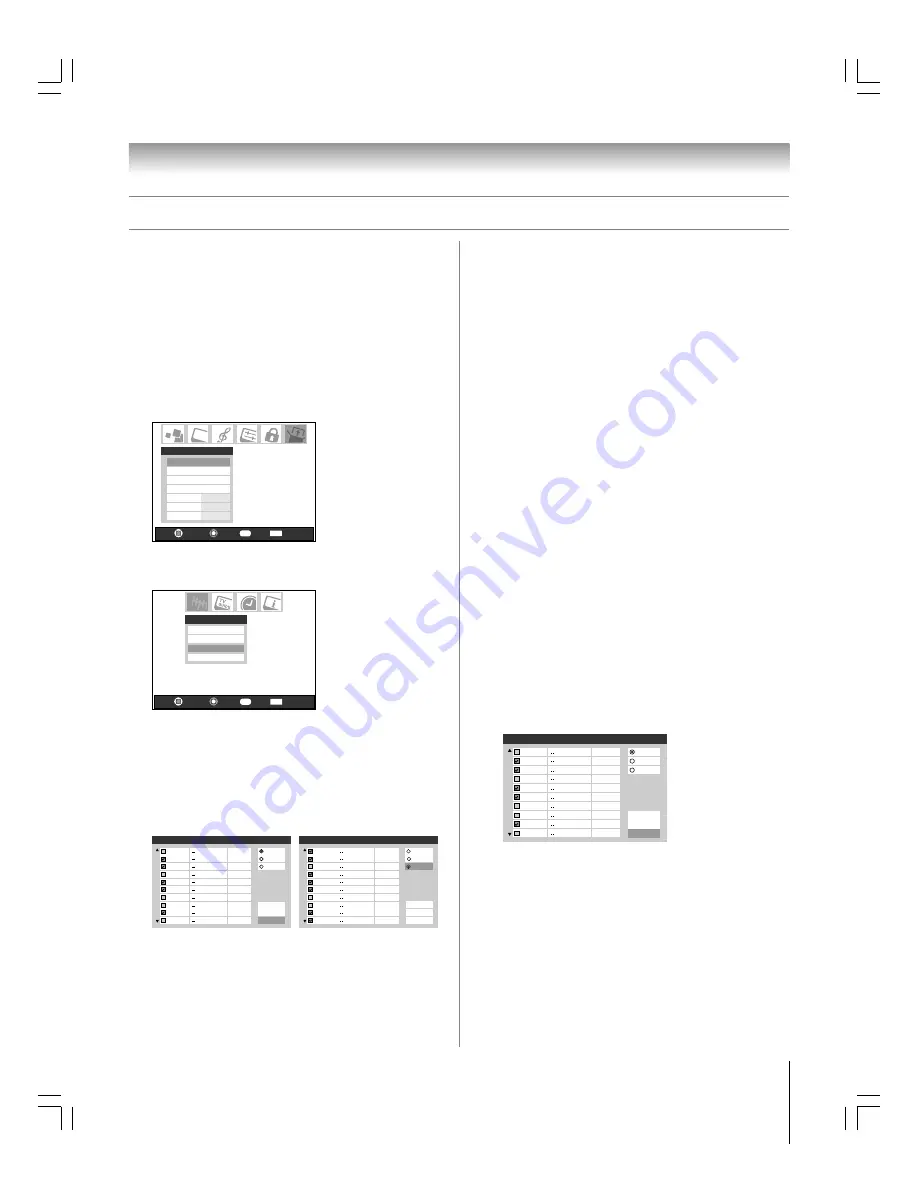
4. The illustration below left shows channels programmed for

the ANT 1 antenna input. To view the list of channels
programmed for the ANT 2 or Cable box antenna input,
press the 

y


z

 to highlight either “ANT 2” or “Cable Box”

and press ENTER.

Note: 

“Cable Box” will appear only if you connected a cable

box to your TV.

Channel Add/Delete

2

Analog

ANT 1

ANT 2

ANT 1

Digital

Digital

Analog

Analog

Analog

Analog

Analog

Digital

Analog

2 - 1

2 - 2

3

4

5

6

7

7 - 1

8

Cable Box

Reset

Done

Cancel

Channel Add/Delete

1

Analog

ANT 1

Cable Box

Analog

Analog

Analog

Analog

Analog

Analog

Analog

Analog

Analog

2

3

4

5

6

7

8

9

10

ANT 2

Cable Box

Reset

Done

Cancel

Programming channels into the TV’s channel memory 

(continued)

To add a channel to the channel memory:

Highlight the unchecked box next to the channel number
you want to add, and then press ENTER to check the box.

To manually add digital subchannels on a physical channel:

Use the Channel Numbers and the Dash (–/100) on the
remote control to enter the channel number (for example,
56–1).
If the channel is found, the number will be added to the list
and the box will be checked.
If the channel is not found, a message will appear.

To remove a channel from the channel memory:

Highlight the checked box next to the channel number you
want to remove, and then press ENTER to uncheck the
box.

To save your new settings:

Highlight Done and press ENTER.

To revert to your original settings:

Highlight Cancel and press ENTER before saving.

To remove all channels from the channel memory:

Highlight Reset and press ENTER, and then highlight
Done and press ENTER.

Note:

• This action applies to the current antenna input only. To

delete/add channels on the other input, highlight the input
you want (ANT1 or ANT 2) and press ENTER.

• This action cannot be canceled unless you highlight Cancel

and press ENTER before saving your changes.


Channel Add/Delete

2

Analog

ANT 1

ANT 2

ANT 1

Digital

Digital

Analog

Analog

Analog

Analog

Analog

Digital

Analog

2 - 1

2 - 2

3

4

5

6

7

7 - 1

8

Cable Box

Reset

Done

Cancel

#01E_035-037_27HL95

05.9.12, 10:44 PM

37

Black

Summary of Contents for TheaterWide 27HL95

Page 1: ...ou communicate with your Toshiba dealer about this TV Model number Serial number Integrated High definition LCD Television OWNER S MANUAL 27HL95 HIGH DEFINITION TELEVISION For an overview of steps for setting up and using your new TV see page 8 High definition programming is required to view High Definition TV broadcasts Please contact your cable or satellite provider YC M1 23566693A 01E_001_27HL9...

Page 2: ...duct Do not allow children to climb on or play with furniture and TVs Avoid placing any item on top of your TV such as a VCR remote control or toy that a curious child may reach for Remember that children can become excited while watching a program and can potentially push or pull a TV over Share our safety message about this hidden hazard of the home with your family and friends Thank you 2500 Wi...

Page 3: ...e the affected area thoroughly with water and consult your doctor ALWAYS contact a service technician to inspect the TV any time it has been damaged or dropped 15 The apparatus shall not be exposed to dripping or splashing and that no objects filled with liquids such as vases shall be placed on the apparatus Wide blade Installation Care and Service Installation Follow these recommendations and pre...

Page 4: ...qualified service technician to properly dispose of the TV Note The lamp unit contains mercury the disposal of which may be regulated due to environmental considerations For disposal or recycling information contact your local authorities or the Electronics Industries Alliance www eiae org Installation cont from previous page 25 Always make sure the antenna system is properly grounded to provide a...

Page 5: ...there may be an occasional pixel dot of light that does not operate properly does not light remains constantly lit etc This is a structural property of LCD technology is not a sign of malfunction and is not covered under your warranty Such pixels are not visible when the picture is viewed from a normal viewing distance Note Interactive video games that involve shooting a gun type of joystick at an...

Page 6: ... channels 58 Using the Channel Browser 58 Tuning your favorite channels 60 Tuning to the next programmed channel 60 Tuning to a specific channel programmed or unprogrammed 60 Switching between two channels using Channel Return 60 Switching between two channels using SurfLock 60 Selecting the picture size 61 Scrolling the TheaterWide picture TheaterWide 2 and 3 only 63 Using the auto aspect ratio f...

Page 7: ..._______ In the United States TV Guide and other related marks are registered marks of Gemstar TV Guide International Inc and or one of its affiliates The TV Guide On Screen system is manufactured under license from Gemstar TV Guide International Inc and or one of its affiliates The TV Guide On Screen system is protected by one or more of the following issued United States patents 6 498 895 6 418 5...

Page 8: ...out the remote control page 28 for an overview of the buttons on the remote control 9 Program the remote control to operate your other device s pages 24 25 10 AFTER connecting all cables and devices plug in the power cords for your TV and other devices Now Booting will be displayed on the screen until the picture appears or the green LED will blink until the TV goes into standby mode When the TV i...

Page 9: ...d hold the POWER button on the TV top panel for 5 or more seconds to reset the TV 8 CHANNEL yz When no menu is on screen these buttons change the channel programmed channels only see page 36 When a menu is on screen these buttons function as up down menu navigation buttons 9 VOLUME x When no menu is on screen these buttons adjust the volume level When a menu is on screen these buttons function as ...

Page 10: ...lete connection 4 A V OUT Standard composite video and analog audio outputs for connecting a VCR for editing and dubbing See page 18 for details 5 DIGITAL AUDIO OUT Optical audio output in Dolby Digital or PCM pulse code modulation format for connecting an external Dolby Digital decoder amplifier A V receiver or home theater system with optical audio input See page 20 6 G LINK For use with one of ...

Page 11: ... devices with component video output ColorStream is Toshiba s brand of component video These cables are typically color coded red green and blue Separate audio cables are required for a complete connection Note Component video cables provide better picture performance than a standard composite video or S video cable HDMI cable is for use with devices with HDMI High Definition Multimedia Interface ...

Page 12: ...RD service See page 40 for additional information From digital Cable service connect to ANT 1 only ________ CableCARD is a trademark of Cable Television Laboratories Inc Note Always use the EJECT button to remove the CableCARD Never remove the CableCARD by hand Never insert any object or card including without limitation a PCMCIA card other than a CableCARD into the CableCARD slot Always make sure...

Page 13: ... Connecting a camcorder You will need one set of standard A V cables If you have a camcorder with S video you can use an S video cable instead of a standard video cable for better picture performance Plug the S video and standard audio cables into the VIDEO 1 IN inputs on the upper back panel of the TV instead of the inputs on the side panel To view the camcorder video Select the VIDEO 2 video inp...

Page 14: ...stead of a standard video cable will provide better picture performance as mentioned in the first bulleted item at the top of this page _____________ To select the video input source press INPUT on the remote control see page 56 To program the TV remote control to operate other devices see Chapter 3 From Cable TV Connecting a VCR and Cable box Stereo VCR TV lower back panel The unauthorized record...

Page 15: ...ils Select the VIDEO 2 video input source on the TV To view the VCR or view and record antenna channels Turn ON the VCR Tune the VCR to the channel you want to watch Select the VIDEO 1 video input source on the TV _____________ To select the video input source press INPUT on the remote control see page 56 To program the TV remote control to operate other devices see Chapter 3 From antenna From sat...

Page 16: ... on the TV To view the DVD player Turn ON the DVD player Select the VIDEO 1 video input source on the TV To view VCR Turn ON the VCR Select the VIDEO 2 video input source on the TV _____________ To select the video input source press INPUT on the remote control see page 56 To program the TV remote control to operate other devices see Chapter 3 DVD player with S video TV lower back panel Stereo VCR...

Page 17: ...channels Select the ANT 1 video input source on the TV To view the DVD player Turn ON the DVD player Select the ColorStream HD video input source on the TV To view the VCR Turn ON the VCR Select the VIDEO 1 video input source on the TV To record a TV program while watching a DVD Turn ON the VCR Tune the VCR to the channel to record Select the ColorStream HD video input source on the TV to view the...

Page 18: ...2 records The unauthorized recording use distribution or revision of television programs videotapes DVDs and other materials is prohibited under the Copyright Laws of the United States and other countries and may subject you to civil and criminal liability To use the TV Guide On Screen recording feature 1 Connect the G LINK cable according to the instructions on page 21 2 Make sure the VCR is conn...

Page 19: ...hat you follow these procedures When turning on your electronic components turn on the TV first and then the HDMI or DVI device When turning off your electronic components turn off the HDMI or DVI device first and then the TV To connect a DVI device you will need one HDMI to DVI adapter cable HDMI type A connector per DVI device For proper operation the length of an HDMI to DVI adapter cable shoul...

Page 20: ...ormat field select either Dolby Digital or PCM depending on your device see Selecting the optical audio output format on page 72 Audio Setup MTS Stereo Language English Reset Done Optical Output Format Dolby Digital TV lower back panel Dolby Digital decoder or other digital audio system Note Some audio systems may not be compatible with Dolby Digital bitstream signals Older audio systems that are ...

Page 21: ...R If you cannot locate the device s infrared sensor 1 Turn OFF the device 2 Starting at the lower left corner of the device place the end of the device s remote control with the infrared emitter so it touches the front of the device and press POWER Do not use the TV s remote control for this step 3 If the device turns on the point at which the remote control touched the device is the location of t...

Page 22: ...s may not be displayed correctly To display the optimum picture use the PC setting feature see Using the PC setting feature on page 74 TV lower back panel TV upper back panel Note Some PC models cannot be connected to this TV An adapter is not needed for computers with a DOS V compatible mini D sub 15 pin terminal Depending on the DVD s title and the specifications of the PC on which you are playi...

Page 23: ... batteries into a fire Preparing the remote control for use Your TV remote control can operate your TV and many other devices such as cable converter boxes satellite receivers VCRs DVD players and HTIBs home theater in a box even if they are different brands If you have a Toshiba device Your TV remote control is preprogrammed to operate most Toshiba devices See page 27 If you have a non Toshiba de...

Page 24: ...e control operate your device If some keys are not operational repeat the device code setup using another code if other codes are listed for your device If after trying all listed codes the necessary keys do not operate your device use the device s original remote control Every time you change the batteries you will need to reprogram the remote control Some newer VCRs respond to either of two code...

Page 25: ...eo 056 059 061 081 Goldstar 005 010 014 054 056 065 067 Gradiente 018 065 Harman Kardon 005 Hitachi 024 025 035 037 042 063 070 080 JBL 076 JC Penney 005 006 007 008 009 010 023 024 025 026 035 056 061 063 065 Jensen 024 025 037 JVC 005 006 007 014 037 043 062 063 068 082 Kenwood 005 006 007 012 014 037 043 053 068 071 Kodak 010 LG 010 Lloyds 053 073 079 Logik 061 LXI 010 Magnasonic 061 065 078 Ma...

Page 26: ...e control to recognize the device if you have not already done so See pages 24 and 25 To use your TV remote control to operate a Cable converter box or satellite receiver set the Device Switch to CBL SAT VCR set the Device Switch to VCR DVD player or HTIB set the Device Switch to DVD Note Even after the TV remote control is programmed it may not operate certain features on your other device If thi...

Page 27: ... channel INFO Info Info Top Menu TOP MENU Top Menu MENU Menu DVD Menu Menu Menu DVD MENU yz FAVyz Menu select Menu select up down x Menu select Menu select Channel Browser Menu select Menu select Channel Browser ENTER Enter Select Enter Enter EXIT DVD CLEAR Exit Exit Clear VOLyz Volume up down TV Volume up down TV Volume up down TV Volume up down CHyz PAGE Channel up down Channel up down Channel u...

Page 28: ...e On Screen system Chapter 7 ENTER activates highlighted items in the main menu system and the TV Guide On Screen system Arrow buttons yzx When a menu is on screen these buttons select or adjust programming menus Also see x below FAV yz tunes to the next higher lower favorite channel page 38 TV GUIDE opens the TV Guide On Screen system Chapter 7 CH yz cycles through programmed channels when no men...

Page 29: ...D This option is not available if CableCARD is not inserted Picture Settings Picture Settings Edit Window Video Advanced Picture Settings Advanced Picture Settings Edit Window Theater Settings Theater Settings Edit Window Audio Settings Audio Settings Window Audio Advanced Audio Settings Advanced Audio Settings Window Audio Setup Audio Setup Window Favorite Channels Favorite Channels Edit Window P...

Page 30: ...Navigating the menu system All menus close automatically if you do not make a selection within 60 seconds except the signal meter menu which closes automatically after 5 minutes To close a menu instantly press EXIT Setup Installation menu layout To open the Installation menu illustrated below press MENU on the remote control or TV top panel open the Setup menu select Installation and press ENTER F...

Page 31: ... setup process to provide you with a channel lineup and program listings for your area The listings are automatically updated several times a day Note You must first set up your TV according to the applicable connection instructions in Chapter 2 To set up the TV Guide On Screen system 1 Press MENU and open the Setup menu 2 Highlight Installation and press ENTER Navigate Select Exit EXIT Installati...

Page 32: ...able box tune your Cable box to channel 02 leave the Cable box and TV ON and then press ENTER Screen 10 appears Screen 10 The TV Guide On Screen system will test the code for the brand of Cable box you selected Do not press any keys on the TV remote control or Cable box until the testing process is completed When testing is completed screen 11 appears Screen 11 If your Cable box tuned itself to ch...

Page 33: ...ervice Press ENTER to display screen 15 Screen 15 Is a VCR connected If you select Yes screen 16 appears If you select No screen 21 appears Screen 16 The on screen diagram shows the correct way to connect your VCR to the G LINK terminal on the TV Make sure the G LINK cable is installed properly For additional details see page 21 Press ENTER to display screen 17 Screen 17 Select your VCR brand and ...

Page 34: ...lar program listing updates remember to do the following 1 Leave the TV in standby mode when it is not in use by turning it OFF but leaving the power cord plugged in 2 If you have a Cable box connected leave it ON 3 If you have a VCR connected turn it OFF when not in use Do not unplug the power cord See page 13 for VCR connection instructions 4 If you have more than one Cable system in your area y...

Page 35: ...al menu may not be accessible items will be grayed out in some instances for example if a cable box is connected to the ANT 1 input or if one of the VIDEO modes is the current input during TV Guide On Screen setup Terrestrial Input Configuration Channel Program Channel Add Delete Signal Meter Navigate Select Exit EXIT Back RTN 4 Press x to select the input source Cable or Antenna for the ANT 1 inp...

Page 36: ... have to repeat the programming process again unless your Cable TV service lineup changes significantly If you have a CableCARD inserted page 12 channel programming for ANT 1 is disabled because the CableCARD automatically loads the Cable channel list into the TV s channel memory To program channels automatically 1 Make sure you have configured the antenna input sources See page 35 for details 2 P...

Page 37: ...le Box Analog Analog Analog Analog Analog Analog Analog Analog Analog 2 3 4 5 6 7 8 9 10 ANT 2 Cable Box Reset Done Cancel Programming channels into the TV s channel memory continued To add a channel to the channel memory Highlight the unchecked box next to the channel number you want to add and then press ENTER to check the box To manually add digital subchannels on a physical channel Use the Cha...

Page 38: ... message will appear You will need to delete uncheck a channel before you can add another When done highlight Done and press ENTER To program favorite channels for another input Either Highlight ANT 1 ANT 2 or Cable Box which will change the favorite channel settings in the selected input This will not change the TV s current input Or Press INPUT to select ANT 1 ANT 2 or Cable Box and then repeat ...

Page 39: ...sequence will start and the time and date will be set automatically Cancel Time And Date Manual TV Guide On Screen Your TV Guide On Screen system can provide accurate time and date information It is recommended you set up TV Guide On Screen first and use it to obtain the time and date If you have already set up the TV Guide On Screen system or if you have not set up the time the time and date sett...

Page 40: ...tions Signal Meter Antenna 1 Physical Digital Channel 13 Virtual Digital Channel Done N A Signal Locked 0 0 Peak To close the screen and return to the Terrestrial menu Highlight Done and press ENTER To return to normal viewing Press EXIT Viewing the CableCARD menu A CableCARD enables you to view encrypted digital channels See page 12 for connection and subscription information After the CableCARD ...

Page 41: ...Software Version System Information Done Brand Model Toshiba 27HL95 Product Information System Information Done 0 4 0 Mar 29 2005 10 44 39 FW 0 16 Sub 46 Software Version To close the screen and return to the Installation menu Highlight Done and press ENTER To return to normal viewing Press EXIT Restore Factory Defaults To restore all settings and channels to their factory default values 1 Follow ...

Page 42: ...arch for shows by category keyword or alphabetically On screen help The TV Guide On Screen system contains on screen feature definitions and navigation instructions Setting up the TV Guide On Screen system Follow these instructions to set up the TV Guide On Screen system so it can receive current program data for your area Note If you move the TV to a different ZIP postal code you will need to per...

Page 43: ...tor REC PAGE UP DOWN Numbers Navigating the TV Guide On Screen system ENTER MENU While watching TV press TV GUIDE to enter the TV Guide On Screen system The LISTINGS screen will appear with the current show highlighted When in the TV Guide On Screen system if you press TV GUIDE from any screen the TV will tune to the show displayed in the Video Window Use the arrow keys on the remote control yzx t...

Page 44: ...nd button and press ENTER To cancel any changes and close the panel menu press MENU or highlight Cancel and press ENTER If a panel menu contains more options than can be displayed in one panel the word more appears at the bottom of the menu To access the additional options either scroll down using z or the PAGE UP DOWN CH yz button Info Box Video Window When you open the TV Guide On Screen system ...

Page 45: ...ts Remind Once Show is set to remind once Other frequencies are Daily manual reminding only Regularly and Weekly Remind Off Show is set to remind but reminder is currently Off show remains in schedule Remind Reminder is suspended due to a schedule conflict show remains in schedule Suspended Reminder resumes when the conflict no longer exists Info Box An Info Box contains information about a show S...

Page 46: ...do the following View eight days of show listings Read show descriptions Tune directly to a show currently airing Set a show to Remind e g start time frequency automatic power ON auto tune TV Set a show to Record e g start end time frequency Lock and unlock the Video Window Access panel ads and channel ads Use the Number buttons on the remote control to jump to a specific channel s listings To wat...

Page 47: ... date and time 4 Highlight a show and press ENTER to watch if on now or press MENU to display the Episode Options panel menu See Episode Options panel menu on page 46 TV Guide On Screen Services continued SEARCH screen SEARCH allows you to find shows by keyword alphabetically or by category HDTV Movies Sports Children Educational News Variety Series With SEARCH highlighted in the Service Bar press...

Page 48: ...vices continued 6 A list of all matching shows for that keyword is displayed 7 Highlight a show and press ENTER to display all airings Then highlight a specific listing and press ENTER to watch if on now or press MENU to display the Episode Options panel menu From the Episode Options menu you can choose to set a recording or reminder or tune to the channel see Episode Options panel menu on page 46...

Page 49: ...w to Record or edit the record settings for a show in LISTINGS SEARCH and SCHEDULE There are three ways to set a show to Record as described below 1 Set a show to Record using the REC key on the remote control Press REC on the remote control to record the show Once with current default settings start and end recording on time Each time you press REC you change the Record frequency but not the defa...

Page 50: ...o change is made within 3 minutes the notification banner will close automatically the channel will change to the one set to record and the recording will occur as scheduled If you want to cancel the recording select Don t change cancel recording in the notification banner and press ENTER Record features continued Record conflict A conflict message appears for the following reasons A show set to R...

Page 51: ... can change the default values of the Remind Options panel menu fields See Change default options on page 54 for details 6 Highlight the WHEN field to set a time for displaying the reminder screen and press x to choose in the range from 15 minutes early to 15 minutes late or On Time default 1 minute early 7 Press ENTER to highlight SCHEDULE REMINDER and press ENTER again to close the menu A Remind...

Page 52: ...as the same start time as an existing auto tune Reminder A show set with an auto tune Reminder overlaps with a scheduled Recording Select one of these options Auto Tune Anyway This show will override an existing show set to auto tune Proceed No Auto Tune Set the show as a Reminder but do not auto tune Don t Set This Reminder Cancels the Reminder Remind features continued Remind icons Following is ...

Page 53: ...ghlight a choice press ENTER and follow the on screen instructions With SETUP highlighted in the Service Bar press INFO to display a help screen Press INFO again to close the screen Change system settings This option appears only after you have completed the initial TV Guide On Screen setup process as described in Chapter 5 1 From the SETUP screen highlight CHANGE SYSTEM SETTINGS and press ENTER 2...

Page 54: ...O GUIDE to Off if you do not want the TV Guide On Screen system to open every time you turn on the TV 4 When finished press ENTER to highlight DONE and press ENTER again to close the menu and accept the changes or highlight CANCEL to close the menu with no changes SETUP screen continued Change channel display This option allows you to edit channel information that appears in LISTINGS including the...

Page 55: ...ails on entering values in these fields 4 When finished press ENTER to highlight DONE and press ENTER again to close the menu and accept the changes or highlight CANCEL to close the menu with no changes Remind defaults 1 From the SETUP screen highlight CHANGE DEFAULT OPTIONS and press ENTER 2 Highlight REMIND DEFAULTS and press MENU to display the Remind Defaults panel menu 3 Enter the required in...

Page 56: ...eam HD HDMI PC ANT 2 to Select INPUT 0 0 1 2 3 4 5 6 6 Note When the Input Selection screen is open you also can use yz on the remote control or the CHANNEL yz on the top panel to change the input You can repeatedly press INPUT on the remote control or TV VIDEO on the TV top panel to change the input You can label the video input sources according to the specific devices you have connected to the ...

Page 57: ...1 Video 2 ColorStream HD HDMI PC ANT 2 to Select INPUT 0 0 1 2 3 4 5 6 6 Input Selection ANT 1 ANT 1 ANT 1 DVD Cable ColorStream HD Hidden DTV PC ANT 2 to Select INPUT 0 0 1 2 3 4 5 6 6 Input Selection screen Input Selection screen with with no inputs labeled all inputs labeled except input 3 which has been hidden To clear the input labels 1 Press MENU and open the Preferences menu 2 Highlight Inp...

Page 58: ...s channel or forward to the next channel in the channel history In Select mode when you stop on a channel number in the browser banner it will be highlighted with a yellow background but the TV will not automatically tune to the channel 2 Press ENTER to tune the TV to the highlighted channel 3 Press EXIT to close the Channel Browser banner To open the Channel Browser banner Press x or ENTER on the...

Page 59: ...a channel as the Home channel for an input To set a channel as Home using the remote control 1 Tune the TV to the channel you would like to set as the Home channel for the current antenna input 2 Press and hold the HOME button on the remote control for 3 seconds When the Home channel is saved the Channel Browser banner will appear at the bottom of the screen with the home icon flashing green Note ...

Page 60: ... two channels using Channel Return The Channel Return feature allows you to switch between two channels without entering an actual channel number each time 1 Select the first channel you want to view 2 Select a second channel using the Channel Number buttons and the dash button if selecting a digital channel 3 Press RTN on the remote control The previous channel will display Each time you press RT...

Page 61: ...edly press PIC SIZE to select the desired picture size or press y z on the remote control while the Picture Size screen is open Full may not be available for some program formats will be grayed out in the Picture Size screen Natural picture size The image is displayed close to its originally formatted proportion Some program formats will display with side bars and or bars at the top and bottom Nat...

Page 62: ...urce programs only If receiving a squeezed 4 3 format program it is stretched wider to fill the width of the screen but not stretched taller None of the picture is hidden Chapter 8 Using the TV s features To select the picture size press PIC SIZE on the remote control Note If you select one of the TheaterWide picture sizes the top and bottom edges of the picture including subtitles or captions may...

Page 63: ...ct Off in step 3 above You can set separate scroll settings for the TheaterWide 2 and TheaterWide 3 modes for each input To set the scroll settings 1 Press INPUT on the remote control or TV VIDEO on the TV to select the input for which you want to set the picture size and scroll settings 2 Press MENU and open the Video menu 3 Highlight Theater Settings and press ENTER Picture Settings Advanced Pic...

Page 64: ...ture Size Natural Picture Scroll 1 Cinema Mode Auto Aspect Ratio On Film 4 To save the new settings highlight Done and press ENTER To revert to the factory defaults highlight Reset and press ENTER To set the Cinema Mode to Video Select Video in step 3 above Using the FREEZE feature 1 When viewing the TV press FREEZE to make the picture a still picture 2 To return to the moving picture either press...

Page 65: ...ge a picture quality setting for example increase the contrast or change the color temperature the picture mode automatically changes to Preference in the Picture Settings menu Adjusting the picture quality You can adjust the picture quality contrast brightness color tint and sharpness to your personal preferences To adjust the picture quality 1 Press MENU and open the Video menu 2 Highlight Pictu...

Page 66: ...dle High and Auto If the video resolution is 1080i the available selections are Off Low and High If the video resolution is anything other than 480i or 1080i the menu will display the text DNR and will be grayed out with Off selected 4 To save the new settings highlight Done and press ENTER To revert to the factory defaults highlight Reset and press ENTER Adjusting the picture continued Selecting ...

Page 67: ...e back lighting feature to adjust the screen brightness for improved picture clarity To adjust the back lighting 1 Press MENU and open the Video menu 2 Highlight Advanced Picture Settings and press ENTER 3 Press z to highlight Back Lighting and then press x to adjust the screen brightness 0 100 ANT 1 Advanced Picture Settings Done CableClear Auto Color Temperature Back Lighting Cool Dynamic Contra...

Page 68: ...Caption Advanced Preferences Off Closed Caption Mode Off CC1 CC2 CC3 CC4 T1 T2 Navigate Select Exit EXIT Back RTN To view captions Highlight CC1 CC2 CC3 or CC4 CC1 displays translation of the primary language in your area Note If the program or video you selected is not closed captioned no captions will display on screen To view text Highlight T1 T2 T3 or T4 Note If text is not available in your a...

Page 69: ...ble the Digital CC Audio selector presents a default list of services If the selected service is not available the next best service will be used instead To select digital closed captions 1 Press MENU and open the Applications menu 2 Highlight Digital CC Audio Selector and press ENTER Applications TV Guide On Screen Digital CC Audio Selector CableCARD Navigate Select Exit EXIT Back RTN 3 Press yz ...

Page 70: ...ically outputs the type of sound being broadcast stereo or monaural If the stereo sound is noisy select Mono to reduce the noise To listen to an alternate language on an ATSC digital station if available Highlight the Language field in step 3 above and then press x to select the language you prefer To listen to a second audio program on an analog station if available Select SAP in step 3 above Not...

Page 71: ...s your audio adjustments to the following factory settings Bass center 50 Treble center 50 Balance center 0 StableSound Off To turn off the StableSound feature Select Off in step 3 above Adjusting the audio continued Adjusting the audio quality You can adjust the audio quality by adjusting the bass treble and balance To adjust the audio quality 1 Press MENU and open the Audio menu 2 Highlight Audi...

Page 72: ... is monaural the 3D effect does not work WOW FOCUS To turn the vocal emphasis effect On or Off WOW TruBass To select the desired bass expansion level High Low or Off 5 To save the new settings highlight Done and press ENTER To revert to the factory defaults highlight Reset and press ENTER Selecting the optical audio output format Use this feature to select the optical audio output format when you ...

Page 73: ...ge will display on screen when there is one minute remaining on the sleep timer Setting the On Off timer You can use the On Off timer to turn the TV on and off at a preset time on a recurring basis Note You must first set the time see page 39 To set the On Off Timer 1 Press MENU and open the Setup menu 2 Highlight On Off Timer and press ENTER Navigate Select Exit EXIT Installation Sleep Timer On O...

Page 74: ...re left right and up down The adjustment range is within 5 from center The adjustable range may vary depending on the input mode Horizontal Width Vertical Hegiht Adjusts picture width of Horizontal and picture height of Vertical The adjustment range is within 5 from center Clock Phase This function is to reduce noise and sharpen the picture The adjustment range is within 15 from center Sampling Cl...

Page 75: ...eo being viewed in 16 9 aspect ratio When receiving a signal that has sidebars e g 4 3 aspect ratio video over a 1080i or 720p signal the gray level feature will not be applied to the sidebars STEREO Tuner Hold On 5 32pm CABLE 81 1 ANT 1 NC 17 On Timer Weekdays 12 00pm Sleep Timer 18 min Game Timer 28 min Natural 1080i Sample RECALL screen Displaying TV setting information on screen using RECALL T...

Page 76: ...t EXIT Enable Rating Blocking Edit Rating Limits Channels Block Input Lock Off Off Off Off Front Panel Lock Game Timer New PIN Code Locks Back RTN Using the Locks menu 9 The Locks menu includes the Enable Rating Blocking Edit Rating Limits Channels Block Input Lock Front Panel Lock Game Timer and New PIN Code features You can use these features after entering the correct PIN code If you cannot rem...

Page 77: ...X Blocking TV programs and movies by rating V Chip Ratings Description and content themes TV MA Mature Audience Only This program is specifically designed to be viewed by adults and therefore may be unsuitable for children under 17 L Crude or indecent language S Explicit sexual activity V Graphic violence TV 14 Parents Strongly Cautioned This program contains some material that many parents would ...

Page 78: ... to block then press ENTER which puts an in the box next to that channel 7 Repeat step 6 for other channels you want to block 8 Highlight Done and press ENTER To unblock individual channels In step 6 above press yz to highlight the channel you want to unblock and then press ENTER to remove the X from the box and highlight Done and then press ENTER To block all channels at once Highlight Block All ...

Page 79: ...0 minutes 3 minutes and 1 minute remain on the GameTimer If the TV loses power with time remaining on the GameTimer when power is restored the TV will enter VIDEO LOCK mode as if the GameTimer has expired and you will have to deactivate the video lock as described above Using the panel lock feature You can lock the top panel buttons to prevent your settings from being changed accidentally by child...

Page 80: ...put Selection window Cannot view external signals If you cannot view signals from external devices connected to VIDEO 1 VIDEO 2 or ColorStream or or channel 3 or 4 from channels 3 or 4 make sure the Input Lock is set to Off page 78 Black box on screen Set the Closed Caption feature to Off page 68 Poor color or no color The station may have broadcast difficulties Try another channel Adjust the Tint...

Page 81: ... 41 Closed caption problems If the program or video you selected is not closed captioned no captions will display on screen page 68 If text is not available a black rectangle may appear on screen If this happens turn off the closed caption feature page 68 A closed caption signal may not display correctly in the following situations a when a videotape has been dubbed b when the signal reception is ...

Page 82: ...or the TV Guide On Screen system to receive channel line up information 8 Q How do I connect the G LINK IR blaster cable to the G LINK input on the TV A See Chapter 2 Connecting your TV in this manual You also can refer to the TV Guide On Screen prompts during VCR or Cable box setup 9 Q When will I be able to view my TV program listings and use other TV Guide On Screen system features A You will b...

Page 83: ...formation is updated on a daily basis 19 Q I have seen the word download in reference to the TV Guide On Screen system What does that mean A Download refers to the times throughout the day when the TV Guide On Screen system is receiving channel and listings information from your Cable or over the air antenna transmission 20 Q After some show titles I have noticed from 1 to 4 stars What does that m...

Page 84: ... up incorrectly Refer to your VCR owner s manual or contact your Cable TV company for proper wiring procedures 32 Q Is Help available in the TV Guide On Screen system If so how do I find it A Yes Highlight any of the four main Services Listings Schedule Setup Search and press INFO on the remote control An expanded Info Box displays additional help information Press INFO again to close the box Help...

Page 85: ... AC 60 Hz Power Consumption 107 W average 31 W in standby mode Using a CableCARD 27 W in standby mode Without a CableCARD Audio Power 10 W 10 W Speaker Type Two 2 3 8 4 3 4 inches 60 120mm Video Audio Terminals S VIDEO INPUT Y 1 V p p 75 ohm negative sync C 0 286 V p p burst signal 75 ohm VIDEO AUDIO INPUT VIDEO 1 V p p 75 ohm negative sync AUDIO 150 mV rms 30 modulation equivalent 22 k ohm or gre...

Page 86: ...up adjustment of customer controls and installation or repair of antenna systems are not covered by this warranty Reception problems caused by inadequate antenna systems misaligned satellite dishes cable television distribution VCRs DVD players recorders personal computer level IEEE 1394 devices and any other connected signal source device are your responsibility 5 Warranties extend only to defect...

Page 87: ...L PROJECT AS IS AND ANY EXPRESSED OR IMPLIED WARRANTIES INCLUDING BUT NOT LIMITED TO THE IMPLIED WARRANTIES OF MERCHANTABILITY AND FITNESS FOR A PARTICULAR PURPOSE ARE DISCLAIMED IN NO EVENT SHALL THE OpenSSL PROJECT OR CONTRIBUTORS BE LIABLE FOR ANY DIRECT INDIRECT INCIDENTAL SPECIAL EXEMPLARY OR CONSEQUENTIAL DAMAGES INCLUDING BUT NOT LIMITED TO PROCUREMENT OF SUBSTITUTE GOODS OR SERVICES LOSS O...

Page 88: ...Copyright 2005 TOSHIBA CORPORATION All rights reserved 88 E 27HL95 Web 213 276 Chapter 11 Appendix Notes 01E_085 089_27HL95 05 9 12 15 50 88 Black ...

Page 89: ...Copyright 2005 TOSHIBA CORPORATION All rights reserved 89 E 27HL95 Web 213 276 Chapter 11 Appendix Notes 01E_085 089_27HL95 05 9 12 15 50 89 Black ...

Page 90: ... 17 D Device connections 12 22 Defaults restore TV factory 41 Digital Audio Out 20 Digital signal meter 40 DNR Digital Noise Reduction 66 Dolby Digital 20 72 DVD player connection 16 17 DVI connection 19 Dynamic Contrast 67 F G H I Factory defaults restore TV 41 Favorite channels 38 Features TV 7 Focus 72 FREEZE 64 Front of the TV 9 GameTimer 79 G LINK connection 21 HDMI connection 19 HOME button ...

Page 91: ... Searching and sampling the code 24 Restore TV factory defaults 41 RTN button 60 Index continued S Safety care installation and service 2 4 SAP sound 70 Satellite receiver connection 15 Scrolling the TheaterWide picture 63 Service 4 Setup TV 8 12 22 35 Setup TV Guide On Screen system 31 Sleep timer 73 Sound quality adjustments 71 Specifications 85 SRS 3D 72 SRS WOW 72 StableSound 71 Stereo sound 7...

Page 92: ...Channel Browser GameTimer and SurfLock are trademarks of Toshiba America Consumer Products L L C TOSHIBA AMERICA CONSUMER PRODUCTS L L C HEAD OFFICE 82 TOTOWA ROAD WAYNE NJ 07470 U S A NATIONAL SERVICE DIVISION 1420 B TOSHIBA DRIVE LEBANON TN 37087 U S A MANUFACTURED BY Copyright 2005 TOSHIBA CORPORATION All rights reserved 01E_092_27HL95 9 12 05 4 55 PM 92 Black ...

Reviews: