background image

User Manual

Page 7

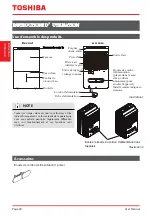
Key Pad Features

Control Pads

Oper

ating

Instruc

tions

Comfort dehumidifying

operation on indicator light

Bucket full

indicator 

light

Timer on/


indicator 

light

High fan

indicator 

light

Continuous operation

on indicator light

Auto defrost 

operation

on indicator 

light

 lter 

indicator

light

LED

Display

When you push the button to change operation modes, the unit will make a beep sound to indicate 
that it is changing modes.

CAUTION

Clean your unit occasionally to keep it looking new. Be sure to unplug the unit before 
cleaning to prevent shock or fire hazards.

NOTE

The appearance of the control panel may vary slightly by model.

COMFORT Button

Press to activate the comfort dehumidifying 
operation.

NOTE

When COMFORT function is turned on, set 
humidity level is automatic and cannot be 
changed manually.

NOTE

When CONTINUOUS function is turned on, 
set humidity level is automatic and cannot 
be changed manually.

FILTER Button

This feature is a reminder to clean the Air Filter 
for more efficient operation. The LED (light) 
will illuminate after 250 hours of fan motor 
operation. To reset after cleaning the filter, press 
the Filter button and the light will go off.

CONT (continuous) Button

Press to activate the continuous dehumidifying 
operation.

PLEIN

FULL

Summary of Contents for TDDP2012ES2C

Page 1: ...tices Before using this product please read this manual carefully and keep it for future reference change without prior notice for product improvement Consult with your dealer or the manufacturer for details m o c e l y t s e f i l a b i h s o t s u 9 1 0 2 1 0 B n o i s r e v Sa O In Ca Tr TDDP2012ES2C TDDP3512ES2C TDDP5012ES2C ...

Page 2: ...installing operating and maintaining this product User Manual CAUTION Safety Precautions 3 Operating Instructions 6 Installation Instructions 11 Care and Cleaning 12 Troubleshooting Tips 13 Contact an authorized service technician for repair or maintenance of this unit The unit is not intended for use by young children or persons with reduced physical sensory or mental capabilities without supervi...

Page 3: ...e room before operating the unit if there is a gas leak from other appliances Do not operate or stop the unit by inserting or pulling out the power cord plug It may cause electric shock Do not allow water to come into contact with any electric parts It may cause failure or electric shock Do not use the wall outlet if it is loose or damaged It may cause fire and electric shock Do not use or keep th...

Page 4: ... securely and take caution to avoid injuries to hand and fingers Clean filter once every two weeks If water enters the unit turn the unit off and disconnect the power contact a qualified service technician Do not place flower vases or other water containers on top of the unit Water may spill inside the unit causing insulation failure and electrical shock or fire If the unit is knocked over during ...

Page 5: ... a time delay fuse or circuit breaker have a qualified electrician install the proper receptacle Ensure the receptacle is accessible after the unit installation Do not use extension cords or an adapter plugs with this unit However if it is necessary to use an extension cord use an approved dehumidifier extension cord only available at most local hardware stores To avoid the possibility of personal...

Page 6: ...t Power cord buckle placed in the water bucket used only when storing the unit Installed as shown below Re ar Front Power cord buckle 1 pc Insert the power cord buckle into the unit Fig 1 Fig 2 NOTE All the pictures in this manual are for illustrative purposes only The actual shape of the unit you purchased may be slightly different but its operations and fuctions are similar OPERATING INSTRUCTION...

Page 7: ...re cleaning to prevent shock or fire hazards NOTE The appearance of the control panel may vary slightly by model COMFORT Button Press to activate the comfort dehumidifying operation NOTE When COMFORT function is turned on set humidity level is automatic and cannot be changed manually NOTE When CONTINUOUS function is turned on set humidity level is automatic and cannot be changed manually FILTER Bu...

Page 8: ...error Unplug the unit and plug it back in If error persists contact Customer Service P2 Bucket is full or bucket is not in right position Empty the bucket and replace it in the right position only available for the unit with no pump feature E3 Unit malfunction Unplug the unit and plug it back in If error persists contact Customer Service Eb Bucket is removed or not in right position Replace the bu...

Page 9: ...ndicates the Timer ON program is initiated Press it again the Timer OFF indicator light illuminates It indicates the Timer OFF is initiated Press or hold the and key buttons to change the Timer by 0 5 hour increments up to 10 hours then at 1 hour increments up to 24 hours The control will count down the time remaining until start The selected time will register in 5 seconds and the system will aut...

Page 10: ...side then insert the drain hose through the drain outlet of the unit and lead the drain hose to the floor drain or a suitable drainage facility See Fig 7 and Fig 8 When you remove the plastic cover if there is some water in the back drain outlet of the unit you must dry it Make sure the hose is secure so there are no leaks and the end of the hose is level or down to let the water flow Direct the h...

Page 11: ...ons only This dehumidifier should not be used for commercial or industrial applications Place the dehumidifier on a smooth level floor strong enough to support the unit with a full bucket of water Allow at least 8 inches of air space on all sides of the unit for air circulation at least 16 inches for air outlet This unit is designed to operate with a working environment between 5 C 41 F and 32 C 9...

Page 12: ...r brush to clean 2 Clean the bucket Every few weeks clean the bucket thoroughly to prevent growth of mold mildew and bacteria Partially fill the bucket with clean water and mild detergent Swish it around in the bucket empty and rinse 3 Clean the air filter To remove the filter pull filter outwards See Fig 10 Wash the filter with clean water then dry Re install the filter replace bucket 4 When not ...

Page 13: ... no curtains blinds or furniture blocking the front or back of the dehumidifier The humidity control may not be set low enough Check that all doors windows and other openings are securely closed Room temperature is too low below 41 F 5 C There is a water vapor source in the room The unit makes a loud noise when operating Air filter may be dirty Clean filter Refer to Care and Cleaning section The u...

Page 14: ......

Page 15: ... veuillez lire attentivement ce manuel et le conserver pour référence ultérieure La conception et les spécifications sont sujettes à modification sans préavis pour améliorer le produit Consultez votre revendeur ou le fabricant pour plus de détails us toshibalifestyle com MANUEL UTILISATEUR Déshumidificateur TDDP2012ES2C TDDP3512ES2C TDDP5012ES2C version B 01 2019 ...

Page 16: ...pour l installation l utilisation et la maintenance de ce produit Manuel Utilisateur AVERTISSEMENT Mesure de Sécurité 3 Instructions d Utilisation 6 Instructions d Installation 11 EntretienetNettoyage 12 Desconseilsdedépannage 13 Contactez un technicien de maintenance agréé pour la réparation ou l entretien de cet appareil L appareil n est pas destiné à être utilisé sans supervision par des jeunes...

Page 17: ... de faire fonctionner l appareil s il y a une fuite de gaz provenant d autres appareils Ne faites pas fonctionner ni n arrêtez l appareil en insérant ou en débranchant le cordon d alimentation Cela pourrait provoquer un choc électrique Ne laissez pas l eau entrer en contact avec des pièces électriques Cela pourrait provoquer une panne ou un choc électrique N utilisez pas la prise murale si elle es...

Page 18: ...lesser les mains et les doigts Nettoyez le filtre une fois toutes les deux semaines Si de l eau pénètre dans l appareil éteignez le et débranchez le contactez un technicien qualifié Neplacezpasdevasesàfleursoud autresréservoirsd eausurledessusdel appareil Del eaupourraitserépandreàl intérieurdel appareil provoquantunedéfaillancedel isolationetunchoc électriqueouunincendie Si l appareil est renvers...

Page 19: ...u protégée par un fusible temporisé ou un disjoncteur demandez à un électricien qualifié d installer la prise appropriée Assurez vous que le réceptacle est accessible après l installation de l appareil N utilisez pas de rallonges ni d adapteurs électriques avec cet appareil Cependant s il est nécessaire d utiliser une rallonge utilisez uniquement une rallonge approuvée déshumidificateur disponible...

Page 20: ...our stocker l appareil Installé comme indiqué ci dessous Arrière Devant Accessoires Boucle de cordon d alimentation 1 pièce Insérez la boucle du cordon d alimentation dans l appareil Illustration 1 Illustration 2 NOTE Toutes les images de ce manuel sont fournies à titre indicatif uniquement La forme réelle de l appareil que vous avez acheté peut être légèrement différente mais son fonctionnement e...

Page 21: ...appareil avant de le nettoyer pour éviter tout risque d électrocution ou d incendie NOTE L apparence du panneau de commande peut varier légèrement d un modèle à l autre Bouton CONFORT Appuyez sur pour activer la fonction de déshumidification confort NOTE Lorsque la fonction CONFORT est activée le niveau d humidité défini est automatique et ne peut pas être modifié manuellement NOTE Lorsque la fonc...

Page 22: ...l évaporateur Débranchez l appareil puis rebranchez le Si l erreur persiste contactez le service à la clientèle P2 Le seau est plein ou le seau n est pas dans la bonne position Videz le seau et remplacez le dans la bonne position Disponible uniquement pour l appareil sans fonction de pompe E3 Dysfonctionnement de l appareil Débranchez l appareil puis rebranchez le Si l erreur persiste contactez le...

Page 23: ...du seau de manière uniforme et retirez le de l appareil Illustration 5 Activer la Minuterie et éteindre la Minuterie Lorsque l appareil est en marche appuyez d abord sur la touche MINUTERIE l indicateur lumineux de la minuterie ARRÊT s allume Cela indique que le programme MINUTERIE ARRÊT est lancé Appuyez à nouveau dessus l indicateur lumineux s allume Il indique que la Minuterie EN MARCHE est lan...

Page 24: ...ge au siphon de sol ou à une installation de drainage appropriée Voir l illustration 7 et l illustration 8 Lorsque vous retirez le couvercle en plastique s il y a un peu d eau dans la sortie de drain arrière de l appareil vous devez le sécher Assurez vous que le tuyau est bien en place afin qu il n y ait pas de fuites et que son extrémité soit à niveau ou en bas pour permettre à l eau de s écouler...

Page 25: ...eur ne doit pas être utilisé pour des applications commerciales ou industrielles Placez le déshumidificateur sur un sol lisse et de niveau suffisamment solide pour supporter l unité avec un seau rempli d eau Laissez au moins 8 pouces d espace libre sur tous les côtés de l appareil pour permettre la circulation de l air au moins 16 pouces pour la sortie d air Illustration 9 Cette unité est conçu po...

Page 26: ... semaines nettoyez soigneusement le seau pour éviter la formation de moisissure de mildiou et de bactéries Remplissez partiellement le seau avec de l eau propre et un détergent doux Secouez l eau dans le seau autour vider et rincer 3 Nettoyez le filtre à air Pour retirer le filtre tirez le filtre vers l extérieur voir illustration 10 Lavez le filtre à l eau claire puis séchez le Réinstallez le fil...

Page 27: ...arrière du déshumidificateur Le contrôle de l humidité peut ne pas être réglé suffisamment bas Vérifiez que toutes les portes fenêtres et autres ouvertures sont bien fermées La température ambiante est trop basse en dessous de 41 F 5 C Il y a une source de vapeur d eau dans la pièce L unité fait un bruit fort lors du fonctionnement Le filtre à air est peut être sale Nettoyer le filtre Reportez vou...

Page 28: ......

Reviews: