background image

1-14

Before Operation (Continued)

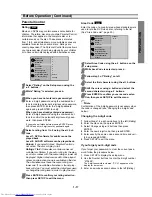
Initial Settings

You can set your own Personal Preferences on the
player.

Initial Settings General Operation

11

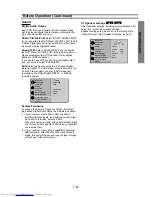
Press SETUP.
The setup menu appears.

22

Press 

v

/

V

to select the desired item.

The screen will show the current setting for the
selected item, as well as alternate setting(s).

33

While the desired item is selected, press 

B

, then

v

/

V

to select the desired setting.

44

Press ENTER to confirm your selection.
Some items require additional steps.

55

Press SETUP, RETURN, or PLAY to exit the
setup menu.

Language

Disc Language 

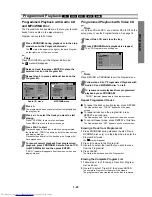
Select a language for the disc’s Menu, Audio, and Subtitle.

Original : The original language set for the disc is selected.
Other : To select another language, press number buttons to
enter the corresponding 4-digit number according to the lan-
guage code list on page 29. If you enter the wrong language
code, press CLEAR.

Menu Language

Select a language for the setup menu. This is the menu
you see when you press SETUP.

Picture

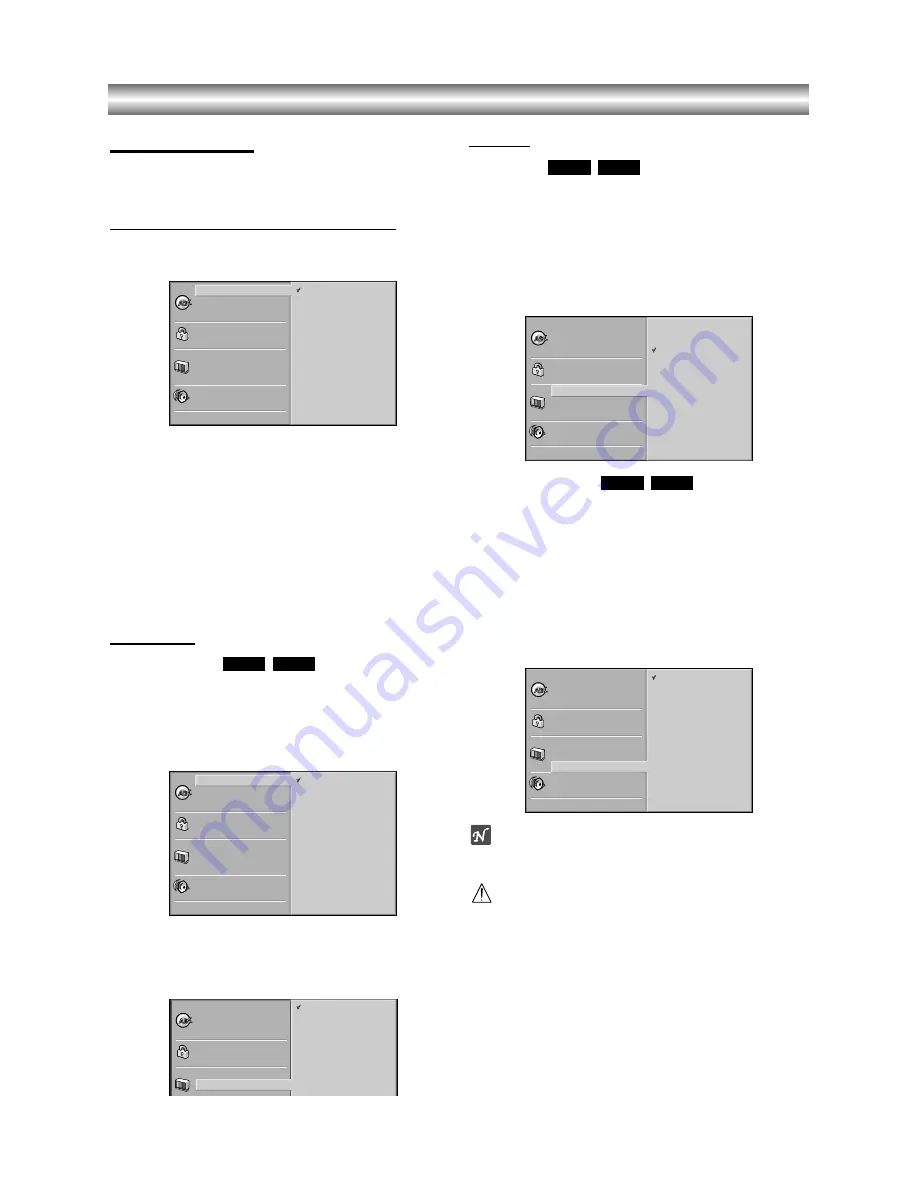
TV Aspect 

4:3 Letterbox: Select when a standard 4:3 TV is con-
nected. Displays theatrical images with masking bars
above and below the picture.
4:3 Panscan: Select when a conventional TV set is
connected. The video material formatted in the Pan &
Scan style is played back in that style (Both sides of the
picture are cut off).
16:9 Wide: Select when a 16:9 wide TV is connected.

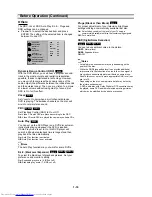
Progressive Scan 

Progressive Scan Video provides the highest quality
pictures with less flickering.
If you are using the COMPONENT VIDEO OUT/
PROGRESSIVE SCAN jacks, but are connecting the
DVD Player to a standard (analog) television, set
Progressive Scan to Off.
If you are using the Component Video jacks for 
connection to a TV or monitor that is compatible with a
progressive scan signal, set Progressive Scan to On.

Note

Progressive Scan will not be displayed in the setup menu
when the rear switch is set at SCART position.

Caution

Once the setting for progressive scan output is entered,
an image will only be visible on a progressive scan
compatible TV or monitor. If you set Progressive Scan
to On in error, you must reset the unit.  
1) Remove any disc from the unit and close the disc

tray. See that “no disc” is displayed on the display
window.

2) Press STOP and hold it for five seconds before

releasing it. The video output will be restored to the
standard setting and a picture will once again be 
visible on a conventional analog TV or monitor.

DVD-A

DVD-V

DVD-A

DVD-V

DVD-A

DVD-V

Disc Subtitle

Disc Menu

Rating

Area Code

TV Aspect

Menu Language

Progre

ive Sc n

Disc Audio

English

Spanish

French

Italian

German

Portuguese

Disc Subtitle

Disc Menu

Rating

Area Code

TV Aspect

Menu Language

Progressive Scan

Digital Audio Output

5.1 Speaker Setup

Others

Disc Audio

4:3 

4:3 

16:9 

Letterbox

Panscan

Wide

Disc Subtitle

Disc Menu

Rating

Area Code

TV Aspect

Menu Language

Progressive Scan

Digital Audio Output

5.1 Speaker Setup

Others

Disc Audio

Original

Spanish

English

Chinese

Polish

Hungarian

French

German

Italian

Other  — — — —

Disc Subtitle

Disc Menu

Rating

Area Code

TV Aspect

Menu Language

Progressive Scan

Digital Audio Output

5.1 Speaker Setup

Others

Disc Audio

Off

On

Disc Subtitle

Disc Menu

Rating

Area Code

TV Aspect

Menu Language

Progressive Scan

Digital Audio Output

5.1 Speaker Setup

Others

Disc Audio

Original

Spanish

English

Chinese

Polish

Hungarian

French

German

Italian

Other  — — — —

Summary of Contents for SD-530ESE

Page 1: ...DEL SD 530ESE Before connecting operating or adjusting this product please read this instruction booklet carefully and completely S SS S u uu u rr rr rr rr o oo o u uu u n nn n d dd d S SS S o oo o u uu u n nn n d dd d 3 33 3 D D D D ...

Page 2: ...equipment to be exposed to dripping or splashing or objects filled with liquids such as vases to be placed on the equipment DON T place hot objects or naked flame sources such as lighted candles or nightlights on or close to equipment High temperatures can melt plastic and lead to fires DON T use makeshift stands and NEVER fix legs with wood screws to ensure complete safe ty always fit the manufac...

Page 3: ...nging the Audio Channel 20 z Subtitles 20 DVD Audio Discs 21 z Moving to another GROUP 21 z Viewing another PAGE 21 Operation with Audio CD and MP3 WMA Disc 22 23 Playing an Audio CD and MP3 WMA Disc 22 Notes on MP3 WMA Recordings 22 z Pause 23 z Moving to another Track 23 z Repeat Track All Off 23 z Search 23 z Random 23 z Repeat A B 23 z Selecting the sound enhancement 23 z Changing the Audio Ch...

Page 4: ...s prohibited by area limits Disc related terms Title DVD video discs only The main film content or accompanying feature content or additional feature content or music album Each title is assigned a title reference number enabling you to locate it easily Group DVD audio discs only The main audio content or accompanying feature content or additional feature content or music album Each group is assig...

Page 5: ...s depends on the operating environment For details please contact your nearest dealer Notes on Discs Handling discs Do not touch the playback side of the disc Hold the disc by the edges so that fingerprints will not get on the surface Do not stick paper or tape on the disc Storing discs After playing store the disc in its case Do not expose the disc to direct sunlight or sources of heat or leave i...

Page 6: ...Tray Insert a disc here ON STANDBY 1 Switches the player ON and OFF TITLE MP3 VCD CD PROG RANDOM ALL A B CHP TRK A DVD Indicates current player function Playback Pause etc ANGLE active DVD video disc inserted DVD audio disc inserted CD Audio CD inserted VCD Video CD inserted MP3 MP3 or WMA disc inserted A DVD DVD TITLE Indicates current title number CHP TRK Indicates current chapter or track numbe...

Page 7: ...back REV Reverse m Search backward FWD Forward M Search forward Reverse SLOW t Reverse slow playback Forward SLOW T Forward slow playback STOP x Stops playback Forward SKIP Advances to next chapter or track Reverse SKIP Returns to beginning of current chapter or track or press twice in quick successions to go to previous chapter or track ON STANDBY Switches DVD Player ON and OFF E A M Selects soun...

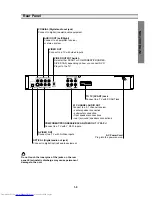
Page 8: ...reo system VIDEO OUT Connect to a TV with video inputs AC Power Cord Plug into the power source S VIDEO OUT Connect to a TV with S Video inputs COMPONENT PROGRESSIVE SCAN VIDEO OUT Y Pb Pr Connect to a TV with Y Pb Pr inputs 5 1 CHANNEL AUDIO OUT Connect to a 5 1 channel receiver center speaker connection subwoofer connection front speakers connections rear surround speakers connections VIDEO OUTP...

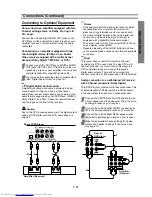
Page 9: ... using the audio cables Component Video ColorStream connection Best 1 1 Connect the COMPONENT VIDEO OUT PROGRESSIVE SCAN jacks on the DVD Player to the corresponding in jacks on the TV using the Y Pb Pr cable C 2 Connect the Left and Right AUDIO OUT jacks of the DVD Player to the audio left right in jacks on the TV A using the audio cables SCART connection Connect the TO TV scart jack on the DVD P...

Page 10: ...distorted sound or no sound at all Six Channel Digital Surround Sound via digital con nection can only be obtained if your receiver is equipped with a Digital Multi channel decoder To see the audio format of the current DVD in the on screen display press AUDIO Repeated pressing of the AUDIO button may allow you to select between various audio formats available on the disc Note This player does not...

Page 11: ... from this point Action prohibited or not available Notes z Some discs may not provide all of the features on the on screen display example shown below z If no button is pressed for 10 seconds the on screen display disappears OFF A B ALL TRACK GROUP CHAPT TITLE Items Title Number Chapter Number Time search Audio language and Digital Audio Output mode Subtitle language Angle Sound Function Press v ...

Page 12: ...e Subtitle language Page or Angle Function Press 3 3 4 4 to select desired item Shows the current group number and total number of groups and skips to the desired group number Shows the current track number and total number of tracks and skips to the desired track number Shows the elapsed playing time Display only Shows the current encoding method and channel number and changes the setting Shows t...

Page 13: ...alog television set Progressive Scan to Off If you are using the Component Video jacks for connection to a TV or monitor that is compatible with a progressive scan signal set Progressive Scan to On Note Progressive Scan will not be displayed in the setup menu when the rear switch is set at SCART position Caution Once the setting for progressive scan output is entered an image will only be visible ...

Page 14: ...l Audio Output as indicated as above 1 If your receiver or amplifier is NOT capable of handling 96KHz signals loud buzzing sounds might be heard In this case select 48 KHz When this choice is made this unit will automatically convert any 96KHz signals to 48KHz so your system can decode them 2 If your receiver or amplifier is capable of handling 96KHz signals select 96KHz When this choice is made t...

Page 15: ...on may not work for some DVDs B L E Black Level Expansion To select the black level of playback pictures Set your preference and monitor s ability On Expanded grey scale 0 IRE cut off Off Standard grey scale 7 5 IRE cut off Pluge Blacker than Black For proper adjustment of your television brightness settings utilizing a commercially available test disc On Select when you adjust the level of your T...

Page 16: ...r a lower one If no suitable alternative is found play back will stop You must enter the 4 digit password or change the rating level in order to play the disc 5 5 Press ENTER to confirm your rating selection then press SETUP to exit the menu Area Code Enter the code of a country area whose standards were used to rate the DVD video disc referring to the list See Area Code List page 30 1 1 Select Ar...

Page 17: ...om your player The region code for this player is 2 two General Features Note Unless stated otherwise all operations described use the remote control Some features may also be available on the Setup menu Moving to another TITLE GROUP When a disc has more than one title group you can move to another title group as follows z z Press DISPLAY then press the appropriate num bered button 0 9 to select a...

Page 18: ...e TV screen 2 To repeat the title currently playing press REPEAT a second time The Repeat Title icon appears on the TV screen 3 To exit Repeat mode press REPEAT a third time The Repeat Off icon appears on the TV screen DVD Audio Discs Repeat Track Group Off 1 To repeat the currently playing track press REPEAT The Repeat Track icon appears on the TV screen 2 To repeat the group currently playing pr...

Page 19: ...cene 4 To remove the MARKER SEARCH menu press SEARCH To clear a Marked Scene 1 During disc playback press SEARCH The MARKER SEARCH menu will appear on the screen 2 Press b B to select the Marker number that you want to erase 3 Press CLEAR The Marker number will be erased from the list 4 Repeat steps 2 and 3 to erase additional Marker numbers 5 To remove the MARKER SEARCH menu press SEARCH Special ...

Page 20: ...quality sound even though you re playing a DVD Audio disc and might not have surround effect Moving to another GROUP Some DVD Audio discs divide content into different groups Your player enables you to quickly access different groups during playback via the on screen display 1 Press DISPLAY during playback or in stop mode 2 Press 3 4 to select Group icon 3 Press 1 2 or the numbered buttons 0 9 to ...

Page 21: ... 05 44 1kHz WMA 2 Bit rate within 32 320kbps MP3 32 128kbps WMA 3 CD R physical format should be ISO 9660 4 If you record MP3 WMA files using the software which cannot create a FILE SYSTEM for example Direct CD etc it is impossible to playback MP3 WMA files We recommend that you use Easy CD Creator which creates an ISO9660 file system 5 A single session disc requires MP3 WMA files in the first tra...

Page 22: ...SEARCH mode press PLAY Random 1 Press RANDOM during playback or when playback is stopped The unit automatically begins Random Playback and RANDOM or RAND appears on the display window and menu screen 2 To return to normal playback press RANDOM repeat edly until RANDOM or RAND disappears on the display window and menu screen Repeat A B To repeat a sequence 1 During disc playback press A B RPT at yo...

Page 23: ...he previous file Still Picture 1 Press PAUSE STEP during slide show The player will now go into PAUSE mode 2 To return to the slide show press PLAY or press PAUSE STEP again To flip the picture Press v V during showing a picture to flip the picture horizontally or a vertically To rotate picture Press b B during showing a picture to rotate the picture clockwise or counter clockwise Notes on JPEG Re...

Page 24: ...Press PROGRAM while playback is stopped The VCD Program menu will appear Note Press RETURN or PROGRAM to exit the Program menu 3 3 Follow steps 2 6 of Programmed Playback with Audio CD and MP3 WMA disc on left 4 4 To resume normal playback from programmed playback press PROGRAM PROG indicator disappears in the display window Repeat Programmed Tracks z z To repeat the track currently playing press ...

Page 25: ...V Video Mode Setting z z With certain discs the playback picture may be flick ering or Dot Crawl is shown on straight lines That means Vertical interpolation or De interlace is not perfectly matched with the disc In this case the picture quality may be improved by changing the video mode z z To change the video mode press and hold DISPLAY about 3 seconds during disc playback The new video mode num...

Page 26: ...ge for Front speaker L R z z When you do not have a certain speaker connected select None z z Front L R speaker s size can be set to Large or Small z z If Front L R speaker s size is set to Small Rear and Center speaker s size can be set only to Small or None Subwoofer s size can be set only to Large z z Subwoofer s size can be set only to Large or None Distance If you connected speakers to your D...

Page 27: ...Plug the power cord into the wall outlet securely z Insert a disc Check that the DVD or audio CD indicator in the display window is lit z Select the appropriate video input mode on the TV so the picture from the DVD player appears on the TV screen z Connect the video cable securely z Turn on the TV z Set Progressive Scan to Off see page 14 z Select the correct input mode of the audio receiver so y...

Page 28: ...nterlingua 7165 Irish 7384 Italian 7465 Japanese 7487 Javanese 7578 Kannada 7583 Kashmiri 7575 Kazakh 7589 Kirghiz 7579 Korean 7585 Kurdish 7679 Laothian 7665 Latin 7686 Latvian Lettish Code Language 7678 Lingala 7684 Lithuanian 7775 Macedonian 7771 Malagasy 7783 Malay 7776 Malayalam 7784 Maltese 7773 Maori 7782 Marathi 7779 Moldavian 7778 Mongolian 7865 Nauru 7869 Nepali 7879 Norwegian 7982 Oriya...

Page 29: ...n Islands KZ Kazakhstan LA Laos LB Lebanon Code Area LC Saint Lucia LI Liechtenstein LK Sri Lanka LR Liberia LS Lesotho LT Lithuania LU Luxembourg LV Latvia LY Libya MA Morocco MC Monaco MD Moldavia MG Madagascar MH Marshall Islands MK Macedonia ML Mali MM Myanmar MN Mongolia MO Macau MP Northern Mariana Islands MQ Martinique French MR Mauritania MS Montserrat MT Malta MU Mauritius MV Maldives MW ...

Page 30: ...egative sync RCA jack x 1 SCART AV S VIDEO OUT Y 1 0 V p p 75 Ω negative sync Mini DIN 4 pin x 1 C 0 3 V p p 75 Ω COMPONENT VIDEO OUT Y 1 0 V p p 75 Ω negative sync RCA jack x 1 Pb Pr 0 7 V p p 75 Ω RCA jack x 2 Audio output digital audio 0 5 V p p 75 Ω RCA jack x 1 Audio output optical audio 5 V p p 75 Ω Optical connector x 1 Audio output analog audio 2 0 Vrms 1 KHz 0 dB 600 Ω RCA jack L R x 1 SC...

Reviews: