

8
Tuning the television for the first time
Before switching on the television put your decoder and media recorder to
Standby
if they are connected
and ensure the aerial is connected. To set up the television use the buttons on the remote control as detailed
on page 5.
8
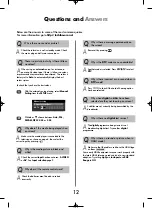
Press
z
or
x
to view the
DTV
(digital channels)
or
ATV
(analogue channels) lists.
9
Use
e
or
f
to move through the list to select a
channel then press
EXIT
to view.
In
ATV
mode some areas may receive duplicate
stations. There may not be a clear picture or the
signal may be weak, so the station order can be
changed using
ATV Manual Tuning
.
NOTE:
The time will be set automatically by
transmission but can be advanced or decreased
by up to 3 hours using
Local Time Settings
in
the
DTV Settings
screen.
When the search is complete the television will
automatically select position one.
The
Auto Tuning
screen will display the total
number of services found.
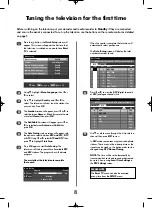
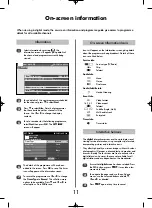
1
2
3
4
5
6
7
Press the
i
button, the
Quick Setup
screen will
appear. This screen will appear the first time that
the television is switched on and each time
Reset
TV
is selected.
Using
e
highlight
Menu Language
, then
z
or
x
to select.
Press
e
to highlight
Country
and
z
or
x
to
select. The television will now tune the stations for
your country. Press
OK
.
The
Location
screen will appear, press
z
or
x
to
select between
Home
or
Store
(for normal home
use select
Home
) then press
OK
.
The
Ant/Cable In
screen will appear, press
z
or
x
to select between
Antenna
or
Cable
then
press
OK
.
The
Auto Tuning
start up screen will appear with
the option to select between
DTV and ATV
,
DTV
or
ATV
. Using
z
or
x
select
ATV and DTV
then
press
e
to highlight
Start Scan
.
Press
OK
again to start
Auto Tuning
. The
television will start to search for all available
DTV
and
ATV
stations. The progress bar will indicate
progress.
You must allow the television to complete
the search.
PLEASE NOTE
The
Reset TV
menu can also be accessed
at any time from the
SETUP
menu.
Edit OK Location EXIT Watch TV
Quick Setup
Menu Language
English
Country
United Kingdom
Primary Subtitle Language
English
Secondary Subtitle Language
English
Primary Audio Language
English
Secondary Audio Language
English
Auto Tuning
Progress Found
DTV tune 75% 80
ATV tune
Waiting...
Channel: C58
Auto Tuning
DTV Services Found: 90 ATV Services Found: 4
DTV ATV
Type
Pos.
Name
CH
1
BBC ONE
34
2
BBC TWO
34
3
ITV1
31
4
Channel 4
31
5
Five
48
6
ITV2
31
7
BBC THREE
34
Auto Tuning
DTV Services Found: 90 ATV Services Found: 4
DTV ATV
Pos.
Name
CH
0
VCR
C60
1
BBC ONE
C22
2
BBC TWO
C28
3
ITV
C25
4
CH4
C32
5
S1
7
C69
Q
p
g


