– 13 –
Concealed Duct High Static Pressure
Installation Manual
6
DRAIN PIPING WORK
CAUTION
Following the Installation Manual, perform the drain piping work that water is properly drained, and
apply a heat insulation not to cause a dew condensation.
Inappropriate piping work may cause the water leakage in the room and wet of furniture.
REQUIREMENT
• The drain piping flows the natural drainage. Make sure to set the drain piping from the unit with
descending slope of 1/50 to 1/100 and do not make up-down and trap in the midway.
• To prevent overflow of the drain, be sure to drop the drain pipe directly below after the supplied flexible
hose had been connected to the indoor unit. When drain pipe is installed to make ascending slope or
right beside, this may cause water leakage according to trapping the drain water in the drain pan and
the overflow or undraine may occur.
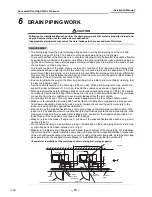
• To prevent overflow of the drain, make sure to set in 1 location of the drain trap in the midway of the
drain pipe as shown in right figure (As the drain trap is required to prevent the absorption of the bad
smell through the drain piping, so it is required to prevent difficult to drainage according to differential
pressure may increase between the drain pan port and the room air when the external static pressure
(especially in the air inlet side) becomes to high.)
• Be sure to institute the plug on the drain trap portion which is able to structure of easy cleaning, that
is easy to stockpile of dust.
• Set the horizontal pulling of the drain pipe to 20m or less. When drain piping is too long, attach the
support bracket at intervals of 1.5m to 2m to avoid the undulance as shown in figure below.
• Main piping flows the natural drainage. Make sure to make descending slope of 1/50 to 1/100 and do
not make up-down bend and trap in the midway. Also, be sure to connect with adhesive the drain pipe
connection from the air conditioner to avoid water leakage from the joint portion.
• Do not apply the air vent. This may cause water leakage according to overflow of drain water.
• Make sure to insulate the all piping with heat insulation including drain pipe and main pipe prevent
from dew condensation. Especially, make sure to insulate the connecting portion securely to the
indoor unit using with the supplied heat insulation.
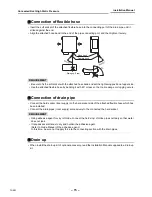
• Be sure to use the supplied flexible hose not to give stress on the drain pipe connection port of the
indoor unit. Pay attention when connecting the rigid vinyl chloride pipe to the drain pipe directly, drain
pipe gives stress and it may cause water leakage. Also, caution for that forgetting about tighten or
loosen fixing of the hose band may cause water leakage.
• Make sure to set the break off angle to 45° or below of the supplied flexible hose even as up, down,
right and left of it.
• Do not install the rising up, guard frame piping or double trap on the drain piping after the drain trap
or drain trap parts had been installed on it. (Fig.1)
• Make sure to install the drain trap parts with respect to each system of the main piping. For installation
the unit such as the hospital, install the every one unit to prevent the in-hospital infection or prevention
of the air backflow with respect to each one unit. For using of the drain trap parts, install the drain trap
parts according to the supplied Owners Manual or Installation Manual that is purchased it.
380
1.5
m~
2
m
1/50
~
1/100
380
check panel
Ceiling
Check port
Plug (Check,
cleaning port)
Drain trap
Check port
Plug (Check,
cleaning port)
Main drain
piping
10
0 or
m
or
e
50
or
mo
re
100
or
m
or
e
50
or
mo
re
check panel
<Example for installation of the drain trap and main piping (Incl. piping support)>
(Unit:mm)
13-EN


