background image

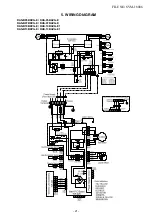
RAS-

B

05BKVG-

E


/


RAS-05BAVG-E 

RAS-

B

07BKVG-

E


/


RAS-07BAVG-E  

RAS-

B

10BKVG-

E


/


RAS-10BAVG-E

1


RAS-

B

1

3

BKVG-

E

 / RAS-1

3

BAVG-E

1


5. WIRING DIAGRAM

FILE NO. SVM-18006

- 21 -

Summary of Contents for RAS-B05BKVG-E

Page 1: ...vised on January 2019 R32 SPLIT TYPE Indoor Unit RAS B05BKVG E RAS B07BKVG E RAS B10BKVG E RAS B13BKVG E RAS B16BKVG E Outdoor Unit RAS 05BAVG E RAS 07BAVG E RAS 10BAVG E1 RAS 13BAVG E1 RAS 16BAVG E FILE NO SVM 18006 2 ...

Page 2: ... WIRING DIAGRAM 21 6 SPECIFICATIONS OF ELECTRICAL PARTS 23 7 REFRIGERANT CYCLE DIAGRAM 24 8 CONTROL BLOCK DIAGRAM 28 9 OPERATION DESCRIPTION 31 10 INSTALLATION PROCEDURE 55 11 HOW TO DIAGNOSE THE TROUBLE 71 12 HOW TO REPLACE THE MAIN PARTS 98 13 EXPLODED VIEWS AND PARTS LIST 118 FILE NO SVM 18006 2 ...

Page 3: ... prevent mixing of refrigerant or refrigerating machine oil the sizes of connecting sections of charging port on main unit and installation tools are different from those used for the conventional refrigerant units Accordingly special tools are required for the new refrigerant R32 units For connecting pipes use new and clean piping materials with high pressure fittings made for R32 only so that wa...

Page 4: ... THE REFRIGERANT THE GAS PRESSURE IN THE REFRIGERATION CIRCUIT WILL BECOME ABNORMALLY HIGH AND IT MAY RESULT IN THE PIPE BURSTING AND POSSIBLE PER SONNEL INJURIES IN THE EVENT THAT THE REFRIGERANT GAS LEAKS OUT OF THE PIPE DURING THE SERVICE WORK AND THE INSTALLATION WORK IMMEDIATELY LET FRESH AIR INTO THE ROOM IF THE REFRIGERANT GAS IS HEATED SUCH AS BY FIRE GENERATION OF POISONOUS GAS MAY RESULT...

Page 5: ... a room with a floor area large than Amin m2 How to get Amin m2 Amin M 2 5 x 0 22759 x h0 2 M is the refrigerant charge amount in appliance in kg h0 is the installation height of the appliance in m 0 6 m for floor standing 1 8m for wall mounted 1 0 m for window mounted 2 2 m for ceiling mounted Comply with national gas regulations CAUTION Exposure of unit to water or other moisture before installa...

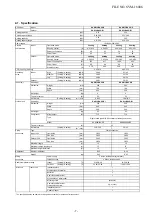
Page 6: ...AVG E RAS 07BAVG E Dimension Height mm 530 530 Width mm 660 660 Depth mm 240 240 Net weight kg 21 21 Compressor Motor output W 500 500 Type Model NX66F0F 20D Fan motor output W 43 Air flow rate Cooling Heating m3 min 29 30 29 30 Piping Type Flare connection connection Indoor unit Liquid side mm 6 35 6 35 Gas side mm 9 52 9 52 Outdoor unit Liquid side mm 6 35 6 35 Gas side mm 9 52 9 52 Maximum leng...

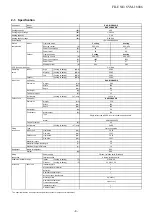
Page 7: ...S 13BAVG E1 Dimension Height mm 530 530 Width mm 660 660 Depth mm 240 240 Net weight kg 23 23 Compressor Motor output W 712 712 Type Model KSK89D53UEZ Fan motor output W 43 Air flow rate Cooling Heating m3 min 32 0 32 0 33 33 Piping Type Flare connection connection Indoor unit Liquid side mm 6 35 6 35 Gas side mm 9 52 9 52 Outdoor unit Liquid side mm 6 35 6 35 Gas side mm 9 52 9 52 Maximum length ...

Page 8: ...pth mm 290 Net weight kg 34 Compressor Motor output W 750 Type Model KSN108D22UFZ Fan motor output W 43 Air flow rate Cooling Heating m3 min 34 36 Piping Type Flare connection connection Indoor unit Liquid side mm 6 35 Gas side mm 12 7 Outdoor unit Liquid side mm 6 35 Gas side mm 12 7 Maximum length m 20 Maximum charge less length m 15 Maximum height difference m 12 Refrigerant Name of refrigerant...

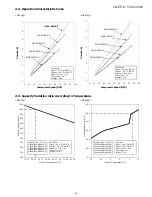
Page 9: ...0 0 120 0 15 10 5 0 5 10 Heating Capacity ratio Outside Temperature ºC 50 0 55 0 60 0 65 0 70 0 75 0 80 0 85 0 90 0 95 0 100 0 105 0 32 33 34 35 36 37 38 39 40 41 42 43 44 45 46 Cooling Capacity ratio Outside Temperature oC Conditions Indoor DB 27oC WB 19oC Outdoor DB 35oC WB 24oC Indoor Air Flow High Pipe Length 5m Voltage 230V Capacity ratio 100 1 50kW RAS B05BKVG E 2 00kW RAS B07BKVG E 2 50kW R...

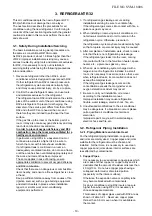
Page 10: ...ces where installation repairs or similar work on air conditioning equipment is performed 3 If a refrigeration gas leakage occurs during installation servicing be sure to ventilate fully If the refrigerant gas comes into contact with fire a poisonous gas may occur 4 When installing or removing an air conditioner do not allow air moisture dust or oil to remain in the refrigeration cycle Otherwise p...

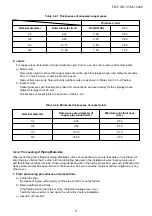
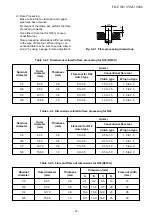
Page 11: ...t joints Nominal diameter 1 4 3 8 1 2 5 8 Reference outer diameter of copper pipe jointed mm 6 35 9 52 12 70 15 88 Minimum joint thickness mm 0 50 0 60 0 70 0 80 3 2 2 Processing of Piping Materials When performing the refrigerant piping installation care should be taken to ensure that water or dust does not enter the pipe interior that no other oil than lubricating oils used in the installed air ...

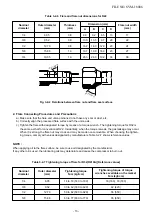
Page 12: ... 5 0 to 0 5 0 to 0 5 0 to 0 5 Conventional flare tool Clutch type Wing nut type 1 0 to 1 5 1 5 to 2 0 1 0 to 1 5 1 5 to 2 0 1 0 to 1 5 2 0 to 2 5 1 0 to 1 5 2 0 to 2 5 Table 3 2 4 Dimensions related to flare processing for R22 Nominal diameter 1 4 3 8 1 2 5 8 Outer diameter mm 6 35 9 52 12 70 15 88 Thickness mm 0 8 0 8 0 8 1 0 A mm Flare tool for R22 clutch type 0 to 0 5 0 to 0 5 0 to 0 5 0 to 0 5...

Page 13: ...ue for R32 is the same as that for conventional R22 Incidentally when the torque is weak the gas leakage may occur When it is strong the flare nut may crack and may be made non removable When choosing the tighten ing torque comply with values designated by manufacturers Table 3 2 7 shows reference values NOTE When applying oil to the flare surface be sure to use oil designated by the manufacturer ...

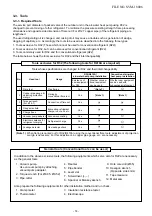
Page 14: ...rge hose Vacuum pump adapter Electronic balance for refrigerant charging Leakage detector Usage Pipe flaring Flaring by conventional flare tool Connection of flare nut Evacuating refrigerant charge run check etc Vacuum evacuating Refrigerant charge Gas leakage check R32 R410A air water heat pump installation Existence of new equipment for R32 Yes Yes Yes Yes Yes Yes Yes Whether conven tional equip...

Page 15: ...e connecting port of the electronic balance and charge liquid refrigerant Indoor unit Outdoor unit Opened Opened Refrigerant cylinder with siphon Check valve Open close valve for charging Electronic balance for refrigerant charging Opened Closed Service port 3 4 Recharging of Refrigerant When it is necessary to recharge refrigerant charge the specified amount of new refrigerant according to the fo...

Page 16: ...hor bronze brazing filler is generally used to join copper or copper alloy 3 Low temperature brazing filler Low temperature brazing filler is generally called solder and is an alloy of tin and lead Since it is weak in adhesive strength do not use it for refrigerant pipes 1 Phosphor bronze brazing filler tends to react with sulfur and produce a fragile compound water solution which may cause a gas ...

Page 17: ...ux which does not contain chlorine 3 When adding water to the flux use water which does not contain chlorine e g distilled water or ion exchange water 4 Remove the flux after brazing 3 5 3 Brazing As brazing work requires sophisticated techniques experiences based upon a theoretical knowledge it must be performed by a person qualified In order to prevent the oxide film from occurring in the pipe i...

Page 18: ...40 131 120 24 Installation plate hanger Drain hose 0 4m Installation plate hanger Connecting pipe 0 35m Flare 9 52mm for 05 07 10 and 13 series Flare 12 70 mm for 16 series Connecting pipe 0 40m Flare 6 35mm 510 40 298 94 94 135 170 170 135 40 144 144 170 170 192 192 Installation plate outline Center line Hanger Hanger Hanger Outline of indoor unit 65 65 64 5 73 5 110 58 17 5 Wireless remote contr...

Page 19: ...4 2 Outdoor Unit RAS 05 07BAVG E RAS 10 13BAVG E1 C L C L 280 400 Unit mm FILE NO SVM 18006 19 ...

Page 20: ...ng Front leg FAN GUARD COVER PV Liquid side Flare 6 35 Ø Flare 12 7 Gas side Service port Installation dimension Air outlel 100 or more 100 or more 600 or more 600 or more Air intlel Ø Ø Ø Ø6 hole 86 Ø6 hole Ø11x14 hole R15 28 A 320 R5 5 36 108 125 50 137 92 5 4 600 320 90 600 90 275 290 550 Ø 436 Z R15 50 36 2 320 342 69 Unit mm FILE NO SVM 18006 20 ...

Page 21: ...RAS B05BKVG E RAS 05BAVG E RAS B07BKVG E RAS 07BAVG E RAS B10BKVG E RAS 10BAVG E1 RAS B13BKVG E RAS 13BAVG E1 5 WIRING DIAGRAM FILE NO SVM 18006 21 ...

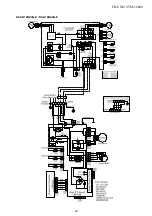
Page 22: ...RAS B16BKVG E RAS 16BAVG E FILE NO SVM 18006 22 ...

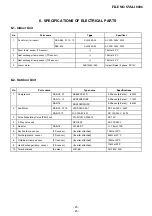
Page 23: ...r attached 62kΩ at 20 C 8 Outside air temp sensor TO sensor Inverter attached 9 Heat Exchanger temp sensor TE sensor Inverter attached 10kΩ at 25 C 10 Terminal block 5 poles JXO 5B AC 250V 20A Parts name 10kΩ at 25 C No Type ype Specificat 1 Fan Motor for indoor RAS B05 07 10 13 SJM 240 25 AC 220 240V 25W RAS B16 SJM 240 35 AC 220 240V 35W 2 Room temp sensor TA sensor 10kΩ at 25 C 3 Heat exchanger...

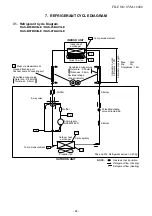
Page 24: ...kness 0 8mm Sectional shape of heat insulator Allowable height difference 12m Allowable pipe length P Pressure measurement Gauge attaching port Vacuum pump connecting port Pulse Modulating valve at liquid side TD 4 way valve Compressor NX66F0F 20D TS T2 Outdoor heat exchanger Temp measurement Propeller fan OUTDOOR UNIT Muffler Muffler Min 2m Chargeless 15m Strainer Max 15m Split capillary TE RAS B...

Page 25: ...hape of heat insulator Allowable height difference 12m Allowable pipe length P Pressure measurement Gauge attaching port Vacuum pump connecting port Pulse Modulating valve at liquid side TD 4 way valve Compressor KSK89D53UEZ TS T2 Outdoor heat exchanger Temp measurement Propeller fan OUTDOOR UNIT Muffler Muffler TE TC TA Min 2m Chargeless 15m TO Strainer RAS B10BKVG E RAS 10BAVG E1 RAS B13BKVG E R...

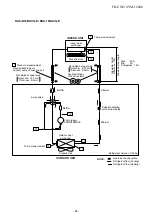
Page 26: ...erence 12m Allowable pipe length P Pressure measurement Gauge attaching port Vacuum pump connecting port Deoxidized copper pipe Outer dia 12 7mm Thickness 0 8mm Pulse Modulating valve at liquid side TD 4 way valve Compressor KSN108D22UFZ TS T2 Outdoor heat exchanger Temp measurement Propeller fan OUTDOOR UNIT Muffler Muffler TE TC TA Max 20m Min 2m Chargeless 15m TO Strainer RAS B16BKVG E RAS 16BA...

Page 27: ... 1 1 to 1 3 11 to 13 59 to 51 High High 52 condition C Tempeature Heat exchanger pipe temp Model name Standard Indoor Outdoor Compressor RAS pressure fan mode fan mode revolution Indoor Outdoor P MPa T1 C T2 C rps 20 7 6 2 1 to 2 2 34 to 36 1 to 2 High High 51 2 1 to 2 4 35 to 40 0 to 1 High High 65 2 4 to 2 6 40 to 42 0 to 1 High High 68 condition C Tempeature Heat exchanger pipe temp B05BKVG E B...

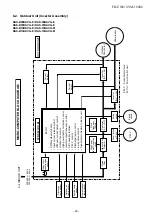
Page 28: ...l Processing Temperature Processing Timer LED brightness dim Serial Signal Communication Functions M C U Indoor Unit Control Panel Power Supply Remote Control Heat Exchanger Sensor Temperature Sensor Infrared Rays Signal Receiver Infrared Rays Initiallizing Circuit Clock Frequency Oscillator Circuit Louver Motor 36 7KHz Power Supply Circuit Noise Filter Indoor Fan Motor Timer Display Operation Dis...

Page 29: ...e control IPM over current detect control Outdoor fan control High power factor correction control Inverter output frequency control A D converter function P M V control Discharge temp control 4 way valve control Signal communication to indoor unit P M V Pulse Motor Valve M C U Micro Control Unit M C U For INDOOR UNIT 4 way valve P M V Inverter DC AC Inverter DC AC Outdoor Fan motor Compressor WP ...

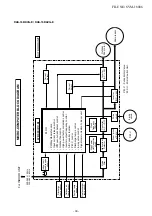
Page 30: ...tion Input current release control IPM over current detect control Outdoor fan control High power factor correction control Inverter output frequency control A D converter function P M V control Discharge temp control 4 way valve control Signal communication to indoor unit P M V Pulse Motor Valve M C U Micro Control Unit M C U For INDOOR UNIT 4 way valve P M V Inverter DC AC Inverter DC AC Outdoor...

Page 31: ...tion command signal Serial signal from outdoor unit controller to indoor unit controller The following signals are sent from the outdoor unit controller The current operation mode The current compressor revolution Outdoor temperature Existence of protective circuit operation For transferring of these signals the indoor unit controller monitors the contents of signals and judges existence of troubl...

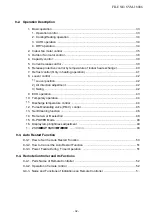
Page 32: ...g 42 9 ECO operation 43 10 Temporary operation 44 11 Discharge temperature control 44 12 Pulse Modulating valve P M V control 45 13 Self Cleaning function 46 14 Remote A or B selection 48 9 3 Auto Restart Function 9 3 1 How to Set the Auto Restart Function 50 9 3 2 How to Cancel the Auto Restart Function 51 9 3 3 Power Failure During Timer Operation 51 9 4 Remote Controller and Its Fuctions 9 4 1 ...

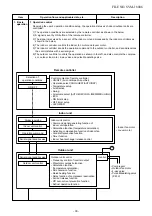
Page 33: ...te controller ON OFF Air conditioner Air purifier Operation select COOL HEAT AUTO DRY Temperature setup Air direction Swing Air volume select AUTO LOW LOW MED MED HIGH ECO ON timer setup OFF timer setup Hi POWER Indoor unit control Command signal generating function of indoor unit operation Calculation function temperature calculation Activation compensation function of indoor fan Cold draft preve...

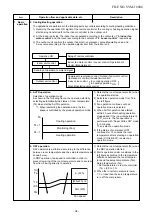
Page 34: ...operation mode the fan speed is controlled by the previous operation mode 4 DRY operation DRY operation is performed according to the difference between room temperature and the setup temperature as shown below In DRY operation fan speed is controlled in order to prevent lowering of the room temperature and to avoid air flow from blowing directly to persons 1 Detects the room temperature Ta when t...

Page 35: ...ig 2 Table 1 Indoor fan air flow rate 2 5 Ta C 2 0 1 5 1 0 0 5 Tsc a b c d e M WC 3 4 5 L W7 Air volume AUTO L L M M H W7 L M 2 WA M H 2 WD Indication Fan speed Fan speed setup COOL ON AUTO MANUAL 3 Fan speed M L x 3 4 L 4 Fan speed M L x 2 4 L 5 Fan speed M L x 1 4 L Linear approximation from M and L Fan speed level Cooling Heating Cooling Heating Cool Heat Dry Fan speed Air flow rate Fan speed A...

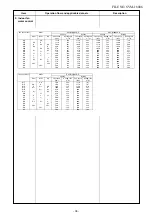
Page 36: ...peed Air flow rate Fan speed Air flow rate rpm m3 hr Fan speed Air flow rate rpm m3 hr Fan speed Air flow rate rpm m3 hr rpm m3 hr WF UH 1110 524 1110 663 1200 582 1200 730 WE UH H 1110 524 1110 663 1200 582 1200 730 WD H M UH 1060 491 1060 626 1170 563 1080 640 WC M H 960 425 960 551 1120 530 1020 596 WB M M 870 367 870 484 1010 458 960 551 WA M M 870 367 870 484 900 386 960 551 W9 L 750 288 750 ...

Page 37: ... 0 d 1 5 e 2 0 f 2 5 g 5 0 5 5 L W9 M WD 1 2 3 H WE H WE Line approximate H and SUL with Tc SUL W2 Stop 46 46 Tc 34 45 45 33 33 33 21 32 32 20 A 4 A 4 A 4 A 4 A 4 A 4 Fan speed MANUAL in starting Fan speed AUTO in stability Fan speed AUTO in starting L L M M H W8 L M 2 WA M H 2 WE Indication Fan speed Fan speed setup HEAT ON AUTO YES NO MANUAL TC 42 C Min air flow rate control Tc 52 51 42 41 Limit...

Page 38: ...r unit controller Fan motor ON 3 Fan lock OFF status of fan motor continues 4 Motor operates as shown in the table below 1 Outdoor unit operation command Outdoor fan control Air conditioner OFF Alarm display Outdoor fan speed rpm 31 7 Compressor speed rps To 10 C To To 10 C To 5 C To 3 C When To is abnormal Hz 16 8 16 8 Hz 48 6 48 6 Hz MAX f 7 f 8 f 9 f 9 f B f E f E f E f E f E f E f E f F f F f ...

Page 39: ...rive circuit does not exceed the specified value 5 Current release control Set temp Ts Room temp Ta Correction of Hz signal Outdoor temp To Setup of current release point Capacity control continues Detection of electromotive force of compressor motor winding Detection of motor speed and rotor position Inverter output change Commutation timing change Change of compressor speed Remote controller Ind...

Page 40: ...ssor speed is kept Q zone When temperature of the indoor heat exchanger drops in the range from 48 C to under 55 C the compressor speed is kept Q zone 2 When temperature of the indoor heat exchanger rises to 55 C or higher the compressor speed is reduced P zone 3 When temperature of the indoor heat exchanger does not rise to 52 C or when it drops below to 48 C the capacity control operation return...

Page 41: ...mpressor 3 The outdoor fan stops at the same time when the compressor stops 4 When temperature of the indoor heat exchanger becomes 38 C or lower stop the indoor fan Finish of defrost operation Returning conditions from defrost operation to heating operation 1 Temperature of outdoor heat exchanger rises to 8 C or higher for 3 seconds 2 Temperature of outdoor heat exchanger is kept at 7 C or higher...

Page 42: ...e of the louver is indicated as the louver closes fully is 0 1 Louver position in cooling operation mode COOL HEAT and the louver returns to the stored position when the next operation is performed Cooling Heating memory position The louver position can be arbitrarily set up by pressing FIX button Swing operation is perfor in range 35 with the Fixed position as the center If the swing range exceed...

Page 43: ...one aHz B zone a to cHz C zone cHz 0 0 5 1 0 1 5 2 0 2 5 3 0 4 0 5 0 6 0 7 0 8 0 9 0 10 0 11 0 Room temp Set temp 3 5 3 0 2 5 1 5 1 0 TSC 1 0 2 0 5 5 1H 2H 11 10 7 6 5 4 3 2 1 OFF Dry Max 12 11 9 8 10 TA 6 0 6 5 3H 4H 5 0 4 5 4 0 2 0 0 5 0 5 12 9 8 Time Zone Frequency FAN Min Hz Fan speed depend on presetting and can change every speed 1 The control target temperature increase 0 5ºC per hour up to...

Page 44: ... 3 seconds or more Did you press RESET button for 10 seconds or more Switch to AUTO RESTART control YES NO NO YES Temporary AUTO operation Temporary COOL Operation 11 Discharge temperature control 1 Purpose This function detects error on the refrigerating cycle or error on the com pressor and performs protective control 2 Operation Control of the compressor speed The speed control is performed as ...

Page 45: ... the range of set tempera ture Discharge temp control 4 When defrost operation is performed the open degree of valve is adjusted accord ing to each setup conditions during preparation for defrost and during defrost operation 4 way valve is inversed 5 To turn off the compressor while the air conditioner stops by control of the thermostat or by remote controller adjust the open degree of valve to th...

Page 46: ...eration performed prior to the reception of the stop code 3 After the Self Cleaning operation has been performed for the specified period the unit stops operating Unit now performing cooling or dry operation Press STOP button Only timer indicator lights and Self Cleaning operation starts Time set now elapses Operation stops function During Self Cleaning operations The louver opens slightly The ind...

Page 47: ...confirm setting Note Table above will show current status of Self Cleaning function Set or Cancel Self Cleaning function by push the RESET button on air conditioner When setting is changed the sound warning will alarm Beep The setting is changed following below 13 1 2 Self Cleaning function release How to set cancel Self Cleaning function To set cancel the Self Cleaning function proceed as follows...

Page 48: ...te Control by the tip of the pencil 00 will be shown the air conditioner ON shown on the display Picture 4 Press MODE during pushing CHECK B will show on the display and 00 will disappear and the air conditioner will turn OFF The Remote Control B is memorized Picture Note 1 Repeat above step to reset Remote Control to be A 2 Remote Control A has not A display 3 Default setting of Remote Control fr...

Page 49: ... turned off 50 All lamps are turned off All turned off In the examples of and the lamp illuminates for 5 seconds before going off FAN 17 Operation mode select table 2 1 Purpose Choosing the operating system as appropriate in real condition Operation Factory default setting prefer Heat pump system Through it is able to cooling only system heating only system or return to factory default Operating s...

Page 50: ...s indoor unit is equipped with an automatic restarting function which allows the unit to restart operating with the set operating conditions in the event of a power supply being accidentally shut down The operation will resume without warning three minutes after power is restored This function is not set to work when shipped from the factory Therefore it is necessary to set it to work 9 3 1 How to...

Page 51: ...te at this time press RESET button once more or use the remote controller to turn it on 9 3 2 How to Cancel the Auto Restart Function To cancel auto restart function proceed as follows Repeat the setting procedure the unit receives the signal and beeps three times The unit will be required to be turned on with the remote controller after the main power supply is turned off When the system is on st...

Page 52: ... HEATING FAN ONLY OPERATION To automatically select cooling or fan only operation 1 Press Select Cool Heat or Fan only 2 Press Set the desired temperature Cooling Heating Min 17 C Max 30 C Fan Only No temperature indication 3 Press Select AUTO LOW LOW MED MED or HIGH MODE MODE FAN 2 Press Set the desired temperature 3 DRY OPERATION COOLING ONLY For dehumidification a moderate cooling performance i...

Page 53: ...rt or stop without using the remote control Operation mode is set on AUTOMATIC operation preset temperature is 25 C and fan operation is automatic speed 7 AUTO RESTART OPERATION To automatically restart the conditioner after the power failure Power of the unit must be on Setting 1 Press and hold the RESET button on the indoor unit for 3 seconds to set the operation 3 beep sound and OPERATION lamp ...

Page 54: ...O when the operating mode is either AUTO or Dry 5 OFF TIMER indicator Indicates when the OFF timer is setting press the OFF timer button and select off time by TEMP botton after that back to press OFF timer again to timer setting and push CLEAR button to stop the operation 6 Hi POWER indicator Indicates when the Hi POWER operation starts Press the Hi POWER button to start and press it again to sto...

Page 55: ...ick heat resisting polyethylene foam 1 Batteries Flat head wood screw Remote control holder Vinyl tape Apply after carrying out a drainage test Wireless remote control Saddle Extension drain hose Not available provided by installer Shield pipe Attach to the front panel Air lter Hook Installation plate Hook 65 mm or more 300 mm or more 300 mm or more C mm or more F mm or more E mm or more D mm or m...

Page 56: ...lation parts 10 2 Installation Fixing bolt arrangement of outdoor unit Part code Parts name Q ty A One each B Pipe insulating material polyethylene foam 6 mm thick 1 C Putty PVC tapes One each Air inlet Air outlet 108 mm 28 mm 600 mm 320 mm 125 mm 86 mm 102 mm 90 mm Ø 2 5 m m Air inlet Air outlet 280 mm 500 mm 53 mm 97 mm Ø25 mm Drain outlet RAS 05 07BAVG E RAS 10 13BAVG E1 Drain outlet RAS 16BAVG...

Page 57: ...Part No 4 5 6 Part No 7 Others Name Owner s manual Installation manual Part name Q ty 10 2 2 Accessory and installation parts The part marked with asterisk is packaged with the outdoor unit Mounting screw 4 x 25 s x 6 Flat head wood screw 3 1 x 16 s x 2 Drain nipple x 1 Cap waterproof x 2 For RAS 16BAVG E only 8 FILE NO SVM 18006 57 ...

Page 58: ...have been changed to 1 2 UNF 20 threads per inch When purchasing a charge hose be sure to confirm the port size As pressure is high and gasification speed is fast it is difficult to read the indicated value by means of charging cylinder as air bubbles occur The size of opposite sides of flare nuts have been increased Incidentally a common wrench is used for nominal diameters 1 4 and 3 8 By increas...

Page 59: ...hole and mounting installation Cutting a hole When installing the refrigerant pipes from the rear 1 After determining the pipe hole position on the mounting plate A drill the pipe hole 65 mm at a slight downward slant to the outdoor side NOTE When drilling a wall that contains a metal lath wire lath or metal plate be sure to use a pipe hole brim ring sold separately Mounting the installation plate...

Page 60: ...in hose installation Piping and Drain Hose Forming Since dewing results in a machine trouble make sure to insulate both the connecting pipes Use polyethylene foam as insulating material Fig 10 3 6 Fig 10 3 8 Rear right Rear left Bottom left Left Bottom right Right Die cutting back body slit Changing drain hose Piping preparation Die cutting back body slit Cut out the slit on the leftward or right ...

Page 61: ...ide Outward form of indoor unit R 30 mm Use polisin polyethylene core or the like for bending pipe Liquid side CAUTION Bind the auxiliary pipes two and connecting cable with facing tape tightly In case of leftward piping and rear leftward piping bind the auxiliary pipes two only with facing tape Carefully arrange pipes so that any pipe does not stick out of the rear plate of the indoor unit Carefu...

Page 62: ...TE Hole should be made at a slight downward slant on the outdoor side Fig 10 3 16 2 Put water in the drain pan and make sure that the water is drained out of doors 3 When connecting extension drain hose insulate the connecting part of extension drain hose with shield pipe Fig 10 3 17 CAUTION Arrange the drain pipe for proper drainage from the unit Improper drainage can result in dew dropping This ...

Page 63: ...not exposed to a strong wind A place free of a leakage of combustible gases A place which does not block a passage When the outdoor unit is to be installed in an elevated position be sure to secure its feet The allowable length of the connecting pipe 10 4 2 Precautions about Installation in Regions with Snowfall and Cold Temperatures 4 Installation in the following places may result in trouble Do ...

Page 64: ...ig 10 4 6 Flare at indoor unit side Flare at outdoor unit side Unit N m Outer dia of copper pipe Ø6 35 mm Ø9 52 mm Ø12 70 mm Tightening torque 16 to 18 1 6 to 1 8 kgf m 30 to 42 3 0 to 4 2 kgf m 50 to 62 5 0 to 6 2 kgf m CAUTION Do not scratch the inner surface of the flared part when removing burrs Flare processing under the condition of scratches on the inner surface of fl are processing part will...

Page 65: ... manual of the vacuum pump Using a vacuum pump Be sure to use a vacuum pump with counter flow prevention function so that inside oil of the pump does not flow backward into pipes of the air conditioner when the pump stops If oil inside of the vacuum pump enters into the air conditioner which use R32 refrigeration cycle trouble may result 1 Connect the charge hose from the manif e to old valv the s...

Page 66: ...r and air inlet grille on the indoor unit Cord clamp Terminal cover Screw Screws Air inlet grille Front panel Valve cover Terminals block 1 Remove the valve cover the electric parts cover and the cord clamp from the outdoor unit 2 Connect the connecting cable to the terminal as identif edbythematchingnumbersontheterminal block of indoor and outdoor unit 3 Insert the power cord and the connecting c...

Page 67: ...able 3 50 mm Earth line 10 mm 70 mm 10 mm Power Supply Input at Outdoor Unit Terminal Block Optional Outdoor Unit Indoor Unit Connecting cable connect to L 2 3 Terminal block L N 1 2 3 Earth line Connecting cable Connecting cable Stripping length of the connecting cable 3 2 L Earth line 50 mm 10 mm 70 mm 10 mm Connecting cable Earth line Earth line Connecting cable Power cord Terminal block Power ...

Page 68: ...irmly 6 Perform wiring works so as to allow a general wiring capacity 7 Wrong wiring connection may cause some electrical part burn out 8 Incorrect or incomplete wiring is carried out it will cause an ignition or smoke 9 This product can be connected to main power supply Connection to fixed wiring A switch which disconnects all poles and has a contact separation at least 3mm must be incorporated i...

Page 69: ... an ignition or smoke 9 This product can be connected to main power supply Connection to fixed wiring A switch which disconnects all poles and has a contact separation at least 3mm must be incorporated in the fixed wiring CAUTION Power Supply Input at Outdoor Unit Terminal Block Indoor Unit Outdoor Unit Connecting cable connect to L 2 3 Terminal block L N 1 2 3 Earth line Connecting cable Connecti...

Page 70: ... the display and 00 will disappear and the air conditioner will turn OFF The Remote Control B NOTE 1 Repeat above step to reset Remote Control to be A 2 Remote Control A has not A display 3 Default setting of Remote Control from factory is A 10 6 2 Remote Control A B Selection is memorized Picture Picture 1 2 10 6 3 Test operation To switch the TEST RUN COOL mode press RESET button for 10 sec The ...

Page 71: ...c shock may be caused in case of touching parts on the P C board by hand The new inverter will be incorporated starting with this unit K The control circuitry has an uninsulated construction No 1 2 3 4 5 Troubleshooting Procedure First Confirmation Primary Judgment Judgment by Flashing LED of Indoor Unit Self Diagnosis by Remote Controller Judgment of Trouble by Every Symptom No 6 7 8 9 10 Trouble...

Page 72: ...times such as when the circuit board is to be replaced place the circuit board assembly in a vertical position Laying the board flat on an electrically conductive object such as the top panel of the air conditioner s outdoor unit while a charge is still retained by the electrolytic capacitors of the inverter s main circuit may cause short circuiting between the electrolytic capacitors and secondar...

Page 73: ...rolytic capacitor completely by using soldering iron etc Discharging method 1 Remove the inverter cover plating by opening four mounting claws 2 As shown below connect the discharge resistance approx 100Ω40W or plug of the soldering iron to voltage between terminals of the C07 WARNING ELECTRIC SHOCK is indicated electrolytic capacitor 760µF 400V on P C board and then perform discharging Fig 11 5 R...

Page 74: ...creasing of compressor motor speed stops approx 30 seconds after operation started and then compressor motor speed increases again approx 30 seconds after In AUTO mode the operation mode is changed In HEAT mode the compressor motor speed does not increase up to the maxi mum speed or decreases before the temperature arrives at the set temperature Description The OPERATION lamp of the indoor unit fl...

Page 75: ...a part of item E occur concurrently priority is given to the block of item B 3 The check codes can be confirmed on the remote controller for servicing OPERATION Flashing display 1 Hz OPERATION TIMER Flashing display 5 Hz OPERATION Flashing display 5 Hz OPERATION TIMER White Flashing display 5 Hz OPERATION Flashing display 5 Hz Protective circuit operation for indoor P C board Protective circuit op...

Page 76: ... button If there is no fault with a code the indoor unit will beep once Beep and the display of the remote controller will change as follows The TIMER indicator of the indoor unit flashes continuously 5 times per 1 sec Check the unit with all 52 check codes to as shown in Table 11 4 1 Press TEMP or TEMP button to change the check code backward If there is a fault the indoor unit will beep for 10 s...

Page 77: ...oom Operation Flashes when 1 Check the sensor TA and connection board temperature sensor is continues error is detected 2 In case of the sensor and its short Circuit or disconnection connection is normal check the P C board TC sensor The heat Operation Flashes when 1 Check the sensor TC and connection exchanger temperature continues error is detected 2 In case of the sensor and its sensor of the i...

Page 78: ...or unit open 4 The outdoor unit abnormal stop at circuit of signal some time Signal circuit of indoor If the other check codes are found P C board or outdoor concurrently check them together P C board is failure Check protector hardware such in some period as Hi Pressure switch Thermal Relay etc Check refrigerant amount or any possibility case which may caused high temperature or high pressure Che...

Page 79: ...hes after Even if trying to operate again all inverter P C board error error is detected operations stop replace inverter 4 times P C board All OFF Flashes after error is detected 4 times 1 Check sensors TE TS connection In case of sensors and it s connection is normal check the inverter P C board 2 Check 4way valve operation position In case TE TS detected temperature relationship are different f...

Page 80: ...omes 4 8 11 or 18 times record error to check code But after re starting operation if no error is detected and air conditioner can operate more than 6 minutes error count is cleared The others Return signal of the outdoor Indoor unit Flashes when 1 Check power supply Rate 10 including unit has been sent when operates error is detected 2 If the air conditioner repeat operates compressor operation s...

Page 81: ...Check sensors TD exceeded 117o C error is detected 2 Check refrigerant amount 4 times 3 Check P M V by measure the resistance of the coil and confirm its operation sound of initial operation etc 4 Observe any possibility cause which may affect high temperature of compressor Compressor is high current All OFF Flashes after 1 Check installation conditions such as though operation Hz is error is dete...

Page 82: ...using diode Measure voltage at terminal block of the indoor unit between No 2 and No 3 or L2 and S If signal is varied 15 60V continuously replace inverter P C board If signal is not varied replace indoor P C board 4 Check and clean heat exchanger area Indoor and Outdoor unit Instantaneous power failure Some protector hardware of the outdoor unit open circuit of signal Signal circuit of indoor P C...

Page 83: ...O YES NO NO YES YES Is it possible to turn on power supply by pressing button on remote control Does transmission mark on remote control flash normally and is its signal transmitted properly Remote control is defective Refer to 4 Remote Control Is fuse F01 of indoor control board blown Is voltage DC 12V or 5V indicated on rear of indoor control board normal Microcomputer is defective Replace main ...

Page 84: ...laced Confirmation procedure YES YES NO NO Turn on power supply Does operation lamp flash Is it wired as shown in Figure below Return the wiring of the power relay is returned to the normal procedure To the paragraph of No Power turns on FILE NO SVM 18006 84 ...

Page 85: ...e Change the setting of cooling to high fan Operation stops Shut off the power supply Motor control circuit failure IC03 Q39 and D01 or 12 V Switching power supply failure Does the cross flow fan rotate normally Is the rotation signal DC 5 V 0 V output between 2 gray lead wire and 3 brown lead wire of the motor connector CN11 when rotating the cross flow fan by hand in no operating status 1 pulse ...

Page 86: ... WHI BLK RED BRW GRY YEL For AC fan motor Do not disconnect the connector while the fan motor is rotating For P C board side proceed to the item Only indoor fan does not operate of Judgment of Trouble by Every Symptom SJM 240 25 RAS B05 07 10 13 SJM 240 35 RAS B16 Resistance value RAS B05 07 10 13 Position P C board Between 3 Black 1 Red Between 3 Black 5 White Between 1 Red 5 White 120 6 8 4 Ω 24...

Page 87: ... a transistor radio when transmitting within 5 cm distance from the radio P C board is failure Replace P C board Is operation possible when the transmitter is moved nearer to the infrared signal receiver of the air conditioner Battery life Replace the batteries Dose the transmission indicator light Is there any beep and operation Normal Remote control is failure Replace remote control Push the but...

Page 88: ...nsmission from indoor unit to outdoor unit is correctly performed based upon the follow ing diagram NOTE Measurement should be performed 2 minutes and 30 seconds after starting of the operation Be sure to prepare a diode for judgment Normal time Voltage swings between DC15 and 60V Inverter Assembly check 11 7 1 Abnormal time Voltage does not vary 2 Outdoor unit stops in a little while after operat...

Page 89: ...s if pressure is low Is connecter of coil connected to inverter Is coil of the pulse motor valve P M V correctly set Existence of condensation at outlet of P M V If there is condensation at outlet 1 4 inch Ø6 35mm valve side the valve is clogged Are temp sensors of indoor outdoor units correctly set to the holder NOTE The temperature sensors which are used to control pulse motor valve include indo...

Page 90: ... discharge resistance approx 100Ω 40W or soldering iron plug between terminals of the electro lytic capacitor 760µF of C07 with printed WARNING ELECTRIC SHOCK on P C board OK if 760µF DC290 to 400V Remove CN31 while pushing the part indicated by an by an arrow because CN31 is a connector with lock Resistance between phases should be approx 16 to 51Ω Should be 100MΩ or more Replace outdoor fan moto...

Page 91: ...fuse was blown be sure to check the electrolytic capacitor and diode block DB01 Connect discharge resistance approx 100Ω 40W or soldering iron plug between terminals of the electro lytic capacitor 760µF of C07 with printed WARNING ELECTRIC SHOCK on P C board OK if 760µF DC280 to 380V Remove CN31 whilepushing the part indicated by an by an arrow because CN31 is a connector with lock Resistance betw...

Page 92: ...eck Simply the Main Parts 11 8 1 How to Check the P C Board Indoor Unit 1 Operating precautions 1 When removing the front panel or the P C board be sure to shut off the power supply breaker 2 When removing the P C board hold the edge of the P C board and do not apply force to the parts 3 When connecting or disconnecting the connectors on the P C board hold the whole housing Do not pull at the lead...

Page 93: ...ION TIMER are lit for 3 seconds and they return to normal 3 seconds later 1 Check whether or not the compressor operates 2 Check whether or not the OPERATION indicator flashes 1 Check whether or not the compressor operates 2 Check whether or not the OPERATION indicator flashes 1 Check it is impossible to detect the voltage AC120V or higher voltage between red and black 2 The motor does not operate...

Page 94: ...rature C TA TC TCJ TO TS TE TD 1 Sensor characteristic table 11 8 2 P C Board Layout TD Discharge temp sensor TA Room temp sensor TC TCJ Heat exchanger temp sensor TO Outdoor temp sensor TS Suction temp sensor TE Outdoor heat exchanger temp sensor GND 12V 5V FILE NO SVM 18006 94 ...

Page 95: ...DF 340 A43 1 Red White White Black Black Red 3 4 Way valve coil Model DXQ 939 at 20 C 4 Pulse Modulating Valve PMV coil Model PQ M10012 000313 5 Outside air temp sensor TO Discharge temp sensor TD Suction temp sensor TS Exchanger temp sensor TE 1 57Ω Resistance value 1450 150Ω 33 7 1 7Ω Resistance value Position 3 19Ω 2 35Ω Position White Red Back Measure the resistance value of each winding by us...

Page 96: ...1 Turn OFF the power supply breaker 2 Discharge all three capacitors completely 3 Check that the normal rectification characteristics are shown in continuity test by the tester 11 8 5 Checking Method for Each Part Case that product is good Pointer swings once and returns slowly When performing test once again under another polarity the pointer should return No Part name Checking procedure Diode ch...

Page 97: ... the outdoor fan motor 4 Motor drive circuit failure of the outdoor P C board 3 How to simply judge whether outdoor fan motor is good or bad NOTE However GND circuit error inside of the motor may be accepted in some cases when the above check is performed When the fan motor does not become normal even if P C board is replaced replace the outdoor fan motor If the resistance value between 1 Red lead...

Page 98: ...ed 3 Do not bring welding equipment near flammable objects Flames from the equipment may cause the flammable objects to catch fire If keeping the power on is absolutely unavoidable while doing a job such as inspecting the cir cuitry wear rubber gloves to avoid contact with the live parts Electric shocks may be received if the live parts are touched High voltage circuits are contained inside this u...

Page 99: ...e front panel toward you to remove it as shown on figure 3 4 1 Follow the procedure item 3 2 Remove screw holding the electric part cover 3 Disconnect the connectors for the fan motor and louver motor from P C board assembly 4 Remove the earth screw and earth line from evaporator 5 Pull out TC and TCJ sensor from sensor holder of the evaporator 6 Remove the 2 fixing screws that secures the electri...

Page 100: ...motor outward 3 5 mm Cross flow fan Set screw Fan motor Body back Horizontal louver 6 1 Remove shaft of the horizontal louver from the back body First remove 2 the center shafts then remove the other shafts Horizontal louver Drain pan To re installation Check the type name of fan motor Keep connector position and arrange fan motor wires follow figure For SJM 240 25 4 5 Fan motor connector 4 5 Fan ...

Page 101: ...crews of the unit display and remove unit display 7 5 Remove the drain pan from the back body Electric part cover Screw Connectors Louver motor connector P C board To re installation Press the drain pan into the back body Please make sure ribs of drain pan in left and right side must be install to lock position Press the center arm of drain pan to back body Center arm of drain pan Back body Drain ...

Page 102: ...g figure Install the cross flow fan so that the right end of the 1st joint from the right of the Cross flow fan is keep 3 5mm from closed wall of the main unit Holding the set screw install the cross flow fan so that flat area on shaft of the fan motor comes to the mounting hole of the set screw 4 Lift up the heat exchanger follow the figure Pull out the left hand side until the cross flow fan is ...

Page 103: ... exchanger is released from the hook of the motor cover then pull out the upper side of heat exchanger To re installation Put the evaporator hins seal on the body back before assembly the heat exchanger Please keep assembly heat exchanger follow figure as below Cross flow fan Heat exchanger Evaporator hins seal Please make sure that the hook of motor cover must be installed into the locking slot o...

Page 104: ...er supply off to stop the operation of air conditioner 2 Remove the front panel Remove the 2 fixing screws 3 Remove the electrical part base Remarks Replace terminal block microcomputer ass y and the P C board ass y 12 2 Microcomputer FILE NO SVM 18006 104 ...

Page 105: ...ower cord and connecting cable attach the cord clamp and wiring cover Put the wiring cover into the front cabinet and insert the claw which has been hooked to the lower part into the square hole and then fix it with screw ST2T 4 x 10s 2 pc 3 Attach the valve cover ST2T 4 x 10s 1 pc Insert the upper part to the front cabinet set the hook claw of the valve cover to square holes at three positions of...

Page 106: ...rouble type in some cases NOTE This capacitor is one with mass capacity Therefore it is dangerous that a large spark generates if short circuiting between Requirement As each connector has a lock mecha nism avoid to remove the connector by holding the lead wire but by holding the connector The connector is one with lock so remove it while pushing the part indicated by an arrow Be sure to remove th...

Page 107: ...nd pinch the lead wires using the closed end splice Fan motor Compressor 1 0 0 Fan motor Propeller fan Flange nut Closed end splice 1 Perform work of item 1 of 1 1 of 2 and ƒ 2 Extract refrigerant gas 3 Remove the partition board ST2T 4 x 10s 3 pcs 4 Remove the sound insulation material 5 Remove the terminal cover of the compressor and disconnect the lead wire of the compressor thermo and the comp...

Page 108: ...n guard in the hole of the front cabinet Push the hooking claws 8 positions by your hand and fix the claws Requirement This completes all the attaching work Check that all the hooking claws are fixed to the specified positions Fan guard Minus screwdriver Hooking claw 6 Pulse Modulating Valve coil 7 1 Detachment 2 Attachment 1 Insert the coil at position which perpendicular with pipe of PMV then tu...

Page 109: ...ect prevention mechanism as such the lock on their housing must be released before they are disconnected 2 Remove the control board assembly from the spacer Remove the heat sink and control board assembly while keeping them screwed together 3 Remove the two fixing screws used to secure the heat sink and control board assembly 4 Mount the new control board assembly NOTE When mounting the new contro...

Page 110: ...inside the indoor unit 2 Attach the upper cabinet ST2TØ4 10L 5 pcs 3 Perform cabling of connecting cable and attach the cord clamp Fix the cord clamp by tightening the screws ST2TØ4 x 14L 3 pcs fitting 2 concave parts of the cord clamp to each connecting cables 4 Attach the valve cover ST2TØ4 x 10L 2 pcs Insert the upper part into the square hole of the side cabinet set hook claws of the valve cov...

Page 111: ...cabinet is fitted into the side cabinet left at the front left side so pull up the top of the front cabinet to remove it 2 Attachment 1 Insert the claw on the front left side into the side cabinet left 2 Hook the bottom part of the front right side onto the concave section of the bottom plate Insert the claw of the side cabinet right into the square hole in the front cabinet 3 Return the screws th...

Page 112: ...ding to trouble type in some cases 4 Remove screw ST2TØ4 x 10L 4pcs fixing the terminal part of inverter box to the main body 5 Remove the front cabinet by performing step 1 in 2 and remove the fixing screws ST2TØ4 x 10L for securing the main body and inverter box 6 Remove various lead wires from the holder at upper part of the inverter box 7 Pull the inverter box upward 8 Disconnect connectors of...

Page 113: ...nting the new control board assembly ensure that the P C board is inserted properly into the P C board support groove NOTE P C board base P C board NOTE NOTE 1 Disconnect the leads and connectors connected to the other parts from the control board assembly 1 Leads 3 leads black white orange connected to terminal block Lead connected to compressor Disconnect the connector 3P Lead connected to react...

Page 114: ...ate and heat exchanger 6 Fan motor 1 Perform work of item 1 of 1 and 2 2 Remove the flange nut fixing the fan motor and the propeller Flange nut is loosened by turning clockwise To tighten the flange nut turn counterclockwise 3 Remove the propeller fan 4 Disconnect the connector for fan motor from the inverter 5 Remove the fixing screws 4 pcs holding by hands so that the fan motor does not fall Pr...

Page 115: ...sor from the terminal 6 Remove pipe connected to the compressor with a burner 7 Remove the fixing screw of the bottom plate and heat exchanger ST2TØ4 10L 1 pc 8 Remove the fixing screw of the bottom plate and valve fixing plate ST2TØ4 10L 1 pc 9 Pull upward the refrigeration cycle 8 Reactor 1 Perform work of item 1 of 2 and 3 2 Remove screws fixing the reactors ST2TØ4 10L 2 pcs Compressor Reactor 10 ...

Page 116: ...t 1 Insert claws of the fan guard in the holes of the front cabinet Push the hooking claws 9 positions by hands and fix the claws All the attaching works have completed Check that all the hooking claws are fixed to the specified positions Minus screwdriver Hooking claw BODY PMV COIL PMV Rotate 180 C 1 Detachment 1 Perform step 1 in 2 all the steps in 3 and 1 in 5 2 Turn the coil by 180 degrees the...

Page 117: ... temperature sensor into the holder and install the holder onto the heat exchanger CAUTION During the installation work and on its completion take care not to damage the coverings of the sensor leads on the edges of the metal plates or other parts It is dangerous for these coverings to be damaged since damage may cause electric shocks and or a fire CAUTION After replacing the parts check whether t...

Page 118: ...YCLE ASSY For RAS B05 07BKVG E REFRIGERATION CYCLE ASSY For RAS B10 13BKVG E REFRIGERATION CYCLE ASSY For RAS B16BKVG E EVAPORATOR HINS SEAL For RAS B05 07 10 13BKVG E HOLDER SENSOR PIPE SHIELD INSTALLATION PLATE PIPE HOLDER TERMINAL COVER ASSY WIRELESS REMOTE CONTROL HOLDER REMOTE CONTROL PACKING SLEEVE PACKING CUSHION RIGHT PACKING CUSHION LEFT 216 43T39368 FRONT PANEL ASSY GRILLE OF AIR INLET A...

Page 119: ...43T6W322 Description Description 405 43T6V681 TEMPERATURE SENSOR TERMINAL 5P TF TEMPERATURE SENSOR CORD CLAMP PC BOARD ASSY WRS LED PC BOARD FOR RAS B05BKVG E 407 43T50306 PC BOARD FOR RAS B07BKVG E PC BOARD FOR RAS B10BKVG E PC BOARD FOR RAS B13BKVG E PC BOARD FOR RAS B16BKVG E TEMPERATURE SENSOR 406 43T6W302 404 402 406 405 401 407 119 FILE NO SVM 18006 119 ...

Page 120: ...16 43T46469 32 43T91302 17 43T63360 33 43T91301 PACKED VALVE COVER UPPER CABINET ASSEMBLY FIXING PLATE VALVE BASE PLATE ASSEMBLY DRAIN NIPPLE 4 WAY VALVE 4 WAY VALVE COIL PARTITION ASSEMBLY MOTOR BASE MOTOR BASE CONNECTION PLATE CARTON BOX ASM FBBRD UD CUSHION PKG UPR PE SHEET 18 43T41525 FAN GUARD PROPELLER FAN FRONT CABINET ASSEMBLY CONDENSER ASSEMBLY TERMINAL COVER VALVE PACKED 9 52 DIA BONNET ...

Page 121: ...01 17 43T63360 53 43T91303 PACKED VALVE COVER UPPER CABINET ASSEMBLY FIXING PLATE VALVE BASE PLATE ASSEMBLY DRAIN NIPPLE 4 WAY VALVE 4 WAY VALVE COIL PARTITION ASSEMBLY MOTOR BASE MOTOR BASE CONNECTION PLATE CARTON BOX CUSHION PKG UPR PE SHEET ASM FBBRD UD 18 43T41525 FAN GUARD PROPELLER FAN FRONT CABINET ASSEMBLY CONDENSER ASSEMBLY TERMINAL COVER VALVE PACKED 9 52 DIA BONNET 9 52 DIA VALVE PACKED...

Page 122: ...6469 52 43T91301 17 43T63360 53 43T91303 PACKED VALVE COVER UPPER CABINET ASSEMBLY FIXING PLATE VALVE BASE PLATE ASSEMBLY DRAIN NIPPLE 4 WAY VALVE 4 WAY VALVE COIL PARTITION ASSEMBLY MOTOR BASE MOTOR BASE CONNECTION PLATE CARTON BOX CUSHION PKG UPR PE SHEET ASM FBBRD UD 18 43T41525 FAN GUARD PROPELLER FAN FRONT CABINET ASSEMBLY CONDENSER ASSEMBLY TERMINAL COVER VALVE PACKED 9 52 DIA BONNET 9 52 DI...

Page 123: ...T00448 32 43T91301 15 43T00690 33 43T63318 16 43T46469 34 43T79305 17 43T63360 35 43T46470 18 43T58306 36 43T63361 FAN MOTOR NUT FLANGE NUT RUBBER CUSHION HOLDER SENSOR MOTOR BASE CONNECTION PLATE HOLDER SENSOR HOLDER SENSOR PARTITION ASSEMBLY CARTON BOX ASM FBBRD UD CUSHION PKG UPR PE SHEET HOLDER SENSOR DRAIN NIPPLE 4 WAY VALVE 4 WAY VALVE COIL 19 43T20319 CONDENSOR ASSEMBLY VALVE PACKED 6 35 DI...

Page 124: ... FUSE TEMPERATURE SENSOR SENSOR HEAT EXCHANGER SPACER KGES 702 43T6V912 HEATSINK PC BOARD FOR RAS 05BAVG E PC BOARD FOR RAS 07BAVG E PC BOARD FOR RAS 10BAVG E1 PC BOARD FOR RAS 13BAVG E1 TERMINAL 5P Description Description TE Sensor Ø6 TS Sensor Ø6 TD Sensor Ø6 TD Sensor Ø4 701 702 703 704 705 706 707 703 43T60392 RAS 05 07BAVG E RAS 10 13BAVG E1 FILE NO SVM 18006 124 ...

Page 125: ...3T60465 702 43T6V746 706 43T60304 703 43T60392 707 43T62313 704 43T60326 TEMPERATURE SENSOR SENSOR HEAT EXCHANGER BASE PLATE PC HEATSINK PC BOARD TERMINAL 5P FUSE Description Description RAS 16BAVG E TE Sensor Ø6 TS Sensor Ø6 TO Sensor Ø6 703 705 706 TD Sensor Ø4 FILE NO SVM 18006 125 ...

Page 126: ...144 9 MOO 5 BANGKADI INDUSTRIAL PARK TIVANON ROAD TAMBOL BANGKADI AMPHUR MUANG PATHUMTHANI 12000 THAILAND ...

Reviews: